Flux, Redux, and SwiftUI
Before we dive into some code, it’s important to begin with some background, philosophy, and history. What did product engineering look like for the Apple Ecosystem before SwiftUI? How did other declarative UI frameworks and ecosystems manage shared mutable state at scale? What could we learn from other ecosystems that could influence how we think about our shared mutable state when building products for SwiftUI? It’s important to understand that the architecture we are proposing was not built in a vacuum. The code itself will be new, but the ideas behind the code have already proven themselves in the real world.
React
Facebook launched in 2004.1 By 2010, FB had grown to 500 million users.2 The previous year, FB reached another important milestone: profitability.3 To understand more the scale that engineers were shipping impact at during this era, FB was employing less than 500 engineers.
Historically, FB hired engineers as software generalists. Engineers were onboarded without being preallocated into one specific team or role. After onboarding, engineers quickly discovered that nothing was ever “complete” at FB. The company and products grew so quickly, engineers were encouraged — and were needed — to work on new products outside their speciality.
As FB (the company and the product) scaled, engineers building for front-end WWW began to realize their architecture was not scaling with them. At this point in time, FB front-end architecture was built on “classic” front-end engineering. Engineers used imperative logic to manipulate long-lived mutable view objects. Sometimes this was called “MVC”, sometimes it was called “MVVM”, and sometimes it was called “MVW” (Model-View-Whatever) or “Model-View-Asterisk”. These architectures all shared a common assumption that made it challenging to onboard new engineers and ship products at scale: views were mutable objects and engineers needed to use complex imperative logic to manage their state correctly.
Starting around 2011, a FB engineer named Jordan Walke began to “rethink best practices” about application architecture for front-end engineering. This new framework would become ReactJS. React gave engineers the tools to declare their view component tree without the need for imperative mutations directly on mutable view objects. React gave product engineers the tools to focus on “the what not the how”. For two years, FB products began to migrate to this new infra. React led to code that was faster to write and easier to maintain. After crossing the threshold of one-billion users in 2012,4 FB announced the ReactJS framework would be released to the community as open source in 2013.5
The early public demos of React gave engineers a battle-tested infra for declaring their user interface, but FB did not publicly make a strong value statement about how these engineers should manage shared mutable state at scale. While a declarative framework like React redefines the “Controller-View” relationship, React — as announced to the public — did not yet have a strong opinion about how to redefine the “Model-Controller” relationship.
Flux
What engineers outside FB did not know was that FB did have a new application architecture being developed internally alongside the React infra. During the two years React was being developed and scaled, a team of FB engineers led by Jing Chen also noticed that their architecture was not scaling as the company was growing. React focused its attention on redefining the programming model engineers use to build graphs of view components; this new team of engineers began to think about their data and their models with a similar philosophy.
At this time, conventional architectures were encouraging complex mutable state to be delivered to views through mutable objects: controllers or view models. Views were using imperative logic to mutate shared state directly: through a controller or on the model objects themselves. As the size of the product grew, the graph of relationships between controllers and models grew quadratically: it was out of control. One controller class would become so large it was slowing down engineers that needed to work on it. A temporary solution might have been to break this apart into “child” controllers, but the relationship graph between these controllers then grew quadratically. There was always going to be quadratic complexity; trying to refactor it out of one place just moved it somewhere else.
In addition, mutable model objects — where the state of these models could be directly mutated with imperative logic by the view objects — led to code that was difficult to reason about; as the size of the product scaled, engineers needed to know “global” context to make “local” changes. It was very easy for bugs to ship; an engineer might mutate state at some place in the view graph when another place in the view graph was not expecting, or prepared for, a mutation.
The next problem was bugs that looked like “race conditions” or “non-deterministic” chain reactions. Since mutable state was often being bound with two-directional data bindings that can both read from and write to an object, an engineer might mutate shared state in one part of their view graph, while a different part of the view graph is not only subscribing to listen for state mutations, but then making their own state mutations once they received that notification.
Code was complex, unpredictable, and difficult to make changes to. Parallel to the work the React team was doing to redefine the programming model product engineers used to build user interfaces, this new team began to redefine the programming model product engineers used to manage shared mutable state.
The architecture was called Flux, and shared a lot of philosophy with React. Flux gave product engineers tools to think about shared mutable state by moving away from an imperative programming model. Product engineers could declare actions and events as they happen from their view components and migrate the imperative logic to mutate state down into their model layer in Flux Stores. Product engineers no longer needed two-directional data bindings that read and wrote to shared state; the data flow became one-directional. Complex view controllers — or complex graphs of view controllers — started to become obsolete. Code became simple, predictable, and easy to make changes to.
Flux was built on JS, but drew a lot of influence from Haskell, a functional programming language, and Ruby, a “multi-paradigm” language (like JavaScript) that also encouraged functional programming patterns. Another influence was the Command Query Responsibility Segregation (CQRS) Pattern.6
Conceptually and ideologically, Flux paired very well with the programming model of React. In 2014, one year after React was announced, FB announced the Flux architecture.7 While Flux did ship with a small JS framework library, product engineers outside FB were encouraged to think about Flux as a design pattern that could also be implemented with custom frameworks. While the first public releases of React shipped without a strong opinion about an architecture for state management, FB was now evangelizing Flux as the correct “default” choice for most product engineers coming to the React Ecosystem.
ComponentKit
While front-end engineering for WWW was undergoing big changes at FB, mobile engineering for iOS was also evolving in new directions. From the early days of engineering at FB, the company was first and foremost a “web” company. The DNA of the company was very much tied into the WWW product and ecosystem. In an attempt to share engineering resources and knowledge, the FB “Big Blue” mobile app for iOS began to ship with many surfaces rendered in HTML5; it was a “hybrid app”. As the app began to grow (more products and more users), the performance limitations of HTML5 were impacting the reputation of the business: users were complaining. About the time WWW engineers were beginning to build React, FB engineers started to build a new version of the native mobile app for iOS.
As FB transitioned away from HTML5 hybrid views, engineers made some architectural decisions that would have important consequences later. FB mobile engineers chose MVC and UIKit as their main architecture. To manage their shared mutable state and data, mobile engineers chose the Core Data framework. The first native rewrites to the Big Blue FB app were successful: performance was much better than the hybrid app. This same year, FB publicly announced it was focusing on “mobile-first” growth.8 Historically, engineers at FB might launch new features on WWW. Launching that same feature on mobile iOS either meant writing HTML5 in a hybrid app, or waiting for one of the (few) native specialists at the company to build native Objective-C and UIKit.
With FB focusing on mobile-first growth, engineers from across the company that were shipping new products were now ramping up on learning UIKit and Core Data to ship on this new technology. Everything was good… until it wasn’t.
When the engineers building the native rewrite chose MVC, UIKit, and Core Data, the engineers were choosing what looked like the “best practices” at the time. These were the tools Apple built, and these were the tools Apple told engineers were the best for building applications at scale. While building an application using “conventional” iOS architecture and frameworks might have helped FB move fast and ship quickly, this architecture would soon lead to the same class of problems that caused the WWW team to pivot to React and Flux.
When placing and updating views on screen, the imperative and object-oriented programming model of UIKit and MVC was slowing engineers down. View Controllers were growing at quadratic complexity as the product scaled. Controllers — either one giant controller or a complex graph of controllers — would need to correctly position and mutate a graph of view objects using imperative logic. It was very easy for engineers to make a mistake that led to UI bugs and glitches. As this was happening, the Core Data framework was locking engineers into thinking about data as mutable model objects which were updated using imperative logic. Two-directional data bindings on these mutable model objects were leading to the same “cascading” class of bugs the front-end WWW team saw before Flux. On top of that, Core Data was really slow. Engineers tried all the tricks they could think of to speed up Core Data, but it led to unnecessary complexity that product engineers would have to work through and understand.
Neither of these frameworks (UIKit or Core Data) were scaling to support the ambitious goals of FB continuing to ship products with mobile-first growth. After about two years of struggling with MVC, a team of engineers led by Adam Ernst began an ambitious attempt to “rewrite” the app that had already been rewritten only two years before. They saw that the front-end WWW team encountered problems scaling products built on a MVC architecture, and the native mobile team was encountering the same class of problems. They saw that migrating to React and Flux solved these problems for WWW engineers, and they began to write an Objective-C++ native version of the React and Flux frameworks. These new frameworks, like React and Flux, would encourage declarative thinking instead of imperative thinking, functional programming instead of object-oriented programming, and immutable model values instead of mutable model objects.
The new UI framework was called ComponentKit.9 ComponentKit originally launched as a rewrite of the News Feed product, but ComponentKit spread to become the dominant framework product engineers would use for mobile iOS at FB. While ComponentKit was using the principles of React to solve the scalability problems of UI layout by migrating away from UIKit, a project called MemModels was in development to use the principles of Flux to solve the scalability problems of mutable state management by migrating away from Core Data. ComponentKit was released to the open-source community in 2015, but the “native” Flux framework was unfortunately not released publicly. Similar to the first version of React, FB presented a solution for bringing declarative programming to UI product engineering, but did not ship a companion framework for bringing declarative programming to complex state management.
Redux
The Flux framework and architecture was released to the open-source community in 2014. Over the following year, the engineering team behind Flux saw that product engineers at FB were beginning to repeat some of the same logic across products. Flux did not make assumptions about caching, faulting, paging, sorting, or other typical work that a network-driven application like FB might perform to fetch and present data from a remote server. For smaller companies and teams, the Flux framework might have been a great starting point for building the data model for smaller applications. For a rapidly growing company like FB, there was a lot of engineering impact that was being lost on duplicating logic across multiple product surfaces. The Flux team began to build a new framework which started with the philosophical foundation of Flux and offered new infra to help product teams working across FB that were blocked on these common problems.
The new framework was called [Relay]10, and was released along with the [GraphQL]11 data query language as a Flux-Inspired solution for managing the complex state of a network-driven application driven by a complex (but well defined) graph schema of data. The Relay framework was powerful and a huge leap forward over the initial release of Flux, but Relay was not a lightweight and general-purpose solution for state management: it was dependent on GraphQL as a schema to model data.
As FB engineers were building Relay, the React ecosystem and community continued to experiment with the Flux architecture. Over time, a number of legit grievances about decisions or ambiguity in the original Flux implementation led to the community beginning to think about what a next-generation evolution of Flux might look like.12
In 2015, Dan Abramov introduced the Redux framework and architecture at React Europe.13 For the most part, Redux began with many of the same opinions and assumptions of Flux: data still flowed in one direction with product engineers passing actions using declarative logic instead of mutating state directly at the component level with imperative logic. At the model layer, Flux Stores — which could be multiple stores in one application — contained imperative logic for mapping actions to mutations on state. Unlike Flux, Redux builds from just one store and saves engineers from managing complexity to keep multiple stores synchronized. The imperative logic to map actions to mutations on state is written outside of Stores in pure functions called Reducers. Using inspiration from Elm (a language and architecture emphasizing immutability), Redux Reducers map the state of an application with an action to produce the next state of the application.14 Using inspiration from ImmutableJS, Redux requires these state objects to be immutable — unlike Flux, which gave engineers the option to model their state with mutable objects.14
The Relay framework was a very powerful solution for managing network-driven applications built from GraphQL data schemas at scale. This project was hugely impactful inside FB and for applications built from a similar tech stack, but it was a “heavyweight” solution relative to the simplicity and flexibility of the original Flux implementation. Redux refined the original Flux implementation with ideas that reduced boilerplate and simplified state transformations. Leveraging immutable data structures led to code that was more predictable and easier to reason about. Over time, Redux became the dominant choice for unidirectional data flow state management for React Applications.15
SwiftUI
While the WWW team at FB was building the React framework in JS and the iOS team at FB was building the ComponentKit framework in Objective-C++, engineers at Apple led by Chris Lattner were building the Swift Programming Language.16 Swift brought some influences from C++ along with some influences from Objective-C. Swift also brought some influences from the functional programming patterns found in languages and ecosystems like Haskell and Ruby — which were also big influences on Flux.
One of the biggest differences between Swift and Objective-C was the flexibility and power of immutable value types. While simple C-style structs allocated on the stack were always available in Objective-C, the primary building blocks of almost all Objective-C applications were objects allocated on the heap. For an application like FB that was migrating away from the semantics of mutability, this led to workarounds like choosing Objective-C++ to improve the efficiency of creating objects and the Remodel library for adding “immutable” semantics to mutable data objects.[^17]17 Swift offered more flexibility for engineers by shipping powerful immutable value type structures along with support for mutable reference type classes. Swift Structs were far more flexible and powerful than Objective-C structs. Because Swift Structs followed value semantics, engineers were now able to “reason locally” about their code in a way that was not possible with reference semantics.18 Apple soon began to recommend structs and value semantics as the “default” choice for engineers to model their data types.19
Throughout the Objective-C era, Apple continued to evangelize MVC as the preferred application architecture for applications built from AppKit and UIKit.[^21]20 While Swift introduced powerful new abilities to encourage functional programming with immutable model values, the primary tools for building applications on Apple platforms were still AppKit and UIKit — which meant that the application architecture recommended by Apple continued to be object-oriented MVC.[^23]21
As early as 2017, rumors began to leak that Apple was building a new framework for declarative UI.22 In 2019, Apple announced SwiftUI.23 For engineers experienced with building applications in the FB ecosystem using React and ComponentKit, the programming model used by SwiftUI looked very familiar. SwiftUI “views” — similar to what React and ComponentKit called “components” — were built declaratively using immutable data structures. Rather than product engineers telling their view hierarchy how it should be built using imperative logic, product engineers started telling the SwiftUI infra what should be built using declarative logic. Like React and ComponentKit, SwiftUI encouraged product engineers to focus on “the what not the how”.
Considering the experience front-end teams from WWW and iOS had trying to scale classic MVC architectures across complex applications and large teams, a first-party solution for declarative UI built on a language that included support for immutable data values and functional programming looked like a huge leap forward for engineering on Apple Platforms. While the launch of SwiftUI offered a framework for managing graphs of view components declaratively, SwiftUI, like the early versions of React and ComponentKit, shipped without strong public opinions about what architecture should look like for mutable state management.
The early demos of SwiftUI from Apple emphasize what React Engineers would think of as “component state”.24 While Apple was encouraging a unidirectional flow of data through one subgraph of view components, we did not yet hear very clear messaging from Apple about what architecture we would use for a unidirectional flow of data across multiple subgraphs of view components. Without a clear new direction from Apple, many engineers across the community — engineers that might not have the context of what had been happening in and around FB — began to architect SwiftUI applications by using declarative logic to put view components on screen, but falling back to imperative logic on shared mutable state to transform user input into the new state of their system.25
SwiftData
In 2023, Apple launched a “next-generation” update to their Core Data framework. This new version was called SwiftData.26 SwiftData reduced some of the legacy artifacts, complex setup, and repetitive boilerplate code that was needed for many engineers using Core Data in modern Swift applications. What SwiftData did not offer product engineers was a fundamentally different programming model from what was already being offered in Core Data. When using SwiftData with SwiftUI, product engineers were still using imperative logic to mutate shared object references. The “UI” side of the application was modern and declarative, but the “Data” side of the application was still classic and imperative.
ImmutableData
As we build the ImmutableData infra and deploy the architecture to sample applications in SwiftUI, we will see how we can bring our mental model of “the what not the how” to a complete application architecture. With our experience building SwiftUI applications, we already know how to “think declaratively” for building a graph of view components; all we do now is complete the pattern across our “full stack”: UI and Data. As we build our sample applications, we will use declarative programming and a unidirectional data flow to demonstrate the same philosophies and patterns that scaled to one billion users across applications at FB and across the React ecosystem.
Once our applications are built and we see for ourselves what this architecture looks like, we will benchmark and measure performance. We will see how this architecture built from immutable data structures instead of SwiftData will save memory and CPU. We will even see how the ImmutableData architecture can continue to leverage SwiftData for some of its specialized behaviors: offering the improved performance and programming model of ImmutableData as a “front end” along with the efficient persistent data storage of SwiftData as a “back end”.
Migrating to ImmutableData might seem like we are asking you to “throw away” knowledge and experience, but we see a different point-of-view. We are asking you to expand the mental model you have already learned and practiced for “thinking in SwiftUI”. Bring this mental model with you as we see how declarative, functional, and immutable programming across the stack of our applications leads to code that is easy to reason about, easy to make changes to, and runs faster with less memory than SwiftData.
Let’s get started!
-
https://engineering.fb.com/2010/07/21/core-infra/scaling-facebook-to-500-million-users-and-beyond/ ↩
-
https://techcrunch.com/2009/09/15/facebook-crosses-300-million-users-oh-yeah-and-their-cash-flow-just-went-positive/ ↩
-
https://about.fb.com/news/2012/10/one-billion-people-on-facebook/ ↩
-
https://www.reuters.com/article/net-us-facebook-roadshow/facebooks-zuckerberg-says-mobile-first-priority-idUSBRE84A18520120512/ ↩
-
https://engineering.fb.com/2015/03/25/ios/introducing-componentkit-functional-and-declarative-ui-on-ios/ ↩
-
https://engineering.fb.com/2015/09/14/core-infra/relay-declarative-data-for-react-applications/ ↩
-
https://engineering.fb.com/2015/09/14/core-infra/graphql-a-data-query-language/ ↩
-
https://medium.com/@dan_abramov/the-evolution-of-flux-frameworks-6c16ad26bb31 ↩
-
https://redux.js.org/understanding/history-and-design/prior-art ↩ ↩2
-
https://en.wikipedia.org/wiki/Swift_(programming_language)#History ↩
-
https://engineering.fb.com/2016/04/13/ios/building-and-managing-ios-model-objects-with-remodel/ ↩
-
https://www.swift.org/documentation/articles/value-and-reference-types.html ↩
-
https://developer.apple.com/documentation/swift/choosing-between-structures-and-classes#Choose-Structures-by-Default ↩
-
https://developer.apple.com/library/archive/referencelibrary/GettingStarted/RoadMapiOS-Legacy/chapters/StreamlineYourAppswithDesignPatterns/StreamlineYourApps/StreamlineYourApps.html ↩
-
https://developer.apple.com/documentation/uikit/about_app_development_with_uikit ↩
-
https://mjtsai.com/blog/2018/05/01/scuttlebutt-regarding-apples-cross-platform-ui-project/ ↩
ImmutableData
Before we open Xcode and start working, let’s begin with a little strategy and philosophy about what we are trying to build and how we plan to build it.
This tutorial project is meant to be “hands on”: instead of giving you the infra and then showing you how to use it, we start by building the infra from scratch à la [Build Yourself a Redux]1. After building the infra together, we shift our attention to building products with that infra.
We have a few principles we want to keep in mind while engineering together:
-
We write code from scratch. There will be a few times that we present the option to import a new open-source library or external dependency, but these are for specialized tasks, like building a local HTTP server to simulate a network response, or specialized data structures for improving performance at scale. The core
ImmutableDatainfra does not require any external dependencies: it’s just you and the Apple SDK. -
We prefer simple code instead of less code. We are not optimizing for total lines of code when we work. We are optimizing for clearly communicating to engineers what this code is doing. We want to choose efficient data structures and algorithms, but we don’t look for opportunities to write “clever” code if simple code runs at the same time and space complexity.
-
Our infra should be lightweight, and the API our products use to communicate with that infra should also be lightweight. We aren’t trying to “fight the framework” with syntax or design that feels out of place with “traditional” SwiftUI applications. Our goal is to teach a new way of thinking about state management and data flow for SwiftUI. That does not mean you should have to un-learn or throw away the knowledge you already have. Most of what you already know will transfer over to this “new” way of thinking about things. You already know how to put SwiftUI on screen; what we’re teaching is a new way of getting the events out of SwiftUI and turning those events into transformations on your state.
-
Our
ImmutableDatainfra will deploy to any Apple platform that supports SwiftUI. To save ourselves some time, our sample application products will build SwiftUI optimized only for macOS. Learning how to build SwiftUI in a way that is optimized for multiple platforms is an important skill, but this is orthogonal to our goal of teaching a new way of thinking about state management and data flow. You are welcome to use our macOS sample application products as a starting point if you would like to build SwiftUI products that are also optimized for iOS, iPadOS, tvOS, visionOS, or watchOS. -
We write code that is testable, but we don’t teach you how to write tests. We like unit testing,[^2]2 but we understand that some of you might have different opinions or learning styles when it comes to engineering. Instead of teaching engineers how to build this infra and these products and the tests that go along with them, we give engineers the opportunity to write as many tests as they choose. The
mainbranch and thechapterbranches of theImmutableData-Samplesrepo contain the completed tests. You are welcome to reference our tests if you would like to see for yourself how an engineer might test a product built onImmutableData. -
This project is intended to be completed linearly: from beginning to end. You are welcome to complete every chapter at your own pace, but each chapter will build on what we learned previously. If you skip ahead, you might lose some important context or insight and the tutorial might be more challenging than we intended.
After completing this tutorial, we will have built multiple Swift Modules together. These modules are our “infra”, the shared libraries that are used to build sample applications, and our “products”, the sample applications that depend on our shared libraries. Here is what we are going to build:
ImmutableData: This is the “data” infra module to power ourImmutableDataarchitecture. This module builds theStorewhere we save our global application state.ImmutableUI: This is the “UI” infra module that we use to read from and write to ourStorefrom SwiftUI.Counter: This is a sample application product similar to a “Hello World” for ourImmutableDataarchitecture. This application is very simple, but is good practice to see the architecture in action before we build more complex products.Animals: This is a sample application product cloning the Animals SwiftUI sample application from Apple.3 The application from Apple demonstrates how to read and write model data to a SwiftData store. We rebuild this application using theImmutableDatainfra and architecture. In addition to persisting data on disk across app launches, we also demonstrate how theImmutableDataarchitecture can read and write model data to a remote server.Quakes: This is a sample application product cloning the Quakes SwiftUI sample application from Apple.4 The application from Apple demonstrates fetching data from a remote server and caching that data locally using SwiftData. We rebuild this application using theImmutableDatainfra and architecture.
We’re almost ready to get started. The recommended approach is to clone the ImmutableData-Samples repo and checkout the chapter-00 branch. From this commit, you have the option to open Workspace.xcworkspace for a starting point to begin our engineering. The workspace is a collection of modules and application projects. To save ourselves some time and stay focused on teaching the ImmutableData architecture, these modules and application projects are already configured with the correct dependencies between each other. When it is time to add new types to a module, all we have to do is add a new file in the correct place.
Every chapter in this tutorial is focused on a different module. Think of these like a series of pair-programming sessions. Once you open the Workspace from the ImmutableData-Samples repo, we can focus our attention on the module we work through in that chapter.
Once you clone the ImmutableData-Samples repo locally, you have the option to view the completed project from the latest main commit. You also have the option to view the completed work for every chapter: the chapter-01 branch contains all the work needed to complete Chapter 01 in the book. Referencing the repo as you complete chapters also gives you the opportunity to view the complete unit tests which you have the option to use as a starting point for writing unit tests against the ImmutableData architecture in your own products.
Store
The Store class will save the current state of our data models. Our Store class is a long-lived object. You might think of a Store as behaving similar in some ways to a ModelContext from SwiftData. Unlike ModelContext, we expect applications to build just one Store instance for every app lifecycle, but you can create multiple instances when testing.
Our Store instance will be our “source of truth” for all global state in our application. This does not mean our Store instance will need to be the source of truth for ephemeral, local, or component state. Building our sample applications will give us practice choosing what state belongs in Store and what state can be saved directly in our SwiftUI component tree.
Before we write some code, let’s learn a little more about some of the basic types that we use to model and transform our global state over time. Our ImmutableData architecture is inspired by Flux and Redux. While we do not assume any prior experience with Flux and Redux before beginning this tutorial, you might want to familiarize yourself with the basic ideas behind these architectures before we build ImmutableData. We recommend [The Case for Flux]5 by Dan Abramov and [A Cartoon Intro to Redux]6 by Lin Clark to learn more.
State
Our Store class is responsible for saving a State value: this is the source of truth for all global state at a moment in time. This data model is a graph of immutable data structures: we build State by composing Swift value types like struct and enum.
flowchart LR
  accTitle: Data Flow in SwiftUI Part One
  accDescr: Our view is a function of state.
  State --> View
In SwiftUI, our View can be thought of as a function of State. Our components define a body property to construct a declarative description of our UI at this moment in time. It is the responsibility of the infra engineer building SwiftUI to map those declarative descriptions to View objects. When our State updates, our component recomputes our body property.
For this chapter, our State value is where we keep global state. We continue to keep local state saved directly in our component tree. Suppose we were building an application similar to the Contacts application on macOS. A Person data model might represent one person in our application. A customer opening our application would expect changes to their saved contacts to persist across app launches. A customer would also expect that opening their saved contacts in multiple windows would display the same contacts. This implies that our Person data models are what we call global state. While our customer opens their saved contacts in multiple windows, our customer has the ability to display the same contacts in different ways. One window may sort contacts by first name, another window may sort contacts by last name, and another window may filter contact names with a matching substring. These are examples of local state. This state will be saved in our SwiftUI component tree using the conventional patterns (like SwiftUI.State and SwiftUI.Binding) you are already familiar with.
When we build our sample application products, we will see how we build different State types which are customized for specific product domains. For now, our goal is to build an infra generalized across any State type; we build infra in a way that can be shared across multiple products.
Our State serves a similar role as the State type in Redux.7
Action
In a SwiftUI application using SwiftData, our data models were objects that could be mutated directly from our component tree using imperative logic. Let’s try and “think declaratively” and rebuild our mental model for mapping important events to transformations on our source of truth.
Using SwiftData, you might build a Contacts application that displays a detail component for one person. This detail component might have the ability to add or edit information on one person. You might have the ability to add or edit an email address, a phone number, or a name. These user events are then mapped at the component level to imperative instructions on the Person reference. Your “functional” and “declarative” programming model for building and updating this component tree with SwiftUI is then paired with a “object-oriented” and “imperative” programming model for building and updating your graph of data models with SwiftData.
flowchart LR
  accTitle: Data Flow in SwiftUI Part Two
  accDescr: Data flows from action to state, and from state to view.
  Action --> State
  State --> View
  View --> Action
In applications built from SwiftUI, we want data to flow in one direction: this helps product engineers write code that is simple, predictable, easy to reason about, and easy to make changes to. We pass our State to our Component to render a View. Our View responds to a User Event with an Action. Our Action performs a mutation on our State. Our new State then updates our Components to render a new View.
flowchart LR
  accTitle: Data Flow in SwiftUI Part Three
  accDescr: Data flows from action to state causing a mutation, and from state to view causing an update.
  Action -- Mutation --> State
  State -- Updates --> View
  View --> Action
Let’s think through one important step: How exactly does an Action perform a mutation on our State? The earliest public demos of React built a simple application to increment and decrement an integer value. The earliest public demos of SwiftUI built a simple application to toggle a boolean value. What these early demos have in common is that our View responds to a User Event with an imperative mutation. The product engineer building the component builds the imperative logic to mutate State directly in the component itself.
flowchart LR
  accTitle: Data Flow in SwiftUI Part Four
  accDescr: Data flows from view to state causing a mutation, and from state to view causing an update.
  State -- Updates --> View
  View -- Mutation --> State
At this point, we are leveraging a functional and declarative programming model for building and updating our component tree, but we are leveraging an object-oriented and imperative programming model for building and updating our global state.
Our approach for building the ImmutableData architecture is inspired by Flux and Redux. Instead of our component tree mutating our global state with imperative logic, our component tree declares when user events happen. At the data layer of our products, these user events then become the imperative instructions that lead to a transformation of global state.
Our user events, such as a SwiftUI button component being tapped, are instances of Action types, but Action types are not limited to user events. Action types could represent system events like a location alert when moving your device, server events like an incoming push notification or web-socket message, or other events like timers.
We model Action types as immutable data structures. Our Action types can contain context and payloads that carry information from the component tree. When thinking about Action types, try not to think about Action types as “replacements” for imperative mutations on state. An Action type declares an event that just took place; we map that event to a transformation on state using our next type.
Similar to State, we build our infra generalized across any Action type; we will see concrete examples of what Action values look like when we build our sample application products.
Our Action serves a similar role as the Action type in Redux.8
Reducer
When our Actions were imperative mutations, the product engineer building the component builds the imperative logic to mutate State directly in the component itself. When our Actions are declarative, we still need some place to define that imperative logic.
Let’s think back to our mental model for Views: our View can be thought of as a function of State. Let’s think about a similar approach for State. If we pair a State with an Action, let’s construct a function to define the imperative logic we need to transform our State.
flowchart LR
  accTitle: Data Flow through Reducers
  accDescr: Our reducer maps from a State and an Action to a new State.
  oldState[State] --> Reducer
  Action --> Reducer
  Reducer --> newState[State]
Our Reducer is a pure function with no side effects that maps from a State and an Action to a new State.
This is the “Fundamental Theorem of ImmutableData” and the most important concept in Redux. The job of a Reducer is to use Action values to transform State over time. Because our State is an immutable value type, we don’t mutate that State in-place; we return a new State value. Because our Reducer is a pure function with no side effects, our Reducer is deterministic, stable, and predictable.
We can now begin to visualize how the global state of our contacts application is transformed over time. We begin with a State type. This is an immutable value type. Let’s assume every Person in our contacts application is assigned a unique id property. We can then model our global state with a Dictionary where keys are the set of all id properties and values are the set of all Person values.
We can visualize a person detail component which displays the name of a Person value. Our Person is an immutable value type: unlike a SwiftData.PersistentModel, we don’t have the ability to mutate our global state with imperative logic when the user edits the name in our detail component. Instead, we forward an Action to our Reducer. Our Action tells our Reducer what just happened: “the user did tap the edit person button”. Our Action also tells our Reducer any important information like the id of the Person and new name value. With a Dictionary value as our current source of truth, our Reducer can then transform that source of truth into a new global state: a new Dictionary value.
Our product engineer will construct the actual Reducer function needed for our product domain. Our infra is generalized across any Reducer function.
Our Reducer serves a similar role as the Reducer function type in Redux.9
Store
Our State and Action types are immutable value types. Our Reducer is a pure function with no side effects. Our global state is displayed across multiple components and even multiple windows; we need a long-lived object to save a State value to represent the state of our system at a moment in time. This will be our Store class.
flowchart LR
  accTitle: Data Flow in ImmutableData
  accDescr: Data flows from action to store. The store passes the action to a reducer along with the current state of our application. The reducer transforms the current state of our application to a new state. The new state updates the view. The view creates an action on a user event and the cycle continues.
  Action --> Reducer
  subgraph Store
  State --> Reducer
  end
  Reducer --> View
  View --> Action
Here are some of the basic behaviors we want a Store class to implement:
- We want to save a State value to represent the state of our system at a moment in time.
- We want to give product engineers the ability to dispatch an Action value when an important event occurs. The current state of our system and the action are passed to a Reducer to determine the next state of our system.
- We want to give product engineers the ability to select an arbitrary slice of state at a moment in time and apply an arbitrary transformation to that slice of state.
- We want to give product and infra engineers the ability to listen as new Action values are dispatched to the
Store.
With these four behaviors, we can build a whole new architecture for delivering global state to SwiftUI. We can build an architecture that is predictable, testable, and scalable.
Our Store serves a similar role as the Store type in Redux.10
We’re ready to start engineering. Let’s open Workspace.xcworkspace and build our first type. Select the ImmutableData package and add a new Swift file under Sources/ImmutableData. Name this file Store.swift:
ImmutableData
├── Sources
│   └── ImmutableData
│       ├── ImmutableData.swift
│       └── Store.swift
└── Tests
    └── ImmutableDataTests
        └── ImmutableDataTests.swift
Here’s the first step to building our Store:
//  Store.swift

@MainActor final public class Store<State, Action> : Sendable where State : Sendable, Action : Sendable {
  private var state: State
  private let reducer: @Sendable (State, Action) throws -> State

  public init(
    initialState state: State,
    reducer: @escaping @Sendable (State, Action) throws -> State
  ) {
    self.state = state
    self.reducer = reducer
  }
}
Our Store is a class with two generic type parameters: State and Action. The only constraints we make on State and Action are both types must be Sendable. Our State and Action will always be immutable value types, but we lack an easy ability to formalize this constraint in Swift 6.0.
Our UI component tree will select arbitrary slices of state to display from our Store. These operations will be synchronous and blocking. Isolating our Store to MainActor gives us an easy way to pass values to component body properties which are also isolated to MainActor.
Our Store initializer takes two parameters: a State and a Reducer. Our sample application products will use this initializer to customize their Store for their own domain. A contacts application would have a different initialState value than a photo library application. A photo library application would have a different Reducer than a contacts application. This Store class is flexible and composable; we can use the same implementation across all our sample application products without subclassing.
Dispatcher
Let’s think back to the four behaviors we wanted for our Store. We already have a type that represents the state of our system: we define state as a variable that can change over time. Let’s work on the ability to dispatch an Action when an important event occurs.
Before adding functionality to our Store class, let’s begin by defining our new function in a protocol. Add a new Swift file under Sources/ImmutableData. Name this file Dispatcher.swift.
Here is what our new Dispatcher protocol looks like to dispatch an Action when an important event occurs:
//  Dispatcher.swift

public protocol Dispatcher<Action> : Sendable {
  associatedtype Action : Sendable

  @MainActor func dispatch(action: Action) throws
}
We can now switch back to Store and adopt this new protocol:
//  Store.swift

extension Store : Dispatcher {
  public func dispatch(action: Action) throws {
    self.state = try self.reducer(self.state, action)
  }
}
The Dispatcher protocol is at the heart of the ImmutableData architecture. This function is the “funnel” that all transformations on global state must pass through.
The dispatch(action:) function serves a similar role as the dispatch(action) function in Redux.11
Consistent with the philosophy from Redux, our Reducer functions are pure functions and free of side effects. Our Reducer functions are also synchronous and blocking. What if we did want to perform some asynchronous work or side effects along with the work our Reducer performs to transform state? How would this architecture scale to products that need to fetch data from a server or persist data to a local database?
We adopt two different approaches from Redux for managing asynchronous work and side effects: Thunks and Listeners. For now, let’s focus on Thunks; we will cover Listeners in a later section.
Suppose we build our contacts application to perform a network fetch for saved contacts from a remote server. When the remote server returns an array of contacts, we save those contacts as Person instances in our State. Our Reducer is not an appropriate place for asynchronous logic, we must perform our network fetch before we dispatch an Action value with the contacts returned by our remote server. We still would like a way to define the work to perform a network fetch together with the work to dispatch an Action when that network fetch returns. This is what we think of as a Thunk.12
Our Dispatcher currently accepts an Action. What we would like is the ability to also pass a Thunk closure. This closure could perform synchronous or asynchronous work that includes side effects that would not be appropriate for our Reducer. Here is how we define these new functions:
//  Dispatcher.swift

public protocol Dispatcher<State, Action> : Sendable {
  associatedtype State : Sendable
  associatedtype Action : Sendable
  associatedtype Dispatcher : ImmutableData.Dispatcher<Self.State, Self.Action>
  associatedtype Selector : ImmutableData.Selector<Self.State>

  @MainActor func dispatch(action: Action) throws
  @MainActor func dispatch(thunk: @Sendable (Self.Dispatcher, Self.Selector) throws -> Void) rethrows
  @MainActor func dispatch(thunk: @Sendable (Self.Dispatcher, Self.Selector) async throws -> Void) async rethrows
}
Here is how we adopt these functions in our Store:
//  Store.swift

extension Store : Dispatcher {
  public func dispatch(action: Action) throws {
    self.state = try self.reducer(self.state, action)
  }

  public func dispatch(thunk: @Sendable (Store, Store) throws -> Void) rethrows {
    try thunk(self, self)
  }

  public func dispatch(thunk: @Sendable (Store, Store) async throws -> Void) async rethrows {
    try await thunk(self, self)
  }
}
Our thunk closures accept two parameters: a Dispatcher and a Selector. Once we define a thunk closure, we can then select slices of state, dispatch actions, and even choose to dispatch new thunk closures.
Giving our Dispatcher the ability to accept these thunk closures is a powerful alternative to dispatching Action values, but there is a philosophical shift in our thinking taking place that will limit how and where we use this ability. One of our goals in building the ImmutableData architecture is to think declaratively from our UI component tree. Our thunk closures are units of imperative logic. We will see places in our sample application products where we do want this ability, but it will not be from our UI component tree. Our UI component tree will continue to dispatch Action values. Instead of our UI component tree telling our data layer how to behave when an important event occurs, we continue to dispatch Action values to tell our data layer when an important event occurs and what that event was. Before we finish building our Store, we will explore how Listeners will work together with Thunks to factor imperative logic out of our UI component tree.
Our dispatch(thunk:) functions serve a similar role as the Thunk middleware in Redux.13
Selector
Our state is still a private property. We have the ability to transform our State over time with our Reducer, but we also need a way for our UI component tree to select slices of state for displaying to the user. Let’s add this new function in a protocol. Add a new Swift file under Sources/ImmutableData. Name this file Selector.swift.
Here is what our Selector protocol looks like:
//  Selector.swift

public protocol Selector<State> : Sendable {
  associatedtype State : Sendable

  @MainActor func select<T>(_ selector: @Sendable (Self.State) -> T) -> T where T : Sendable
}
Our UI component tree displays data which it “selects” from the current state of our system. This data could be an arbitrary slice of state, such as all contacts with a name beginning with an arbitrary letter. It could be a transformation of a slice of state, such as all contacts sorted by name. Our selector closure will define what data is returned from our Store.
We can now switch back to Store and adopt this new protocol:
//  Store.swift

extension Store : Selector {
  public func select<T>(_ selector: @Sendable (State) -> T) -> T where T : Sendable {
    selector(self.state)
  }
}
As a convenience, there might be times we want to return the complete state of our system with no transformation applied. Here is a convenience function that might be helpful for us:
//  Selector.swift

extension Selector {
  @MainActor public var state: State {
    self.select { state in state }
  }
}
As a best practice, we should prefer selecting only the slices of state needed for a UI component to display. Selecting more state than necessary might result in performance penalties where components evaluate their body on state transformations that do not display new data.
Our selector closures serve a similar role as Selector functions in Redux.14
Streamer
The final piece to our Store class will be the ability for product and infra engineers to listen as Action values are dispatched to our Store.
Our contacts application might launch and display an empty List component. To display Person instances in this List, we might need to perform a network fetch. While thunk closures do give us an ability for UI components to perform asynchronous work when an important event occurs, we want to think declaratively: we want to tell our data layer what just happened; not how it should transform State.
Our solution will be for our UI component tree to continue dispatching Action values to our Store. Since we don’t give our Reducer the ability to perform asynchronous work or side effects, we build asynchronous work or side effects in a Listener class. Our Listener receives Action values as they are dispatched to the Store, then has the ability to perform asynchronous work or side effects by passing a thunk closure back to the Store.
We will see examples of Listener types when we build our sample application products. For now, let’s focus on the ability to stream our updates to an arbitrary Listener. Add a new Swift file under Sources/ImmutableData. Name this file Streamer.swift.
Here is what our Streamer protocol will look like:
//  Streamer.swift

public protocol Streamer<State, Action> : Sendable {
  associatedtype State : Sendable
  associatedtype Action : Sendable
  associatedtype Stream : AsyncSequence, Sendable where Self.Stream.Element == (oldState: Self.State, action: Self.Action)

  @MainActor func makeStream() -> Self.Stream
}
Our makeStream function returns an AsyncSequence. Every element returned by this AsyncSequence is a tuple with a State and an Action. When we dispatch an Action to our Store, we will pass that Action to our Reducer before we notify our Listener types with this Stream. Our Stream elements include the previous State of our system — before we returned from our Reducer — along with the Action that was dispatched. Our listeners will then have the ability to compare the previous State of our system with our current State and perform conditional logic: an example might be checking that a status value has changed from nil to pending before beginning a network fetch.
Our Streamer serves a similar role as the Listener middleware in Redux.15
Before we adopt the Streamer in our Store class, we need a helper class for creating new streams and disposing of old streams when they are no longer needed. Add a new Swift file under Sources/ImmutableData. Name this file StreamRegistrar.swift.
Here is our StreamRegistrar class:
//  StreamRegistrar.swift

@MainActor final class StreamRegistrar<Element> : Sendable where Element : Sendable {
  private var count = 0
  private var dictionary = Dictionary<Int, AsyncStream<Element>.Continuation>()

  deinit {
    for continuation in self.dictionary.values {
      continuation.finish()
    }
  }
}

extension StreamRegistrar {
  func makeStream() -> AsyncStream<Element> {
    self.count += 1
    return self.makeStream(id: self.count)
  }
}

extension StreamRegistrar {
  func yield(_ element: Element) {
    for continuation in self.dictionary.values {
      continuation.yield(element)
    }
  }
}

extension StreamRegistrar {
  private func makeStream(id: Int) -> AsyncStream<Element> {
    let (stream, continuation) = AsyncStream.makeStream(of: Element.self)
    continuation.onTermination = { [weak self] termination in
      guard let self = self else { return }
      Task {
        await self.removeContinuation(id: id)
      }
    }
    self.dictionary[id] = continuation
    return stream
  }
}

extension StreamRegistrar {
  private func removeContinuation(id: Int) {
    self.dictionary[id] = nil
  }
}
The makeStream function returns a new AsyncStream instance and caches it in a Dictionary. The yield function passes a new Element to all cached AsyncStream instances.
One potential limitation with AsyncStream is the lack of “back pressure”.16 In situations where many actions are being dispatched to our Store very rapidly, our AsyncStream may “buffer” elements; this might lead to unexpected behavior if that buffer grows very large. One potential workaround might be to specify a BufferingPolicy when we construct our AsyncStream.17 Another potential workaround might be to use an AsyncAlgorithms.AsyncChannel, which does support back pressure.18 Since our Streamer protocol delivers a Stream as an associatedtype, we have some flexibility here if we decide to migrate our implementation away from AsyncStream in the future: our Store can deliver an AsyncChannel (or a different AsyncSequence type) and still conform to Streamer.
We can now update our Store class. Let’s begin with adding an instance of our StreamRegistrar:
//  Store.swift

@MainActor final public class Store<State, Action> : Sendable where State : Sendable, Action : Sendable {
  private let registrar = StreamRegistrar<(oldState: State, action: Action)>()

  private var state: State
  private let reducer: @Sendable (State, Action) throws -> State

  public init(
    initialState state: State,
    reducer: @escaping @Sendable (State, Action) throws -> State
  ) {
    self.state = state
    self.reducer = reducer
  }
}
We can use this registrar instance to adopt the Streamer protocol:
//  Store.swift

extension Store : Streamer {
  public func makeStream() -> AsyncStream<(oldState: State, action: Action)> {
    self.registrar.makeStream()
  }
}
The final step is to pass our State and Action to this registrar when an Action is dispatched and our Reducer has returned:
//  Store.swift

extension Store : Dispatcher {
  public func dispatch(action: Action) throws {
    let oldState = self.state
    self.state = try self.reducer(self.state, action)
    self.registrar.yield((oldState: oldState, action: action))
  }

  public func dispatch(thunk: @Sendable (Store, Store) throws -> Void) rethrows {
    try thunk(self, self)
  }

  public func dispatch(thunk: @Sendable (Store, Store) async throws -> Void) async rethrows {
    try await thunk(self, self)
  }
}
Remember that State is an immutable value: our Reducer does not have the ability to mutate this value in-place; the job of our Reducer is to return a new State value. Value semantics give us local reasoning: we know that oldState really is the “old” State of our system.
This Store class is small (only about 40 lines of code), but offers us powerful flexibility. With this Store built, we can turn our attention to our UI layer. Our next chapter will build the ability for SwiftUI components to read from and write to our shared mutable state.
Here is our ImmutableData package, including the tests available on our chapter-01 branch:
ImmutableData
├── Sources
│   └── ImmutableData
│       ├── Dispatcher.swift
│       ├── Selector.swift
│       ├── Store.swift
│       ├── StreamRegistrar.swift
│       └── Streamer.swift
└── Tests
    └── ImmutableDataTests
        └── StoreTests.swift
As we discussed, our tutorials are not intended to teach unit testing. We want to keep our tutorials focused on the ImmutableData architecture and products built from that architecture. We do feel that building infra and products in a way that supports testing is an important goal, but we let our readers choose to write their own tests to accompany the tutorials.
When you checkout our chapter-01 branch, you can see the completed work for this chapter. We also include unit tests. You have the option to review our tests; you can also checkout every chapter branch to see the tests we choose to include for every chapter of our tutorials.
-
https://developer.apple.com/documentation/swiftdata/adding-and-editing-persistent-data-in-your-app ↩
-
https://developer.apple.com/documentation/swiftdata/maintaining-a-local-copy-of-server-data ↩
-
https://medium.com/code-cartoons/a-cartoon-intro-to-redux-3afb775501a6 ↩
-
https://redux.js.org/understanding/thinking-in-redux/glossary#state ↩
-
https://redux.js.org/understanding/thinking-in-redux/glossary#action ↩
-
https://redux.js.org/understanding/thinking-in-redux/glossary#reducer ↩
-
https://redux.js.org/understanding/thinking-in-redux/glossary#store ↩
-
https://redux.js.org/usage/deriving-data-selectors#calculating-derived-data-with-selectors ↩
-
https://redux.js.org/usage/side-effects-approaches#listeners ↩
-
https://github.com/swiftlang/swift-evolution/blob/main/proposals/0406-async-stream-backpressure.md ↩
-
https://developer.apple.com/documentation/swift/asyncstream/continuation/bufferingpolicy ↩
-
https://github.com/apple/swift-async-algorithms/blob/main/Sources/AsyncAlgorithms/AsyncAlgorithms.docc/Guides/Channel.md ↩
ImmutableUI
Now that we have our Store class for saving the state of our system at a moment in time, we want a set of types to support selecting and transforming that state from SwiftUI view components.
There are three types we focus our effort on for this chapter:
Provider: A SwiftUI view component for passing aStoreinstance through a view component tree.Dispatcher: A SwiftUIDynamicPropertyfor dispatching Action values from a SwiftUI view component.Selector: A SwiftUIDynamicPropertyfor selecting a slice of State from a SwiftUI view component.
Provider
If you have experience with shipping SwiftData in a SwiftUI application, you might be familiar with the modelContext environment value.1 A typical SwiftUI application might initialize a ModelContext instance at app launch, and then make that ModelContext available through the view component tree with SwiftUI.Environment.
SwiftData supports creating multiple ModelContext instances over your app lifecycle. The Flux architecture supported multiple Store instances. We choose an approach consistent with the Redux architecture; we will create just one Store instance at app launch. We then make that Store available through the view component tree with SwiftUI.Environment.
Select the ImmutableUI package and add a new Swift file under Sources/ImmutableUI. Name this file Provider.swift. This view component is not very complex; here is all we need:
//  Provider.swift

import SwiftUI

@MainActor public struct Provider<Store, Content> where Content : View {
  private let keyPath: WritableKeyPath<EnvironmentValues, Store>
  private let store: Store
  private let content: Content

  public init(
    _ keyPath: WritableKeyPath<EnvironmentValues, Store>,
    _ store: Store,
    @ViewBuilder content: () -> Content
  ) {
    self.keyPath = keyPath
    self.store = store
    self.content = content()
  }
}

extension Provider : View {
  public var body: some View {
    self.content.environment(self.keyPath, self.store)
  }
}
Our initializer takes three parameters:
- A
keyPathwhere we save ourstoreinstance. - A
storeinstance of a genericStoretype. - A
contentclosure to build aContentview component.
All we have to do when computing our body is set the environment value for keyPath to our store on the content view component tree. This store will then be available to use across that view component tree similar to modelContext.
Our Provider component serves a similar role as the Provider component in React Redux.2
Dispatcher
Now that we have the ability to pass a Store type through our environment, how do we dispatch an action from a SwiftUI view component when an important event occurs? Add a new Swift file under Sources/ImmutableUI. Name this file Dispatcher.swift.
This is a simple SwiftUI DynamicProperty. Here is all we need:
//  Dispatcher.swift

import ImmutableData
import SwiftUI

@MainActor @propertyWrapper public struct Dispatcher<Store> : DynamicProperty where Store : ImmutableData.Dispatcher {
  @Environment private var store: Store

  public init(_ keyPath: WritableKeyPath<EnvironmentValues, Store>) {
    self._store = Environment(keyPath)
  }

  public var wrappedValue: some ImmutableData.Dispatcher<Store.State, Store.Action> {
    self.store
  }
}
We initialize our Dispatcher property wrapper with a keyPath. This keyPath should match the keyPath we use to initialize our Provider component. When our SwiftUI view component is ready to dispatch an Action value, the wrappedValue property returns an opaque ImmutableData.Dispatcher. We could return the store instance as a wrappedValue of the Store type, but we are then “leaking” unnecessary information about the store that our view component does not need to know about; this approach keeps our Dispatcher focused only on dispatching Action values.
Our Dispatcher type serves a similar role as the useDispatch hook from React Redux.3
Selector
Our Provider and Dispatcher were both quick to build. Our Selector type will be more complex. Before we start looking at code, let’s talk about our strategy and goals with this type.
We want our Selector to select a slice of our State and apply an arbitrary transform. For a contacts application, an example might be to return the count of all Person values. Another example might be to select all Person values and filter for names with a matching substring. Another example might be to select all Person values and sort by name.
Let’s begin with a definition:
- We define an Output Selector that takes a State as input and returns some data as an Output.
Since we expect our global state to transform many times over an application lifecycle, we would like for this Selector to rerun its Output Selector when the output might have changed. Since the only way for our ImmutableData architecture to transform State is from dispatching an Action, one strategy would be for our Selector to rerun its Output Selector every time an Action value is dispatched to the Store. Let’s think about the performance impact of this strategy.
Let’s start with a simple example: we plan to build a SwiftUI view component that displays the total number of people in our contacts application. If our Person instances are saved as values of a Dictionary, it is trivial for us to select the count of all Person instances. This operation is constant time: O(1).
Here’s our next example: we plan to build a SwiftUI view component that filters for contact names with a matching substring. We can model this as an Output Selector that performs an amount of work linear with the amount of Person instances in our Dictionary: O(n).
Here’s our next example: we plan to build a SwiftUI view component that sorts all contacts by name. We can model this Output Selector as an O(n log n) operation.
The operations that run in O(n) and O(n log n) are not trivial; let’s think about how we can try and optimize this work. Let’s think about the sorting operation. This operation runs in O(n log n) time. However, we can think of a way to help keep this operation from running more times than necessary. Suppose we run the sort algorithm at time T(0) across all Person instances. Suppose an Action is then dispatched to the Store at time T(1). Should we then rerun the sort algorithm? Let’s think about this sort algorithm in terms of inputs and outputs. The input is a collection of Person instances. The output is a sorted array of Person instances. If this sort algorithm is a pure function with no side effects, then the output is stable and deterministic; if the input to our sort algorithm at time T(0) is the same as our input at time T(1), our sorted array could not have changed. If the algorithm to determine if two inputs are equal runs in linear time (O(n)), the option to perform an equality check on our inputs might save us a lot of performance by sorting in O(n log n) only when necessary.
- We define a Dependency Selector that takes a State as input and returns some data as a Dependency.
Instead of rerunning our Output Selector on every Action that is dispatched to our Store, we can rerun our Dependency Selectors. If our Selector memoizes or caches this set of dependencies, and only reruns our Output Selector when one of those dependencies has changed, we can offer a lot of flexibility for product engineers to optimize performance.
The total set of all Action values in our application might be large, but only a small subset of those Action values might result in any mutation to our State that would cause the result of our Output Selector to ever change. If we rerun our Dependency Selectors on every Action that is dispatched, we are performing work that might be expensive (O(n) or greater) when we don’t really need to. Let’s give our Selector the ability to filter those Action values.
- We define a
Filterthat takes a State and an Action as input and returns aBoolas output indicating this State and Action should cause the Dependency Selectors to rerun.
Our Dependency Selectors and Filter are both powerful tools for product engineers to optimize performance, but we would also prefer for these to be optional. A product engineer should be able to create a Selector with no Dependency Selectors and no Filter; this would just rerun the Output Selector on every Action that is dispatched to the Store.
Now that we have some strategy written out, we can begin to build our Selector type. This will be the most complex type we have built so far, but we’ll go step-by-step and try to keep things as simple as possible.
Our Selector type serves a similar role as the useSelector hook from React Redux.4 Our use of memoization and dependency selectors serves a similar role as the Reselect library.5
Our Selector type will use the Streamer protocol we defined in our last chapter for updating our view components as our State transforms over time. There are three types we will build:
Selector: This is apublictype for view components to select a slice of State.Listener: This is apackagetype forSelectorto begin listening toStreamer.AsyncListener: This is aninternaltype forListenerto begin listening toStreamer.
Our AsyncListener is a “helper”; we could make Listener complex enough to listen to Streamer on its own, but we can keep our code a little more organized by keeping some work in AsyncListener.
Our first step is to define our DependencySelector and OutputSelector types. Add a new Swift file under Sources/ImmutableUI. Name this file Selector.swift.
Here are our first two types:
//  Selector.swift

public struct DependencySelector<State, Dependency> {
  let select: @Sendable (State) -> Dependency
  let didChange: @Sendable (Dependency, Dependency) -> Bool

  public init(
    select: @escaping @Sendable (State) -> Dependency,
    didChange: @escaping @Sendable (Dependency, Dependency) -> Bool
  ) {
    self.select = select
    self.didChange = didChange
  }
}

public struct OutputSelector<State, Output> {
  let select: @Sendable (State) -> Output
  let didChange: @Sendable (Output, Output) -> Bool

  public init(
    select: @escaping @Sendable (State) -> Output,
    didChange: @escaping @Sendable (Output, Output) -> Bool
  ) {
    self.select = select
    self.didChange = didChange
  }
}
Our DependencySelector type is initialized with a select closure, which returns a Dependency from a State, and a didChange closure, which returns true when two Dependency values have changed. In practice, we expect most product engineers to choose for their Dependency type to use value inequality (!=) to indicate when two Dependency values have changed. Our approach gives this infra the flexibility to handle more advanced use cases where product engineers need specialized control over the value returned from didChange.
Our OutputSelector type follows a similar pattern: a select closure, which returns an Output from a State, and a didChange closure, which returns true when two Output values have changed. Our didChange closure will be needed when we give our type the ability to use Observable for updating our view component tree.
Let’s turn our attention to AsyncListener. Add a new Swift file under Sources/ImmutableUI. Name this file AsyncListener.swift.
Our AsyncListener will use Observable to keep our view component tree updated. For a quick review of Observable, please read [SE-0395]6. Let’s begin with a small class just for Observable:
//  AsyncListener.swift

import Foundation
import ImmutableData
import Observation

@MainActor @Observable final fileprivate class Storage<Output> {
  var output: Output?
}
Let’s add our AsyncListener type:
//  AsyncListener.swift

@MainActor final class AsyncListener<State, Action, each Dependency, Output> where State : Sendable, Action : Sendable, repeat each Dependency : Sendable, Output : Sendable {
  private let label: String?
  private let filter: (@Sendable (State, Action) -> Bool)?
  private let dependencySelector: (repeat DependencySelector<State, each Dependency>)
  private let outputSelector: OutputSelector<State, Output>

  private var oldDependency: (repeat each Dependency)?
  private var oldOutput: Output?
  private let storage = Storage<Output>()

  init(
    label: String? = nil,
    filter isIncluded: (@Sendable (State, Action) -> Bool)? = nil,
    dependencySelector: repeat DependencySelector<State, each Dependency>,
    outputSelector: OutputSelector<State, Output>
  ) {
    self.label = label
    self.filter = isIncluded
    self.dependencySelector = (repeat each dependencySelector)
    self.outputSelector = outputSelector
  }
}
Our AsyncListener class is generic across these types:
State: The State type defined by our product and ourStore.ActionThe Action type defined by our product and ourStore.Dependency: A parameter pack of types defined by our product.Output: A type defined by our product.
For a quick review of parameter packs and variadic types, please read [SE-0393]7 and [SE-0398]8.
Our AsyncListener class is initialized with these parameters:
label: An optionalStringused for debugging and console logging.filter: An optionalFilterclosure.dependencySelector: A parameter pack ofDependencySelectorvalues. An empty pack indicates no dependencies are needed.outputSelector: AnOutputSelectorfor displaying data in a view component.
Since we use this type for displaying data in a view component, we choose to isolate our type to MainActor.
In a future version of Swift, we might choose to make AsyncListener an Observable type and remove our Storage class. As of Swift 6.0, we are currently blocked on making a variadic type Observable; we use our Storage class as a workaround.9
Here is the function for delivering an Output value to a view component:
//  AsyncListener.swift

extension AsyncListener {
  var output: Output {
    guard let output = self.storage.output else { fatalError("missing output") }
    return output
  }
}
Our Storage returns an optional output. Before we complete this chapter, we will see how we can guarantee that this will not be nil and why a fatalError is used to indicate programmer error.
Let’s add two helper functions we will use only for debugging purposes:
//  AsyncListener.swift

extension UserDefaults {
  fileprivate var isDebug: Bool {
    self.bool(forKey: "com.northbronson.ImmutableUI.Debug")
  }
}

fileprivate func address(of x: AnyObject) -> String {
  var result = String(
    unsafeBitCast(x, to: UInt.self),
    radix: 16
  )
  for _ in 0..<(2 * MemoryLayout<UnsafeRawPointer>.size - result.utf16.count) {
    result = "0" + result
  }
  return "0x" + result
}
We will need three more functions for working with our parameter pack values:
//  AsyncListener.swift

extension ImmutableData.Selector {
  @MainActor fileprivate func selectMany<each T>(_ select: repeat @escaping @Sendable (State) -> each T) -> (repeat each T) where repeat each T : Sendable {
    (repeat self.select(each select))
  }
}

fileprivate struct NotEmpty: Error {}

fileprivate func isEmpty<each Element>(_ element: repeat each Element) -> Bool {
  func _isEmpty<T>(_ t: T) throws {
    throw NotEmpty()
  }
  do {
    repeat try _isEmpty(each element)
  } catch {
    return false
  }
  return true
}

fileprivate struct DidChange: Error {}

fileprivate func didChange<each Element>(
  _ didChange: repeat @escaping @Sendable (each Element, each Element) -> Bool,
  lhs: repeat each Element,
  rhs: repeat each Element
) -> Bool {
  func _didChange<T>(_ didChange: (T, T) -> Bool, _ lhs: T, _ rhs: T) throws {
    if didChange(lhs, rhs) {
      throw DidChange()
    }
  }
  do {
    repeat try _didChange(each didChange, each lhs, each rhs)
  } catch {
    return true
  }
  return false
}
Our original Selector protocol from the previous chapter returned a slice of State for one closure defined by our product engineer. For our DependencySelector values, a product engineer has the option to request that multiple slices of state be used to determine whether or not a dispatched Action should rerun our OutputSelector. Our selectMany function makes it easy for us to pass a parameter pack of closures and return a parameter pack of slices of State.
We include a isEmpty function for confirming if our parameter pack contains no values. We include a didChange function for confirming if two parameter packs changed. We use do-catch statements, but we could also choose for-in and leverage parameter pack iteration for this function.10
Let’s now add a function to update our cached dependency values:
//  AsyncListener.swift

extension AsyncListener {
  private func updateDependency(with store: some ImmutableData.Selector<State>) -> Bool {
#if DEBUG
    if let label = self.label,
       UserDefaults.standard.isDebug {
      print("[ImmutableUI][AsyncListener]: \(address(of: self)) Update Dependency: \(label)")
    }
#endif
    let dependency = store.selectMany(repeat (each self.dependencySelector).select)
    if let oldDependency = self.oldDependency {
      self.oldDependency = dependency
      return didChange(
        repeat (each self.dependencySelector).didChange,
        lhs: repeat each oldDependency,
        rhs: repeat each dependency
      )
    } else {
      self.oldDependency = dependency
      return true
    }
  }
}
We begin with an optional print statement that is available in debug builds. These statements can be very helpful during debugging so that product engineers can follow along to see how their view component tree is being updated as Action values are dispatched. We enable this with our com.northbronson.ImmutableUI.Debug flag passed to UserDefaults.
We pass every select closure to our store and select the current set of Dependency values. If we have already cached a previous set of Dependency values, we compare the two and return true if they have changed. If this is our first time selecting a set of Dependency values, we return true.
Let’s add a function to update our cached Output value:
//  AsyncListener.swift

extension AsyncListener {
  private func updateOutput(with store: some ImmutableData.Selector<State>) {
#if DEBUG
    if let label = self.label,
       UserDefaults.standard.isDebug {
      print("[ImmutableUI][AsyncListener]: \(address(of: self)) Update Output: \(label)")
    }
#endif
    let output = store.select(self.outputSelector.select)
    if let oldOutput = self.oldOutput {
      self.oldOutput = output
      if self.outputSelector.didChange(oldOutput, output) {
        self.storage.output = output
      }
    } else {
      self.oldOutput = output
      self.storage.output = output
    }
  }
}
Similar to our previous function, we begin with an optional print statement in debug builds for product engineers to follow along as Action values are dispatched.
We select our current Output value from Store. If we have already cached a previous Output value, we compare the two and set the new value on our Storage reference — which is Observable — if they changed. This will update our view components that are currently observing this Selector. If this is our first time selecting an Output value, we set the new value on our Storage reference.
Let’s add a new function to update these both together:
//  AsyncListener.swift

extension AsyncListener {
  func update(with store: some ImmutableData.Selector<State>) {
#if DEBUG
    if let label = self.label,
       UserDefaults.standard.isDebug {
      print("[ImmutableUI][AsyncListener]: \(address(of: self)) Update: \(label)")
    }
#endif
    if self.hasDependency {
      if self.updateDependency(with: store) {
        self.updateOutput(with: store)
      }
    } else {
      self.updateOutput(with: store)
    }
  }
}

extension AsyncListener {
  private var hasDependency: Bool {
    isEmpty(repeat each self.dependencySelector) == false
  }
}
If our product engineer provided a set of DependencySelector values, we update our cached set of Dependency values and then update our Output value if those Dependency values have changed. If our product engineer did not provide a set of DependencySelector values, we go ahead and update our Output value.
Our final step is one more function for performing these updates while listening to a stream of values:
//  AsyncListener.swift

extension AsyncListener {
  func listen<S>(
    to stream: S,
    with store: some ImmutableData.Selector<State>
  ) async throws where S : AsyncSequence, S : Sendable, S.Element == (oldState: State, action: Action) {
    if let filter = self.filter {
      for try await _ in stream.filter(filter) {
        self.update(with: store)
      }
    } else {
      for try await _ in stream {
        self.update(with: store)
      }
    }
  }
}
Our listen function takes a stream parameter which adopts AsyncSequence; the Element type returned from this stream is a tuple with a State and an Action. This matches the form of the Element returned by our Streamer protocol from our previous chapter.
If our product engineer provided a Filter closure, we can use the AsyncSequence protocol to filter its elements through this closure. We then call our update function for every element returned by this stream.
That’s all we need for AsyncListener. This type was complex, but will be one of the most important types we need for building a flexible infra that scales to multiple sample product applications. We have two more types to build before our infra is done, but those will be easier and more straight forward.
Our Listener type will act as a helper between our public Selector and our internal AsyncListener. We could have put all of the work from AsyncListener here in Listener, but our code will be a little more readable with this approach.
Add a new Swift file under Sources/ImmutableUI. Name this file Listener.swift.
//  Listener.swift

@MainActor final package class Listener<State, Action, each Dependency, Output> where State : Sendable, Action : Sendable, repeat each Dependency : Sendable, Output : Sendable {
  private var id: AnyHashable?
  private var label: String?
  private var filter: (@Sendable (State, Action) -> Bool)?
  private var dependencySelector: (repeat DependencySelector<State, each Dependency>)
  private var outputSelector: OutputSelector<State, Output>

  private weak var store: AnyObject?
  private var listener: AsyncListener<State, Action, repeat each Dependency, Output>?
  private var task: Task<Void, any Error>?

  package init(
    id: some Hashable,
    label: String? = nil,
    filter isIncluded: (@Sendable (State, Action) -> Bool)? = nil,
    dependencySelector: repeat DependencySelector<State, each Dependency>,
    outputSelector: OutputSelector<State, Output>
  ) {
    self.id = AnyHashable(id)
    self.label = label
    self.filter = isIncluded
    self.dependencySelector = (repeat each dependencySelector)
    self.outputSelector = outputSelector
  }

  package init(
    label: String? = nil,
    filter isIncluded: (@Sendable (State, Action) -> Bool)? = nil,
    dependencySelector: repeat DependencySelector<State, each Dependency>,
    outputSelector: OutputSelector<State, Output>
  ) {
    self.id = nil
    self.label = label
    self.filter = isIncluded
    self.dependencySelector = (repeat each dependencySelector)
    self.outputSelector = outputSelector
  }

  deinit {
    self.task?.cancel()
  }
}
There’s a lot of code, but it’s relatively straight forward. Let’s compare the Listener to AsyncListener:
Both types are generic across these types:
State: The State type defined by our product and ourStore.ActionThe Action type defined by our product and ourStore.Dependency: A parameter pack of types defined by our product.Output: A type defined by our product.
Both types are initialized with these parameters:
label: An optionalStringused for debugging and console logging.filter: An optionalFilterclosure.dependencySelector: A parameter pack ofDependencySelectorvalues (which could be empty).outputSelector: AnOutputSelectorfor displaying data in a view component.
The difference is that our Listener accepts an optional id parameter. We will see in our next steps where this is needed.
Here is the function for delivering an Output value to a view component:
//  Listener.swift

extension Listener {
  package var output: Output {
    guard let output = self.listener?.output else { fatalError("missing output") }
    return output
  }
}
Similar to our approach in AsyncListener, we use a fatalError to indicate a programmer error when our AsyncListener instance has not been created. Our Selector will show us how we can guarantee the listener property has been created before we request output.
Over the course of our app lifecycle, a Listener instance might need to rebuild its AsyncListener instance. For example, a product engineer might decide at runtime that the outputSelector would need to change. We might display a product detail page which selects a Product instance from our State with a productId value. If that productId value changes as the user selects a new product, we need a way to rebuild our AsyncListener: the bug would be if we continue to run our outputSelector with the “stale” productId. Our id property will serve a similar purpose to the id value available to SwiftUI.View.11
Here are two methods to update our Listener if an id has changed:
//  Listener.swift

extension Listener {
  package func update(
    id: some Hashable,
    label: String? = nil,
    filter isIncluded: (@Sendable (State, Action) -> Bool)? = nil,
    dependencySelector: repeat DependencySelector<State, each Dependency>,
    outputSelector: OutputSelector<State, Output>
  ) {
    let id = AnyHashable(id)
    if self.id != id {
      self.id = id
      self.label = label
      self.filter = isIncluded
      self.dependencySelector = (repeat each dependencySelector)
      self.outputSelector = outputSelector
      self.store = nil
    }
  }
}

extension Listener {
  package func update(
    label: String? = nil,
    filter isIncluded: (@Sendable (State, Action) -> Bool)? = nil,
    dependencySelector: repeat DependencySelector<State, each Dependency>,
    outputSelector: OutputSelector<State, Output>
  ) {
    if self.id != nil {
      self.id = nil
      self.label = label
      self.filter = isIncluded
      self.dependencySelector = (repeat each dependencySelector)
      self.outputSelector = outputSelector
      self.store = nil
    }
  }
}
If our id has changed, we then remove the reference to the previous store instance we were listening to. If our id is consistent, no action is taken. We don’t rebuild our AsyncListener instance here; this will be the next step:
//  Listener.swift

import ImmutableData

extension Listener {
  package func listen(to store: some ImmutableData.Selector<State> & ImmutableData.Streamer<State, Action> & AnyObject) {
    if self.store !== store {
      self.store = store

      let listener = AsyncListener<State, Action, repeat each Dependency, Output>(
        label: self.label,
        filter: self.filter,
        dependencySelector: repeat each self.dependencySelector,
        outputSelector: self.outputSelector
      )
      listener.update(with: store)
      self.listener = listener

      let stream = store.makeStream()

      self.task?.cancel()
      self.task = Task {
        try await listener.listen(
          to: stream,
          with: store
        )
      }
    }
  }
}
Our listen function might be called many times over an app lifecycle. If the identity of the store is consistent, we do not need to do any work; we continue listening to the same store.
We pass our optional label, optional filter, dependencySelector, and outputSelector to a new AsyncListener instance and give it our store to set its initial state with update. We then begin a new stream and pass that to our AsyncListener instance in a new Task.
Here’s the final type we need for our infra. Add a new Swift file under Sources/ImmutableUI. Name this file Selector.swift.
//  Selector.swift

import ImmutableData
import SwiftUI

@MainActor @propertyWrapper public struct Selector<Store, each Dependency, Output> where Store : ImmutableData.Selector, Store : ImmutableData.Streamer, Store : AnyObject, repeat each Dependency : Sendable, Output : Sendable {
  @Environment private var store: Store
  @State private var listener: Listener<Store.State, Store.Action, repeat each Dependency, Output>

  private let id: AnyHashable?
  private let label: String?
  private let filter: (@Sendable (Store.State, Store.Action) -> Bool)?
  private let dependencySelector: (repeat DependencySelector<Store.State, each Dependency>)
  private let outputSelector: OutputSelector<Store.State, Output>

  public init(
    _ keyPath: WritableKeyPath<EnvironmentValues, Store>,
    id: some Hashable,
    label: String? = nil,
    filter isIncluded: (@Sendable (Store.State, Store.Action) -> Bool)? = nil,
    dependencySelector: repeat DependencySelector<Store.State, each Dependency>,
    outputSelector: OutputSelector<Store.State, Output>
  ) {
    self._store = Environment(keyPath)
    self.listener = Listener(
      id: id,
      label: label,
      filter: isIncluded,
      dependencySelector: repeat each dependencySelector,
      outputSelector: outputSelector
    )
    self.id = AnyHashable(id)
    self.label = label
    self.filter = isIncluded
    self.dependencySelector = (repeat each dependencySelector)
    self.outputSelector = outputSelector
  }

  public init(
    _ keyPath: WritableKeyPath<EnvironmentValues, Store>,
    label: String? = nil,
    filter isIncluded: (@Sendable (Store.State, Store.Action) -> Bool)? = nil,
    dependencySelector: repeat DependencySelector<Store.State, each Dependency>,
    outputSelector: OutputSelector<Store.State, Output>
  ) {
    self._store = Environment(keyPath)
    self.listener = Listener(
      label: label,
      filter: isIncluded,
      dependencySelector: repeat each dependencySelector,
      outputSelector: outputSelector
    )
    self.id = nil
    self.label = label
    self.filter = isIncluded
    self.dependencySelector = (repeat each dependencySelector)
    self.outputSelector = outputSelector
  }

  public var wrappedValue: Output {
    self.listener.output
  }
}
This code should look very similar to what we built for our Listener type, with the exception of the keyPath parameter for reading a Store from SwiftUI.Environment. Our Selector is a property wrapper; we return the Output from Listener for our wrappedValue.
Selecting an Output value from our Store can be expensive work. SwiftUI view components are intended to be lightweight; the system might create and dispose your view component many times over the course of an app lifecycle. You should always try to avoid performing expensive work when a view component is initialized or a body is computed.12 While the value of the view component might be short-lived, the “lifetime” of the view is tied to its identity.13 By saving our Listener instance as a SwiftUI.State variable, we then tie the lifetime of our Listener instance to the lifetime of the identity of the view. If our Output is an expensive operation — like an O(n log n) sorting operation — we can cache the result of that operation even while the value of our view component is created many times by the system.
This is an important optimization, but then raises a different problem: if the lifetime of our Listener instance is tied to the lifetime of the identity of the view, then how do we update our Listener instance when something changed in how it should compute its Output? Let’s think back to our example of a product detail page which selects a Product instance with a productId. If the user selects a different productId, we want to be sure that our Output now reflects the correct Product instance — not the old one.
We do have the option to set a new id on our view component like we saw from SwiftUI Lab; this would also refresh all the component state, which might not always be what we want.
To offer product engineers flexibility and control, we create a Selector instance with an optional id. As we saw in Listener, changing the id will rerun the Dependency Selectors and Output Selector with the new values from our product engineer.
We’re missing one more step: before a view component is about to compute its body, we want our Selector to make sure the Listener has the current parameters from our product engineer and is ready to return an Output. Similar to an approach from Dave DeLong,14 we use a SwiftUI.DynamicProperty.15 The SwiftUI infra will run our update function before every body is computed. Here is what that looks like for us:
//  Selector.swift

extension Selector: @preconcurrency DynamicProperty {
  public mutating func update() {
    if let id = self.id {
      self.listener.update(
        id: id,
        label: self.label,
        filter: self.filter,
        dependencySelector: repeat each self.dependencySelector,
        outputSelector: self.outputSelector
      )
    } else {
      self.listener.update(
        label: self.label,
        filter: self.filter,
        dependencySelector: repeat each self.dependencySelector,
        outputSelector: self.outputSelector
      )
    }
    self.listener.listen(to: self.store)
  }
}
As of this writing, DynamicProperty is not explicitly isolated to MainActor by SwiftUI. To work around this from Swift 6.0 and compile with Strict Concurrency Checking, we adopt the preconcurrency workaround from [SE-0423]16.
The first step is to pass the current parameters (id, label, filter, dependencySelector, and outputSelector) from our product engineer to our Listener instance. Then, our Listener can listen to our store.
Because SwiftUI guarantees the update will be called before body is computed, we can guarantee that our Listener has already called update and listen before body is computed. This is how we can use fatalError in AsyncListener if Output is missing to indicate a programmer error; Output will never be missing at the time body is being computed.
One future optimization we might be interested in is to reduce the amount of Listener instances that are allocated and disposed. Every Selector instance currently allocates a new Listener instance,17 but these are then disposed if we already have a “long-lived” Listener instance that is tied to the view component identity. Our Listener initializer is lightweight by design; the performance we lose from this approach is a tradeoff we make to keep the code moving forward and simple for the first version of our infra. If the extra object allocations do affect performance in measurable amounts, we always have the option to revisit this code in the future.
Here is our ImmutableUI package, including the tests available on our chapter-02 branch:
ImmutableUI
├── Sources
│   └── ImmutableUI
│       ├── AsyncListener.swift
│       ├── Dispatcher.swift
│       ├── Listener.swift
│       ├── Provider.swift
│       └── Selector.swift
└── Tests
    └── ImmutableUITests
        └── ListenerTests.swift
Our infra is now in-place and we are ready to begin building sample application products. Some of the work we completed so far might seem a little abstract without seeing how product engineers put this to work in a production application. Building three sample application products together from this infra should help to demonstrate how to “think in ImmutableData” when it’s time to bring the ImmutableData architecture to your own products.
-
https://developer.apple.com/documentation/swiftui/environmentvalues/modelcontext ↩
-
https://redux.js.org/usage/deriving-data-selectors#writing-memoized-selectors-with-reselect ↩
-
https://github.com/swiftlang/swift-evolution/blob/main/proposals/0395-observability.md ↩
-
https://github.com/swiftlang/swift-evolution/blob/main/proposals/0393-parameter-packs.md ↩
-
https://github.com/swiftlang/swift-evolution/blob/main/proposals/0398-variadic-types.md ↩
-
https://github.com/swiftlang/swift-evolution/blob/main/proposals/0408-pack-iteration.md ↩
-
https://davedelong.com/blog/2021/04/03/core-data-and-swiftui/ ↩
-
https://developer.apple.com/documentation/swiftui/dynamicproperty ↩
-
https://github.com/swiftlang/swift-evolution/blob/main/proposals/0423-dynamic-actor-isolation.md ↩
-
https://developer.apple.com/documentation/swiftui/state#Store-observable-objects ↩
CounterData
Our ImmutableData and ImmutableUI modules are the “infra” of our project: these are the modules we share across multiple sample application products. These modules make a minimum amount of assumptions and restrictions about what kind of products are built. There’s a lot of power and flexibility with this approach, but the previous chapters might have felt a little abstract without a concrete example of how this is all actually used in production.
Our first sample application product will be simple; it’s the “Hello World” of Redux. Our application is called Counter. All we do is present a UI to increment and decrement an integer.

There’s no network connection and no persistent data storage in our filesystem, but this very simple application will help us see the infra actually being used in a product. Once we have an introduction and build our first product, we will see how the ImmutableData architecture can scale to more complex products.
Our Counter application is inspired by the Counter application for Redux.1
CounterState
Every product we build on the ImmutableData architecture will share the same infra modules. Types like Store are generic across the State that a product engineer defines. Now that we are product engineering, it’s our job to define what State looks like for our product domain.
Let’s have a quick review of a concept introduced earlier. We can think of two “buckets” of state that might describe our application at a moment in time. Local State — or Component State — can be thought of as ephemeral and transient state that reflects details about how our UI is displayed, but not details about the data that is driving that UI. We save Local State locally in our component tree using SwiftUI.State.
Suppose we build an application for displaying a list of contacts. Our list could be very large and our list should support scrolling. The scroll position of our list component would be an example of what we consider Local State. Our list could also support filtering to search for contacts by name. The substring we currently use to search for contacts we consider Local State. Our list could also support sorting by name ascending or descending. Our sort order we consider Local State.
Global State can be thought of as state that reflects the intrinsic data that drives our application. We save Global State globally in our Store.
Suppose our contacts application supports the ability to change the name of a saved contact. We consider the names of our contacts to be Global State. Suppose our contacts application supports the ability to add or delete contacts. We consider the set of all our contacts to be Global State.
There is no “one right way” to distinguish between what should be thought of as Local State and Global State. For the most part, product engineers have the ability to choose what works best for their product domain. We will see plenty of examples of both types of state before our tutorials are complete.
An interesting “thought experiment” for trying to separate these two types of state is what we think of as a “Window Test”. Suppose our contacts application supports multiple windows on macOS. If the user opens two different windows, should those windows display the same contacts? Should the contacts displayed by those windows have consistent names? Should deleting a contact from one window delete the contact from the other window? We consider these to be Global State; these contacts should be saved and shared globally across multiple windows.
Let’s continue with this example. If the user opens two different windows and then scrolls the second window to the last contact in the list, should the first window match the same scroll position? If the user selects the second window and starts to filter for a matching name string, should the first window match to that same name filter? If the user selects the second window and changes the sort order from ascending to descending, should the first window match to that same sort order? We consider these to be Local State; this is transient and ephemeral UI state that is local to one component subgraph.
For our first sample application product, state is going to be very simple. All we need is one integer which can be incremented and decremented. We’ll see much more complex examples in our next sample application products.
Select the CounterData package and add a new Swift file under Sources/CounterData. Name this file CounterState.swift.
Here is our first step:
//  CounterState.swift

public struct CounterState: Sendable {
  package var value: Int

  public init(_ value: Int = 0) {
    self.value = value
  }
}
For all products built from the ImmutableData architecture, we model State as an immutable value type: typically a struct. Any slice of State will also be an immutable value type. Our State types will be complex, but all stored instance properties should map to graphs of value types.
Our CounterState is public because we import this type in our next package. Our value is package because we read this property in our test target. Our value is not public. To read this property in our next package, we define a Selector function. This is a simple function type; our Selector is trivial — we just return the value. A complex product with many subgraphs of components might define many different Selectors. Product Engineers have the ability to define as many Selectors as they might need.
You might be wondering: what if every product defines only one Selector and returns the entire global state to every component? We built our ImmutableUI.Selector to update our component tree with Observable when the selected slice of state changes. As an optimization, we build every component to try and select the smallest slice of state it needs to display its data. If every component selects the entire global state this can lead to slower performance: state updates that do not affect a component lead to a component recomputing its body more times than necessary.2
Here is our Selector function which returns our value to our component tree:
//  CounterState.swift

extension CounterState {
  public static func selectValue() -> @Sendable (Self) -> Int {
    { state in state.value }
  }
}
Our selectValue function takes no parameters and returns a closure. That closure takes a CounterState as a parameter and returns an Int.
The closures returned by our Selectors will always be pure functions: no side effects and no non-deterministic behavior. We also must return synchronously.
This is all we need to build CounterState for our product. This is a very simple product, but think of this as good practice to see this architecture being used before we move on to move complex products.
CounterAction
As previously discussed, a goal with the ImmutableData architecture is to take the experience you have “thinking declaratively” for building graphs of view components and then use that experience to begin thinking declaratively about global state.
In a SwiftUI application using SwiftData, our view component tree uses imperative logic on mutable model objects when it wants to transform global state. SwiftUI encourages you to think of “the what not the how” for building your view component tree. Let’s then think of “the what not the how” for managing our global state.
Our SwiftUI counter application is very simple: an “Increment” button, a “Decrement” button, and a component to display the current value. Let’s start with the Increment Button. What happens when a user taps the Increment Button? In a SwiftData application, we could then perform some imperative logic on a mutable model object. Let’s think about how we would make this more declarative. How would a view component declare to a Store that a user taps the Increment Button? What would this action be called? Suppose you were to just tell me or another person what this action is for. What is the message you want to dispatch when a user taps the Increment Button? Let’s try to brainstorm some ideas about this.
What about IncrementValue? When the user taps the Increment Button, we dispatch the IncrementValue action to a Store. Our view component is no longer performing its own imperative logic, but is instead just passing that imperative logic to the Store in another form. Let’s keep trying new ideas. Our goal right now is to think declaratively. Focus on “the what not the how”. Think of what just happened. Try thinking in the past tense. What just happened?
What about DidIncrementValue? We’re thinking in the past tense, but we’re just moving our imperative logic into the past tense. We’re trying to think declaratively. We’re not trying to “rephrase” our imperative logic. All we are doing is “publishing the news”. What just happened? Why is this action being dispatched? Don’t try and overthink it — just literally try and think of what we tell our Store when the user taps the Increment Button.
What about DidTapIncrementButton? Doesn’t that sound kind of “weird”? Well… it’s not weird; it actually does a great job at telling our Store what just happened: the user just tapped the Increment Button. We shouldn’t be overthinking things when we name this action. On the other hand, your instincts might be telling you this action is not “imperative” enough, or that this action somehow will not do a good job at “communicating” how the Store should behave. Remember, our goal right now is to think declaratively. Our goal is not to communicate the how. Our goal is to communicate the what. What just happened to cause this action to dispatch to our Store? The user just tapped the Increment Button.
From our time spent teaching engineers the Flux and Redux architectures, exercises like what we just completed help work through one of the biggest obstacles we see. Engineers that completely understand how to think declaratively when it’s time to put their view components on screen seem to keep coming back to imperative thinking when it’s time to notify their Store when an important event occurred.
Our experience is that thinking of these actions as a statement in the past tense is one of the tricks to help keep your mind thinking declaratively. One more important trick is to not try and overthink things. Try and literally name your action what just happened: DidTapIncrementButton and DidTapDecrementButton.
Add a new Swift file under Sources/CounterData. Name this file CounterAction.swift.
//  CounterAction.swift

public enum CounterAction : Sendable {
  case didTapIncrementButton
  case didTapDecrementButton
}
Like our State, we model our Action as an immutable value type — not an object. Modeling our Action as an enum helps for building our Reducer functions. You could try and model your Action as a struct, but we very strongly recommend modeling your Action as an enum. If a specific case requires some payload or context to be delivered along with it, we can pass this payload as associated values: we will see many examples of this in our more complex sample application products.
CounterReducer
Let’s review the role of Reducer function types in the ImmutableData architecture:
flowchart LR
  accTitle: Data Flow through Reducers
  accDescr: Our reducer maps from a State and an Action to a new State.
  oldState[State] --> Reducer
  Action --> Reducer
  Reducer --> newState[State]
Just like Redux, our Reducer function types are pure functions without side effects that map a State and an Action to the next State of our system. In SwiftData, the global state of our system can be mutated at any time by any view component in our graph. In the ImmutableData architecture, any and all transformations of global state happen only because of an Action that is dispatched to our Reducer through our Store.
When we built our Action, our goal was to think declaratively. Instead of building Action values that tell our Store how to behave, we build Action values that tell our Store what just happened. Now that we are building a Reducer, this is the appropriate place to think imperatively. Our goal will be to transform the declarative messages from our component tree to imperative logic that returns a new State.
Our first sample application product is very simple; this is by design. The concepts and patterns we see in this chapter demonstrate some of the most important opinions and philosophies in the ImmutableData architecture. Instead of just writing code, take some time to think through what it is we are building. What opinions are we making? How are those opinions different than what you might have experienced working with SwiftData?
Add a new Swift file under Sources/CounterData. Name this file CounterReducer.swift.
//  CounterReducer.swift

public enum CounterReducer {
  @Sendable public static func reduce(
    state: CounterState,
    action: CounterAction
  ) -> CounterState {
    switch action {
    case .didTapIncrementButton:
      var state = state
      state.value += 1
      return state
    case .didTapDecrementButton:
      var state = state
      state.value -= 1
      return state
    }
  }
}
Our reduce function takes two parameters: a CounterState and an CounterAction. We return a new CounterState. This pure function is synchronous, deterministic, and free of side effects.
Modeling our CounterAction as an enum gives us the quick and easy ability to switch over potential Action values. The total set of all Action values can be very large in complex products; we will discuss some strategies in our future chapters to keep these Reducers approachable and organized.
Once we switch over our Action value, we can then define our own imperative logic on every case. This logic transforms the previous state of our system to the next state of our system. In this example, every case maps to one transformation; in practice, is it totally legit for an Action value to “fall through” and result in no transformation. In that situation, we just return the original state. We will see examples of this technique in our next sample application product.
Our reduce function is modeled as a static function on a enum type. Another option would be to model our reduce function as a “standalone” or “free” function outside of any type. We don’t have a very strong opinion here. Our reduce function is stateless by design; it could be modeled as a standalone function. Our convention will be to define our reduce functions on a type, but you can choose a different approach if this is more consistent with style throughout your own projects.
Here is our CounterData package, including the tests available on our chapter-03 branch:
CounterData
├── Sources
│   └── CounterData
│       ├── CounterAction.swift
│       ├── CounterReducer.swift
│       └── CounterState.swift
└── Tests
    └── CounterDataTests
        ├── CounterReducerTests.swift
        └── CounterStateTests.swift
These three types represent the data model layer of our first sample application product. We are ready to build the view component tree in our next steps. Let’s quickly review some important concepts we discussed that will also apply to all products we build on this architecture:
- We model our State as an immutable value type. Our recommendation is to use a
struct. - We model our Action as an immutable value type. Our recommendation is to use an
enum. - We model our Reducer as a stateless and synchronous function with no side effects and no non-deterministic behavior.
Our previous chapters built the infra modules that are shared across sample application products. This chapter was our first experience building code tied to the specific domain of just one product, but we discussed some important opinions and philosophies that we will use throughout our tutorials.
CounterUI
Our Counter sample application product is almost complete. Let’s turn our attention to the SwiftUI view component tree. Let’s review the three components we are going to display for the user: an Increment button, a Decrement button, and a component to display the current value. To display the current value, we will use ImmutableUI.Selector. To mutate the current value, we will dispatch actions using ImmutableUI.Dispatcher. To pass a Store through our component tree, we will use ImmutableUI.Provider.
StoreKey
The components we built in the ImmutableUI module use SwiftUI.Environment to read a Store. What we didn’t define in ImmutableUI is what key path we use to set this Store on SwiftUI.Environment. This decision we left to product engineers. Since we are now product engineers, let’s start by defining a key that will be used across our application to save this Store.
Select the CounterUI package and add a new Swift file under Sources/CounterUI. Name this file StoreKey.swift.
//  StoreKey.swift

import CounterData
import ImmutableData
import ImmutableUI
import SwiftUI

@MainActor fileprivate struct StoreKey : @preconcurrency EnvironmentKey {
  static let defaultValue = ImmutableData.Store(
    initialState: CounterState(),
    reducer: CounterReducer.reduce
  )
}
Our StoreKey adopts EnvironmentKey. Our defaultValue creates a new Store instance with CounterState as the Store.State and CounterAction as the Store.Action.
We are required to provide a defaultValue for EnvironmentKey,1 but our application will provide its own instance through ImmutableUI.Provider. The instance we provide through ImmutableUI.Provider will then be the Store available to ImmutableUI.Selector and ImmutableUI.Dispatcher. If you wish to enforce that the defaultValue is not appropriate to use through ImmutableUI.Selector and ImmutableUI.Dispatcher, you could also choose to pass a custom reduce function that crashes with a fatalError to indicate a programmer error.
To compile from Swift 6.0 and Strict Concurrency Checking, we adopt preconcurrency from [SE-0423]2.
Our next step is an extension on EnvironmentValues:
//  StoreKey.swift

extension EnvironmentValues {
  fileprivate var store: ImmutableData.Store<CounterState, CounterAction> {
    get {
      self[StoreKey.self]
    }
    set {
      self[StoreKey.self] = newValue
    }
  }
}
When building from Xcode 16.0, we have the option to save ourselves some time with the Entry macro. As of this writing, this seems to lead to our defaultValue being created on demand many times over our app lifecycle.3 For now, we build these the old-fashioned way to save our defaultValue as a stored type property: it’s created just once.
We can update our types from our ImmutableUI infra to take advantage of StoreKey. Our ImmutableUI types take an EnvironmentValues key path to a Store as a parameter. As you can imagine, it would be tedious to have to pass the same exact key path in every place we need to call one of these types. Since our product will use the same key path across our application life cycle, we can update the types from ImmutableUI to use this key path without us having to pass it as a parameter. Let’s begin with our ImmutableUI.Provider:
//  StoreKey.swift

extension ImmutableUI.Provider {
  public init(
    _ store: Store,
    @ViewBuilder content: () -> Content
  ) where Store == ImmutableData.Store<CounterState, CounterAction> {
    self.init(
      \.store,
       store,
       content: content
    )
  }
}
This extension on ImmutableUI.Provider adds a new initializer. The original initializer accepts an EnvironmentValues key path as a parameter. Since we defined our StoreKey on the expectation that our application uses this key path everywhere across the component tree, we can define this new initializer that uses our Store key path every time. This also allows us to keep our StoreKey defined as fileprivate while still defining a public initializer on ImmutableUI.Provider that uses our Store key path.
Let’s continue with a new initializer for ImmutableUI.Dispatcher:
//  StoreKey.swift

extension ImmutableUI.Dispatcher {
  public init() where Store == ImmutableData.Store<CounterState, CounterAction> {
    self.init(\.store)
  }
}
Let’s finish with our ImmutableUI.Selector initializers:
//  StoreKey.swift

extension ImmutableUI.Selector {
  public init(
    id: some Hashable,
    label: String? = nil,
    filter isIncluded: (@Sendable (Store.State, Store.Action) -> Bool)? = nil,
    dependencySelector: repeat DependencySelector<Store.State, each Dependency>,
    outputSelector: OutputSelector<Store.State, Output>
  ) where Store == ImmutableData.Store<CounterState, CounterAction> {
    self.init(
      \.store,
       id: id,
       label: label,
       filter: isIncluded,
       dependencySelector: repeat each dependencySelector,
       outputSelector: outputSelector
    )
  }
}

extension ImmutableUI.Selector {
  public init(
    label: String? = nil,
    filter isIncluded: (@Sendable (Store.State, Store.Action) -> Bool)? = nil,
    dependencySelector: repeat DependencySelector<Store.State, each Dependency>,
    outputSelector: OutputSelector<Store.State, Output>
  ) where Store == ImmutableData.Store<CounterState, CounterAction> {
    self.init(
      \.store,
       label: label,
       filter: isIncluded,
       dependencySelector: repeat each dependencySelector,
       outputSelector: outputSelector
    )
  }
}
Each sample application product will be required to provide its own key path to access a Store instance from EnvironmentValues. While we are not required to build these new initializers, this is the convention we follow for our sample application products through this tutorial. You are welcome to follow this convention for your own sample application products.
Dispatch
Our component tree will need to dispatch an Action when the user taps a button. We will use the ImmutableUI.Dispatcher type to dispatch this action. When we built the ImmutableUI.Dispatcher, we returned an opaque ImmutableData.Dispatcher as a wrappedValue. When we built the ImmutableData.Dispatcher protocol, we included a function for dispatching “thunk” closures. We will see in our next sample application product how we use these thunks to dispatch async operations.
While we could use ImmutableUI.Dispatcher to dispatch thunk operations directly from our component tree, we will see that our recommended approach for that will be to use Listeners in our data model layer.
Let’s build a new property wrapper just for our product. This property wrapper will make use of ImmutableUI.Dispatcher, but will only give product engineers the ability to dispatch Action values.
Add a new Swift file under Sources/CounterUI. Name this file Dispatch.swift.
//  Dispatch.swift

import CounterData
import ImmutableData
import ImmutableUI
import SwiftUI

@MainActor @propertyWrapper struct Dispatch : DynamicProperty {
  @ImmutableUI.Dispatcher() private var dispatcher

  init() {

  }

  var wrappedValue: (CounterAction) throws -> () {
    self.dispatcher.dispatch
  }
}
For our wrappedValue, we return the dispatch function from our dispatcher. We do not give product engineers the option to dispatch a thunk operation from components with this type.
Product engineers are not required to build their own Dispatch property wrapper, but we do recommend most product engineers follow this pattern.
Select
Our component tree will need to display the current value. We will use the ImmutableUI.Selector type to select this value from our State. The ImmutableUI.Selector offers a lot of power and flexibility to product engineers to customize the behavior for their product, but all this flexibility might not always be necessary or desirable. A “simpler” API would reduce the friction on product engineers. Let’s see an example of how we can customize the behavior of ImmutableUI.Selector to help improve the developer experience for our product engineers building the Counter application.
The ImmutableUI.DependencySelector and ImmutableUI.OutputSelector give product engineers the ability to define the slices of State they need to be their dependencies and output. These types also offer product engineers the ability to define their own didChange closures for indicating two values have changed. When two Dependency values have changed, we compute a new Output instance. When two Output values have changed, we use Observable to compute a new body in our component.
The ability for product engineers to have control over what logic is used to determine when two Dependency or Output values have changed is very powerful, but can introduce “ceremony” throughout our product. What our product engineers usually want is the ability to define some “default” behavior to save time from writing repetitive boilerplate code. Let’s see how we can build this for our product.
Add a new Swift file under Sources/CounterUI. Name this file Select.swift.
//  Select.swift

import CounterData
import ImmutableData
import ImmutableUI
import SwiftUI

extension ImmutableUI.DependencySelector {
  init(select: @escaping @Sendable (State) -> Dependency) where Dependency : Equatable {
    self.init(select: select, didChange: { $0 != $1 })
  }
}

extension ImmutableUI.OutputSelector {
  init(select: @escaping @Sendable (State) -> Output) where Output : Equatable {
    self.init(select: select, didChange: { $0 != $1 })
  }
}
Our first step is to add some default behavior to ImmutableUI.DependencySelector and ImmutableUI.OutputSelector. These new initializers are available when Dependency and Output adopt Equatable. For this product, we decided that a reasonable default behavior is that we want to use value equality to determine whether or not two values have changed. Rather than require product engineers to pass this value equality operator to every ImmutableUI.DependencySelector and ImmutableUI.OutputSelector, we build two new initializers that pass those value equality operators for us.
Now that we have these new initializers, we can also simplify the initializers on ImmutableUI.Selector:
//  Select.swift

extension ImmutableUI.Selector {
  init(
    id: some Hashable,
    label: String? = nil,
    filter isIncluded: (@Sendable (Store.State, Store.Action) -> Bool)? = nil,
    dependencySelector: repeat @escaping @Sendable (Store.State) -> each Dependency,
    outputSelector: @escaping @Sendable (Store.State) -> Output
  ) where Store == ImmutableData.Store<CounterState, CounterAction>, repeat each Dependency : Equatable, Output : Equatable {
    self.init(
      id: id,
      label: label,
      filter: isIncluded,
      dependencySelector: repeat DependencySelector(select: each dependencySelector),
      outputSelector: OutputSelector(select: outputSelector)
    )
  }
}

extension ImmutableUI.Selector {
  init(
    label: String? = nil,
    filter isIncluded: (@Sendable (Store.State, Store.Action) -> Bool)? = nil,
    dependencySelector: repeat @escaping @Sendable (Store.State) -> each Dependency,
    outputSelector: @escaping @Sendable (Store.State) -> Output
  ) where Store == ImmutableData.Store<CounterState, CounterAction>, repeat each Dependency : Equatable, Output : Equatable {
    self.init(
      label: label,
      filter: isIncluded,
      dependencySelector: repeat DependencySelector(select: each dependencySelector),
      outputSelector: OutputSelector(select: outputSelector)
    )
  }
}
Now, we don’t have to specify a value equality operator when creating a ImmutableUI.Selector instance; our product defines its own default behavior which is appropriate for the domain of this product.
Not every product engineer is going to want to use these defaults; some product engineers might need the flexibility and control of the original initializers. We expect that value equality would be a reasonable default behavior for most product engineers and this is the convention we follow in our sample application products. You are welcome to follow this convention for your own sample application products.
In our previous chapter, we defined the selectValue function to select and return our value from our CounterState. This will be the outputSelector we pass when creating ImmutableUI.Selector for displaying the value in our component tree. In complex products, we might need to display the same slice of State across multiple view component subgraphs. To help make things easier for product engineers and reduce the amount of code that needs to be duplicated, we will define custom Selector types for our products. Each Selector type knows how to select one specific slice of State and return that slice to a view component.
Here is our custom Selector:
//  Select.swift

@MainActor @propertyWrapper struct SelectValue : DynamicProperty {
  @ImmutableUI.Selector(outputSelector: CounterState.selectValue()) var wrappedValue

  init() {

  }
}
Our sample application product will only display value in one place; but this is good practice for us before we move on to more complex products. We will follow this convention throughout our sample application products. We encourage you to follow this convention in your own products.
Our use of custom Selector types serves a similar role as custom hooks in React.4
Content
You might expect that building our view component tree would be a lot of work. The truth is, most of the “heavy lifting” has already been completed; this was by design. For the most part, learning the ImmutableData architecture does not mean learning SwiftUI all over again. Most of our work building component trees will look and feel very familiar to what you already know; this was also by design.
The biggest philosophical difference you must embrace is transforming user events to Action values. This is what we mean by thinking declaratively. Instead of performing an imperative mutation on global state when a button is tapped, we dispatch an Action to our Store.
Let’s start by building our component. Add a new Swift file under Sources/CounterUI. Name this file Content.swift. Here is the declaration:
//  Content.swift

import CounterData
import ImmutableData
import ImmutableUI
import SwiftUI

@MainActor public struct Content {
  @SelectValue private var value

  @Dispatch private var dispatch

  public init() {

  }
}
Our Content uses the property wrappers we built earlier in this chapter. The Dispatch wrapper returns our dispatch function. The SelectValue wrapper returns our value.
Our next step is two helper functions for dispatching Action values:
//  Content.swift

extension Content {
  private func didTapIncrementButton() {
    do {
      try self.dispatch(.didTapIncrementButton)
    } catch {
      print(error)
    }
  }
}

extension Content {
  private func didTapDecrementButton() {
    do {
      try self.dispatch(.didTapDecrementButton)
    } catch {
      print(error)
    }
  }
}
Our dispatch function can throw an error. For this product, we print that error to our console. A discussion on error handling for SwiftUI is orthogonal to our goal of teaching the ImmutableData architecture. In your own products, you might choose to display an alert to the user. For our tutorial, we print to console in the interest of time to keep things concentrated on ImmutableData as much as possible. If you did choose to display an alert to the user, the state to manage that alert could be saved as “component” state using SwiftUI.State; you don’t need to rethink how your global state is built.
Let’s turn our attention to the component tree:
//  Content.swift

extension Content : View {
  public var body: some View {
    VStack {
      Button("Increment") {
        self.didTapIncrementButton()
      }
      Text("Value: \(self.value)")
      Button("Decrement") {
        self.didTapDecrementButton()
      }
    }
    .frame(
      minWidth: 256,
      minHeight: 256
    )
  }
}

#Preview {
  Content()
}
In macOS 15.0, there seems to be a known issue in SwiftUI.Stepper that is causing unexpected behavior when using Observable.5 We can work around this with a custom component.
You can now see this component tree live from Xcode in Preview. This is actually the first time we’ve seen our ImmutableData in action from a live demo. Pretty cool! Tapping the Increment Button dispatches the didTapIncrementButton value to our Store. Tapping the Decrement Button performs the inverse operation and dispatches the didTapDecrementButton value to our Store. Our CounterReducer transforms our CounterState to increment our value. Our component tree is updated when value changes because we built our ImmutableUI.Selector infra on Observable.
The Content component from Preview is using the StoreKey.defaultValue we defined earlier in this chapter. For your products, you might choose to keep StoreKey.defaultValue as a legit option that product engineers can choose to use from Preview. In the products through this tutorial, we will always use Provider to set one Store instance on Environment at the root level of the component tree.
The Preview macro will be very helpful to us as we build our component trees. Let’s see an example of how we can have more control over the Store instance used in Preview.
As we previously discussed, you might choose to pass a Reducer function to your StoreKey.defaultValue instance that crashes with a fatalError to indicate programmer error: product engineers should always use the Store instance that is passed through Provider. Let’s see an example of a Preview that passes a Store through Provider:
//  Content.swift

#Preview {
  @Previewable @State var store = ImmutableData.Store(
    initialState: CounterState(),
    reducer: CounterReducer.reduce
  )

  Provider(store) {
    Content()
  }
}
Our CounterReducer.reduce function does not throw errors, but we still perform a do-catch statement in Content because the ImmutableData.Dispatcher protocol says the dispatch function may choose to throw. Our Content component logs these errors to console, but we can’t see these errors in our app; they don’t exist.
Let’s add a custom Preview just for tracking our error logging:
//  Content.swift

fileprivate struct CounterError : Swift.Error {
  let state: CounterState
  let action: CounterAction
}

#Preview {
  @Previewable @State var store = ImmutableData.Store(
    initialState: CounterState(),
    reducer: { (state: CounterState, action: CounterAction) -> (CounterState) in
      throw CounterError(
        state: state,
        action: action
      )
    }
  )

  Provider(store) {
    Content()
  }
}
Instead of creating a Store instance with CounterReducer.reduce, we define a custom Reducer function that does throw errors. When we run this Preview from Xcode, we can confirm that errors are printed to console when our Button components are tapped.
Passing custom reducers to a Preview can be a legit strategy to improve testability, but our advice is to try and save this technique for special circumstances. For this example, we build a custom Reducer because our production Reducer never throws. We make sure to include a Preview with our production Reducer; we want product engineers to have the ability to test against the same Reducer our users will see in the final product.
Here is our CounterUI package:
CounterUI
└── Sources
    └── CounterUI
        ├── Content.swift
        ├── Dispatch.swift
        ├── Select.swift
        └── StoreKey.swift
Unlike our previous chapters, we don’t have a very strong opinion on unit testing your view component tree built from ImmutableData. We consider unit testing SwiftUI to be orthogonal to our goal of teaching the ImmutableData architecture. For this tutorial, we prefer “integration-style” testing using Preview. If you are interested in learning more about unit testing for SwiftUI, we recommend following Jon Reid and Quality Coding to learn what might be possible for your products.6
-
https://developer.apple.com/documentation/swiftui/environmentkey/ ↩
-
https://github.com/apple/swift-evolution/blob/main/proposals/0423-dynamic-actor-isolation.md ↩
Counter.app
The final step to complete our Counter application is to build a SwiftUI.App entry point.
Select Counter.xcodeproj and open CounterApp.swift. We can delete the original “Hello World” template. Let’s begin by defining our CounterApp type:
//  CounterApp.swift

import CounterData
import CounterUI
import ImmutableData
import ImmutableUI
import SwiftUI

@main @MainActor struct CounterApp {
  @State private var store = Store(
    initialState: CounterState(),
    reducer: CounterReducer.reduce
  )
}
In our previous chapter, we saw that we are required to provide a defaultValue for StoreKey. While you could use this defaultValue as the global state for your application, we strongly recommend creating a Store in your App entry point. In our next sample application products, we also see how this is where we configure our Listeners to manage complex asynchronous operations on behalf of our Store.
Now that we have a Store instance, let’s add a body to complete our application:
//  CounterApp.swift

extension CounterApp : App {
  var body: some Scene {
    WindowGroup {
      Provider(self.store) {
        Content()
      }
    }
  }
}
We deliver our Store instance through our component tree using the Provider type. We don’t have to provide an explicit key path because this is using the extension initializer we defined in our previous chapter.
That should be all we need for now. Go ahead and build and run (⌘ R) and watch our Counter application run on your computer. This window should function like what we saw in the Previews we built in our previous chapter: Our Increment Button and Decrement Button update our Value component. What we didn’t see from Preview was multiple windows. Go ahead and create a new window (⌘ N) to see them both working together. Change the value in the first window and watch it update in the second window.
As previously discussed, we focus our attention in this tutorial on building macOS applications. This saves us some time and keeps us moving forward, but the ImmutableData infra is meant to be multiplatform: any platform where SwiftUI is available. Nothing about CounterApp really needs macOS; we could deploy this app to iOS, iPadOS, tvOS, visionOS, or watchOS. Optimizing SwiftUI applications to display on multiple platforms is an important topic, but is mostly a discussion about presentation of data; this is orthogonal to our main goal: teaching the ImmutableData architecture. We continue to focus on macOS for this tutorial, but we encourage you to deploy ImmutableData to all platforms supported by your product.
This sample application is very simple; all of our state is global state: just an integer value. In our next sample application products, we will see examples of much more complex global states along with examples of local state which we save in our view component tree directly.
Finally, we want to discuss some very important topics for front-end engineering: internationalization, localization, and accessibility. Internationalization and localization is the process of presenting data in formats and languages most appropriate for users.1 Accessibility is the process of presenting data in a way that everyone can understand your product, including people with disabilities that might use assistive technologies.2 Building applications for all users is an important goal, but is mostly a discussion about presentation of data. This can be learned orthogonally to the ImmutableData architecture. We encourage you to explore the resources available from Apple for learning more about these best practices.
AnimalsData
Our Counter application was an introduction to what product engineering looks like when using the ImmutableData architecture. The application was meant to be simple; our goal for presenting this application was to begin to build the “muscle memory” for thinking declaratively.
You’ve seen one example of what ImmutableData looks like as a product engineer, but you might have some important questions about how well an architecture like this scales to complex applications. Our CounterReducer performs all its work synchronously and free of side effects. For an application that saves all of its data in-memory, this might be all we need. Many of us are going to be shipping complex products that must perform asynchronous fetching to query data from a server. Our products might need to save data to a persistent store for it to be available across app launches. These are examples of side effects that should not happen from a Reducer. Our goal for these next chapters will be to learn how to use ImmutableData for products that need to perform asynchronous work and side effects.
Our product will be called Animals. It is a direct clone of the Animals sample application shipped by Apple.1 Go ahead and clone the Apple project repo, build the application, and look around to see the functionality. The Apple project supports multiple platforms, but we are going to focus our attention on macOS.
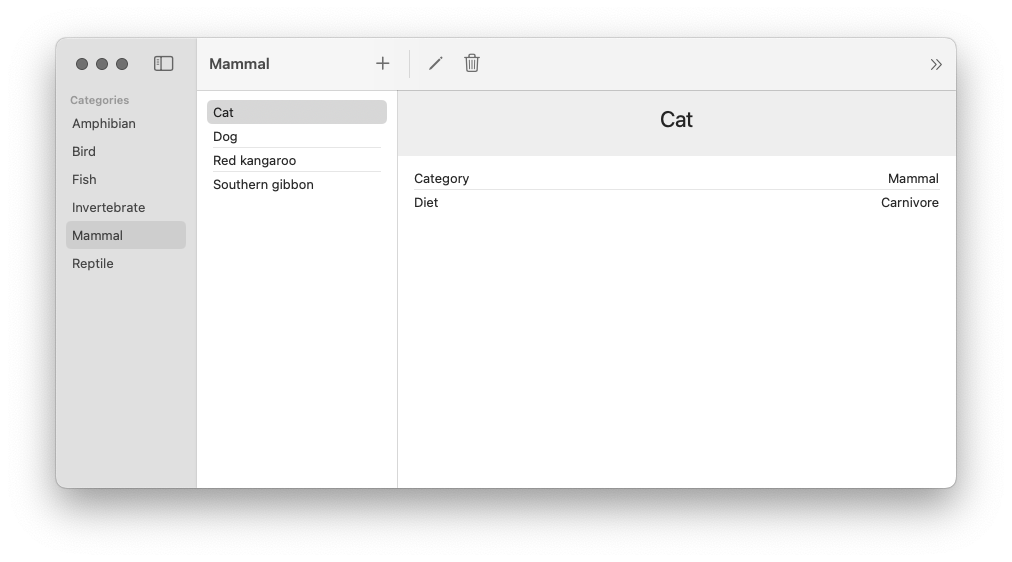
Our Animals product is a catalog of animals and animal categories. The set of all animal category values is fixed, but animals can be added, deleted, and edited. Every animal comes with a name, an animal category, and a diet classification (the diet values are also fixed).
The application loads with a set of sample data. There are the six animal categories and six animals. Selecting a category from the category list displays all animals assigned to that category. Selecting an animal from the list displays an animal detail page with the data for that animal. The animal detail page displays buttons to edit or delete the animal. The toolbar also displays a button to add a new animal and a button to reload the sample data that was displayed when the app was first launched.
The Animals application leverages SwiftUI to display data and SwiftData to persist that data across app launches. Pairing SwiftUI with SwiftData is a very common pattern, so this application is a great example for us to practice using ImmutableData for these more advanced use cases.
Similar to our previous application, we will start with our data layer and our data models. This will also be the layer where we build our support for adding asynchronous side effects when we dispatch Action values to our Reducer. We build a user-interface layer that depends on that data layer to display data. Our final step will be a thin app layer that ties everything together.
Category
There are two basic data model types represented in our state: Animals and Categories. Let’s begin by adding a Category data model. Select the AnimalsData package and add a new Swift file under Sources/AnimalsData. Name this file Category.swift.
//  Category.swift

public struct Category: Hashable, Sendable {
  public let categoryId: String
  public let name: String

  package init(
    categoryId: String,
    name: String
  ) {
    self.categoryId = categoryId
    self.name = name
  }
}

extension Category: Identifiable {
  public var id: String {
    self.categoryId
  }
}
This type is pretty simple: just a categoryId and a name. We conform to Identifiable to indicate the categoryId value represents the unique identifier of this instance. We conform to Hashable for the ability to test for equality and create stable hash values.
Our Category is public for us to use it from different packages (like AnimalsUI). Our init is package to imply instances will only be created from this package. Packages like AnimalsUI should not have the ability to create or mutate these instances directly; we will dispatch Action values through a Reducer to affect changes in our global state.
Similar to the Apple sample project, we want to generate some sample data on the initial app launch. Here are some Category values for that:
//  Category.swift

extension Category {
  public static var amphibian: Self {
    Self(
      categoryId: "Amphibian",
      name: "Amphibian"
    )
  }
  public static var bird: Self {
    Self(
      categoryId: "Bird",
      name: "Bird"
    )
  }
  public static var fish: Self {
    Self(
      categoryId: "Fish",
      name: "Fish"
    )
  }
  public static var invertebrate: Self {
    Self(
      categoryId: "Invertebrate",
      name: "Invertebrate"
    )
  }
  public static var mammal: Self {
    Self(
      categoryId: "Mammal",
      name: "Mammal"
    )
  }
  public static var reptile: Self {
    Self(
      categoryId: "Reptile",
      name: "Reptile"
    )
  }
}
Animal
Let’s add the Animal data model. Add a new Swift file under Sources/AnimalsData. Name this file Animal.swift.
//  Animal.swift

public struct Animal: Hashable, Sendable {
  public let animalId: String
  public let name: String
  public let diet: Diet
  public let categoryId: String

  package init(
    animalId: String,
    name: String,
    diet: Diet,
    categoryId: String
  ) {
    self.animalId = animalId
    self.name = name
    self.diet = diet
    self.categoryId = categoryId
  }
}

extension Animal {
  public enum Diet: String, CaseIterable, Hashable, Sendable {
    case herbivorous = "Herbivore"
    case carnivorous = "Carnivore"
    case omnivorous = "Omnivore"
  }
}

extension Animal: Identifiable {
  public var id: String {
    self.animalId
  }
}
Let’s add the sample data values:
//  Animal.swift

extension Animal {
  public static var dog: Self {
    Self(
      animalId: "Dog",
      name: "Dog",
      diet: .carnivorous,
      categoryId: "Mammal"
    )
  }
  public static var cat: Self {
    Self(
      animalId: "Cat",
      name: "Cat",
      diet: .carnivorous,
      categoryId: "Mammal"
    )
  }
  public static var kangaroo: Self {
    Self(
      animalId: "Kangaroo",
      name: "Red kangaroo",
      diet: .herbivorous,
      categoryId: "Mammal"
    )
  }
  public static var gibbon: Self {
    Self(
      animalId: "Bibbon",
      name: "Southern gibbon",
      diet: .herbivorous,
      categoryId: "Mammal"
    )
  }
  public static var sparrow: Self {
    Self(
      animalId: "Sparrow",
      name: "House sparrow",
      diet: .omnivorous,
      categoryId: "Bird"
    )
  }
  public static var newt: Self {
    Self(
      animalId: "Newt",
      name: "Newt",
      diet: .carnivorous,
      categoryId: "Amphibian"
    )
  }
}
Status
Our AnimalsData module will perform asynchronous operations to persist state to the filesystem in a database. When performing these asynchronous reads and writes, there are opportunities for edge-casey bugs where two different components are attempting to read from or write to the same value. To help defend against this from happening, let’s define a small Status type for marking the progress of our asynchronous operations. Add a new Swift file under Sources/AnimalsData. Name this file Status.swift.
//  Status.swift

public enum Status: Hashable, Sendable {
  case empty
  case waiting
  case success
  case failure(error: String)
}
Consistent with a convention from Redux, we adopt an enum instead of an isLoading boolean value.2 This gives us more flexibility to indicate when an attempted load has succeeded or failed.
AnimalsState
Our Animal and Category types are the basic data models of our product. We still need to define a root State type which will be passed to our Reducer.
Our convention for modeling state will follow a recommended convention from Redux. We “normalize” our data models.3 We conceptualize our root state as “domains” that can be thought of similarly to tables in a database. Each domain saves its data models through key-value pairs. For our product, these slices would be Animals and Categories. Let’s see what this looks like. Add a new Swift file under Sources/AnimalsData. Name this file AnimalsState.swift.
//  AnimalsState.swift

import Foundation

public struct AnimalsState: Hashable, Sendable {
  package var categories: Categories
  package var animals: Animals

  package init(
    categories: Categories,
    animals: Animals
  ) {
    self.categories = categories
    self.animals = animals
  }
}

extension AnimalsState {
  public init() {
    self.init(
      categories: Categories(),
      animals: Animals()
    )
  }
}
Our AnimalsState is public, but the animals and categories are only package. We want these properties exposed to our test target, but our component tree should not be able to directly access the raw data. Following a convention from Redux, our Selectors will expose slices of state to our component tree. Our Selectors are public, but the exact structure of that state remains an opaque implementation detail.4
Let’s add our Categories domain:
//  AnimalsState.swift

extension AnimalsState {
  package struct Categories: Hashable, Sendable {
    package var data: Dictionary<Category.ID, Category> = [:]
    package var status: Status? = nil

    package init(
      data: Dictionary<Category.ID, Category> = [:],
      status: Status? = nil
    ) {
      self.data = data
      self.status = status
    }
  }
}
Our data property is a Dictionary for efficient reading and writing of Category values by a key. Our status property will be used to represent the loading status of our Category values. When an asynchronous operation to read Category values from our persistent database is taking place, this value will be waiting. When our persistent database returns data, this value will be success.
Let’s turn our attention to Animals:
//  AnimalsState.swift

extension AnimalsState {
  package struct Animals: Hashable, Sendable {
    package var data: Dictionary<Animal.ID, Animal> = [:]
    package var status: Status? = nil
    package var queue: Dictionary<Animal.ID, Status> = [:]

    package init(
      data: Dictionary<Animal.ID, Animal> = [:],
      status: Status? = nil,
      queue: Dictionary<Animal.ID, Status> = [:]
    ) {
      self.data = data
      self.status = status
      self.queue = queue
    }
  }
}
Similar to Categories, we define a data property for efficient reading and writing of Animal values by a key and a status property to represent the loading status of our Animal values. Unlike our Category value, our Animal values can be edited and deleted. To save a loading status for specific Animal values, we can define a new queue property.
These two domains are all we need to model the global state of our product. Do these two domains represent the complete state of our product? Our product offers the ability to edit and delete existing animals with a form. We also have the ability to add new animals. Does the state of this form belong in global state? Consistent with the convention from Redux, we choose to model this form data as component state.5 For additional state, we remember our “Window Test”. If our user opens two windows to see their data in two places at once, should a currently selected animal be reflected across both windows? We believe that it would be more appropriately modeled as component state; each window can track its own currently selected animal independently.
We use Dictionary values to map key values to our data models. You might have questions about the performance of this data structure when our application grows very large. Swift Collections (like Dictionary) are copy-on-write data structures; when we copy the data structure and mutate the copy, our data structure copies all n elements. In Chapter 18, we investigate how we can add external dependencies to our module and import specialized data structures for improving CPU and memory usage. In Chapter 19, we benchmark and measure the performance of immutable data structures against SwiftData. For now, we will continue working just with the Standard Library (and Dictionary).
Our next step is to define the public Selectors which select slices of state for displaying in our component tree. The sample application from Apple will be our guide: we clone the functionality. Let’s start by conceptualizing two “buckets” of Selectors: Selectors that operate on our Categories domain and Selectors that operate on our Animals domain. In more complex applications, Selectors might need to aggregate and deliver data across multiple domains all at once; we’re going to try and keep things simple for now while we are still learning.
Let’s begin with our Categories domain. Let’s think through the different operations needed to display data from our Categories domain in our component tree:
SelectCategoriesValues: TheCategoryListdisplaysCategoryvalues in sorted alphabetical order.SelectCategories: We will also define a selector to return theDictionaryof allCategoryvalues without sorting applied; we will see how these two selectors work together to improve the performance of ourCategoryListcomponent.SelectCategoriesStatus: We return the status of our most recent request to fetchCategoryvalues. We will use this to defend against some edge-casey behavior in our component tree and disable certain user events whileCategoryvalues are being fetched.SelectCategory: We return aCategoryvalue for a givenCategory.IDkey. We would also like a selector to return aCategoryvalue for a givenAnimal.IDkey: to return aMammalfor aCat.
We perform similar work for our Animals domain:
SelectAnimalsValues: TheAnimalListcomponent displaysAnimalvalues for a specificCategory.IDvalue in sorted alphabetical order.SelectAnimals: Similar toSelectCategories, we define a Selector to return theDictionaryofAnimalvalues for a specificCategory.IDvalue without sorting applied.SelectAnimalsStatus: Similar toSelectCategoriesStatus, we return the status of our most recent request to fetchAnimalvalues.SelectAnimal: We return aAnimalvalue for a givenAnimal.IDkey.SelectAnimalStatus: UnlikeCategoryvalues,Animalvalues can be edited and deleted. We track aStatusfor eachAnimal.IDvalue with an update pending. We use this value to defend against edge-casey behavior in our component tree where two windows might try to edit the sameAnimalat the same time.
These Selectors might seem a little abstract for now, but these will make more sense once we see them in action in our component tree. We could take a different approach and define these Selectors while we build our component tree. It’s a tradeoff; we prefer this approach for now to keep our focus on building the AnimalsData package before we turn our attention to our component tree.
Let’s begin with the SelectCategories Selector. This one will be one of the more simple Selectors.
//  AnimalsState.swift

extension AnimalsState {
  fileprivate func selectCategories() -> Dictionary<Category.ID, Category> {
    self.categories.data
  }
}

extension AnimalsState {
  public static func selectCategories() -> @Sendable (Self) -> Dictionary<Category.ID, Category> {
    { state in state.selectCategories() }
  }
}
All we need to do here is return the Dictionary representation of our Category graph. The Selector we pass to our Store instance is a static function that takes an AnimalsState instance as a parameter. As a style convention, we define a private helper on our AnimalsState instance to pair with our static Selector. You are welcome to follow this convention in your own products if it helps you keep code simple and organized.
Let’s add SelectCategoriesValues. This is a Selector for returning a sorted array of Category values. There is no “one right way” to design a function that offers sorting; for this product, we will choose an approach consistent with SwiftData.Query.6 We offer the ability to pass a KeyPath and a SortOrder.
//  AnimalsState.swift

extension AnimalsState {
  fileprivate func selectCategoriesValues(
    sort descriptor: SortDescriptor<Category>
  ) -> Array<Category> {
    self.categories.data.values.sorted(using: descriptor)
  }
}

extension AnimalsState {
  fileprivate func selectCategoriesValues(
    sort keyPath: KeyPath<Category, some Comparable> & Sendable,
    order: SortOrder = .forward
  ) -> Array<Category> {
    self.selectCategoriesValues(
      sort: SortDescriptor(
        keyPath,
        order: order
      ))
  }
}

extension AnimalsState {
  public static func selectCategoriesValues(
    sort keyPath: KeyPath<Category, some Comparable> & Sendable,
    order: SortOrder = .forward
  ) -> @Sendable (Self) -> Array<Category> {
    { state in state.selectCategoriesValues(sort: keyPath, order: order) }
  }
}
Here is the SelectCategoriesStatus Selector for returning the status of our most recent fetch.
//  AnimalsState.swift

extension AnimalsState {
  fileprivate func selectCategoriesStatus() -> Status? {
    self.categories.status
  }
}

extension AnimalsState {
  public static func selectCategoriesStatus() -> @Sendable (Self) -> Status? {
    {state in state.selectCategoriesStatus() }
  }
}
For a given Category.ID (which could be nil), we would like a Selector to return the Category value (if it exists). Here is our SelectCategory Selector:
//  AnimalsState.swift

extension AnimalsState {
  fileprivate func selectCategory(categoryId: Category.ID?) -> Category? {
    guard
      let categoryId = categoryId
    else {
      return nil
    }
    return self.categories.data[categoryId]
  }
}

extension AnimalsState {
  public static func selectCategory(categoryId: Category.ID?) -> @Sendable (Self) -> Category? {
    { state in state.selectCategory(categoryId: categoryId) }
  }
}
Is this Selector really necessary? We already built SelectCategories to return all the Category values. Could we return all the Category values in our component tree and then choose our desired Category from that Dictionary? We could… but this could lead to performance problems. We want our component to recompute its body when the data returned by its Selectors changes. If we only care about one Category value, but our component is depending on all Category values, we are missing an opportunity to “scope” down our Selector to depend on only the data needed in that component. Our Category values are constant, but we still follow this convention because it is going to be very important for performance as we build more complex products that depend on state that changes over time.
In addition to returning the Category value for a Category.ID, we would also like an easy way to return the Category value for an Animal.ID.
//  AnimalsState.swift
extension AnimalsState {
  fileprivate func selectCategory(animalId: Animal.ID?) -> Category? {
    guard
      let animalId = animalId,
      let animal = self.animals.data[animalId]
    else {
      return nil
    }
    return self.categories.data[animal.categoryId]
  }
}

extension AnimalsState {
  public static func selectCategory(animalId: Animal.ID?) -> @Sendable (Self) -> Category? {
    { state in state.selectCategory(animalId: animalId) }
  }
}
A legit question a this point would be why we would need an extra Selector to return the Category an Animal belongs to. Why is the Category an Animal belongs to not saved on the Animal itself? One important goal and philosophy to keep in mind is that our infra and patterns for state-management are built from Immutable Data. If every Animal instance saved the Category it belongs to as a property, that Category would be an immutable struct. When multiple Animal instances belong to the same Category, those Animal instances duplicate Category values across multiple places; there is more than one “source of truth”.
In this product, Category values are constant; they do not change over time. While we could probably get away with saving Category values as properties on Animal, you could see how we would run into problems once Category values are no longer constant. When a Category value would update state, we have to update that state across more than one source of truth.
Our preference and convention for this product is to normalize our data models consistent with a convention from Redux.3 Instead of each Animal saving its Category value, each Animal saves only its Category.ID value.
Let’s turn our attention to our Animals domain. Here is our Selector for returning all Animal values belonging to a Category.ID:
//  AnimalsState.swift

extension AnimalsState {
  fileprivate func selectAnimals(categoryId: Category.ID?) -> Dictionary<Animal.ID, Animal> {
    guard
      let categoryId = categoryId
    else {
      return [:]
    }
    return self.animals.data.filter { $0.value.categoryId == categoryId }
  }
}

extension AnimalsState {
  public static func selectAnimals(categoryId: Category.ID?) -> @Sendable (Self) -> Dictionary<Animal.ID, Animal> {
    { state in state.selectAnimals(categoryId: categoryId) }
  }
}
Our SelectAnimals selector performs a filter transformation on our data; we iterate through all our Animal values and return those that match our Category.ID. This operation is linear time. Should we be “caching” these values so we can return them in constant time? Maybe. For the most part, we follow the Redux convention that a filtered set of Animal values is derived state and does not belong stored in our Redux state.7 As we continue building our product, we will see how AnimalsFilter can help reduce the amount of times we perform this operation.
There could be times when the best option is to cache derived data. We are not opposed to this approach, but keep in mind there is going to be additional complexity now that you are potentially duplicating data across multiple sources of truth; when your data updates you are now responsible for correctly keeping that data in-sync across multiple places. Caching derived data is not always going to be the wrong tool, but we believe it should not always be the first tool you reach for.
Let’s add a Selector for returning sorted Animal values.
//  AnimalsState.swift

extension AnimalsState {
  fileprivate func selectAnimalsValues(categoryId: Category.ID?) -> Array<Animal> {
    guard
      let categoryId = categoryId
    else {
      return []
    }
    return self.animals.data.values.filter { $0.categoryId == categoryId }
  }
}

extension AnimalsState {
  fileprivate func selectAnimalsValues(
    categoryId: Category.ID?,
    sort descriptor: SortDescriptor<Animal>
  ) -> Array<Animal> {
    self.selectAnimalsValues(categoryId: categoryId).sorted(using: descriptor)
  }
}

extension AnimalsState {
  fileprivate func selectAnimalsValues(
    categoryId: Category.ID?,
    sort keyPath: KeyPath<Animal, some Comparable> & Sendable,
    order: SortOrder = .forward
  ) -> Array<Animal> {
    self.selectAnimalsValues(
      categoryId: categoryId,
      sort: SortDescriptor(
        keyPath,
        order: order
      ))
  }
}

extension AnimalsState {
  public static func selectAnimalsValues(
    categoryId: Category.ID?,
    sort keyPath: KeyPath<Animal, some Comparable> & Sendable,
    order: SortOrder = .forward
  ) -> @Sendable (Self) -> Array<Animal> {
    { state in state.selectAnimalsValues(
      categoryId: categoryId,
      sort: keyPath,
      order: order
    ) }
  }
}
Similar to our approach for SelectCategoriesValues, we pass a KeyPath and a SortOrder to return sorted Animal values for a Category.ID.
Similar to SelectCategoriesStatus, we define a Selector to return the status of our most recent request to fetch Animal values. We will use this value to control around any user events that might lead to edge-casey behavior if we should not be performing this event before a request has completed.
//  AnimalsState.swift

extension AnimalsState {
  fileprivate func selectAnimalsStatus() -> Status? {
    self.animals.status
  }
}

extension AnimalsState {
  public static func selectAnimalsStatus() -> @Sendable (Self) -> Status? {
    {state in state.selectAnimalsStatus() }
  }
}
Let’s add a Selector for returning a Animal value for a given Animal.ID:
//  AnimalsState.swift

extension AnimalsState {
  fileprivate func selectAnimal(animalId: Animal.ID?) -> Animal? {
    guard
      let animalId = animalId
    else {
      return nil
    }
    return self.animals.data[animalId]
  }
}

extension AnimalsState {
  public static func selectAnimal(animalId: Animal.ID?) -> @Sendable (Self) -> Animal? {
    { state in state.selectAnimal(animalId: animalId) }
  }
}
Our last Selector returns a Status value for a given Animal.ID. We will use this to track when an Animal value might be waiting for a mutation; this value can be used in our component tree to prevent an edit from taking place while we are already trying to edit that same Animal value from another component.
//  AnimalsState.swift

extension AnimalsState {
  fileprivate func selectAnimalStatus(animalId: Animal.ID?) -> Status? {
    guard
      let animalId = animalId
    else {
      return nil
    }
    return self.animals.queue[animalId]
  }
}

extension AnimalsState {
  public static func selectAnimalStatus(animalId: Animal.ID?) -> @Sendable (Self) -> Status? {
    {state in state.selectAnimalStatus(animalId: animalId) }
  }
}
These Selectors are public and deliver the data and state we need to display in our component tree. We wrote a lot of code, but we also learned some important things along the way that will help us when we build Selectors for more complex products.
AnimalsAction
We learned some important lessons while building CounterAction. In that chapter, our action values represented user events from our component tree. Those user events were received by our Reducer, which mapped those user events to transformations on our State. The ImmutableData architecture requires that Reducer functions are synchronous and free of side effects. Let’s see how we build Action values when our product will perform work that is asynchronous.
Let’s build and run the existing Animals sample app from Apple. Let’s run through the functionality and sketch out the user events we can document taking place from our component tree. Let’s think carefully and document only the user events that should affect our global state; events that should only affect local component state may be omitted.
- The
CategoryListcomponent displays a button to reload the sample data from first launch. - The
AnimalListcomponent allows swiping on an Animal to delete. The option to delete a selected Animal is also available from the Menu Bar. - The
AnimalDetailcomponent displays a button to delete the selected Animal. - The
AnimalEditordisplays a button to either edit an existing Animal or save a new Animal.
This is not a complete set of all user events — just the user events that should affect our global state. The AnimalDetail component displays a button to present the AnimalEditor component. This is an example of local component state; we choose to save this state at our component level — not in ImmutableData.
There are two more subtle user events. When our CategoryList will be displayed, we want to fetch our Categories. When our AnimalList will be displayed, we want to fetch our Animals. We choose to transform our global state for efficiency and performance. A user can launch our product and open multiple windows on their macOS desktop. If every window performed an independent fetch, we would be fetching the same data multiple times. Transforming global state means we can keep track of our most recent fetch and prevent unnecessary fetches from consuming system resources.
These Action values tell one side of our story: user events coming from our component tree. There is one more domain we want to support: data events coming from our persistent store. This product will need to support asynchronous operations to save its global state to a persistent store on our filesystem. We’re going to pass operations to our persistent store, wait for a response, and then dispatch an Action value back to our Reducer. In the same way that our “User Interface” domain was for action values that came from our component tree, our “Data” domain is for action values that come from our persistent store. Before we complete this chapter, we will see exactly how User Events are transformed into Data Events. For now, let’s concentrate on just defining what action values our persistent store would need to dispatch to our Reducer.
- The
Categoryvalues were fetched. - The
Animalvalues were fetched. - The Sample Data from first launch was reloaded and the previously stored data was deleted.
- An
Animalvalue was added. - An
Animalvalue was updated. - An
Animalvalue was deleted.
Let’s put these together and see what our Action values look like. Add a new Swift file under Sources/AnimalsData. Name this file AnimalsAction.swift.
Before we start writing code, let’s think a little about our approach to naming these actions. Remember: our goal is to think declaratively. These action values tell our Reducer what just happened — not how it should behave. One convention we adopt in this tutorial is to name our Action values by where they came from. An action from the UI domain indicating that the Category List will be displayed could be named: uiCategoryListOnAppear. This works, but let’s try a slightly different approach. We’re going to model our Action values not as “one big” enum type, but as a set of “nested” enum types. When we build our Reducer, we can see how pattern-matching against these enum types enables a natural pattern of composition to keep code organized.
Let’s start with our domains and then work down to specific actions:
//  AnimalsAction.swift

public enum AnimalsAction: Hashable, Sendable {
  case ui(_ action: UI)
  case data(_ action: Data)
}
Our UI domain will be for action values coming from our component tree. Our Data domain will be for action values coming from our persistent store.
Let’s start with our UI domain. We define four sub-domains under UI: these map to four components.
//  AnimalsAction.swift

extension AnimalsAction {
  public enum UI: Hashable, Sendable {
    case categoryList(_ action: CategoryList)
    case animalList(_ action: AnimalList)
    case animalDetail(_ action: AnimalDetail)
    case animalEditor(_ action: AnimalEditor)
  }
}
Under the UI.CategoryList domain, we define two actions: the action for when the component will be displayed, and the action for when the user confirms to reload sample data:
//  AnimalsAction.swift

extension AnimalsAction.UI {
  public enum CategoryList: Hashable, Sendable {
    case onAppear
    case onTapReloadSampleDataButton
  }
}
Under the UI.AnimalList domain, we define two actions: the action for when the component will be displayed, and the action for when the user confirms to delete an Animal.
//  AnimalsAction.swift

extension AnimalsAction.UI {
  public enum AnimalList: Hashable, Sendable {
    case onAppear
    case onTapDeleteSelectedAnimalButton(animalId: Animal.ID)
  }
}
The onTapDeleteSelectedAnimalButton passes an Animal.ID as an associated value; without this value, our Reducer would not know which Animal the user just attempted to delete. Associated values can be important tools for passing critical information to your Reducer, but take care to keep these “clean” and avoid passing data that is not necessary to process your action.
Under the UI.AnimalDetail domain, we define one action: the action for when the user confirms to delete an Animal.
//  AnimalsAction.swift

extension AnimalsAction.UI {
  public enum AnimalDetail: Hashable, Sendable {
    case onTapDeleteSelectedAnimalButton(animalId: Animal.ID)
  }
}
Under the UI.AnimalEditor domain, we define two actions: the action for when the user confirms to add an Animal, and the action for when the user confirms to update an Animal:
//  AnimalsAction.swift

extension AnimalsAction.UI {
  public enum AnimalEditor: Hashable, Sendable {
    case onTapAddAnimalButton(
      id: Animal.ID,
      name: String,
      diet: Animal.Diet,
      categoryId: Category.ID
    )
    case onTapUpdateAnimalButton(
      animalId: Animal.ID,
      name: String,
      diet: Animal.Diet,
      categoryId: Category.ID
    )
  }
}
Let’s turn our attention to our Data domain. We will define a PersistentSession sub-domain to indicate these actions are from events in the session we use to manage our persistent store:
//  AnimalsAction.swift

extension AnimalsAction {
  public enum Data: Hashable, Sendable {
    case persistentSession(_ action: PersistentSession)
  }
}
Here are the six action values we define under Data.PersistentSession:
//  AnimalsAction.swift

extension AnimalsAction.Data {
  public enum PersistentSession: Hashable, Sendable {
    case didFetchCategories(result: FetchCategoriesResult)
    case didFetchAnimals(result: FetchAnimalsResult)
    case didReloadSampleData(result: ReloadSampleDataResult)
    case didAddAnimal(
      id: Animal.ID,
      result: AddAnimalResult
    )
    case didUpdateAnimal(
      animalId: Animal.ID,
      result: UpdateAnimalResult
    )
    case didDeleteAnimal(
      animalId: Animal.ID,
      result: DeleteAnimalResult
    )
  }
}
For every asynchronous operation on our persistent store, we assume that the operation could either succeed or fail. Our associated values will contain valid data when our operation succeeds or an error string when our operation fails. Here are those result types:
//  AnimalsAction.swift

extension AnimalsAction.Data.PersistentSession {
  public enum FetchCategoriesResult: Hashable, Sendable {
    case success(categories: Array<Category>)
    case failure(error: String)
  }
}

extension AnimalsAction.Data.PersistentSession {
  public enum FetchAnimalsResult: Hashable, Sendable {
    case success(animals: Array<Animal>)
    case failure(error: String)
  }
}

extension AnimalsAction.Data.PersistentSession {
  public enum ReloadSampleDataResult: Hashable, Sendable {
    case success(
      animals: Array<Animal>,
      categories: Array<Category>
    )
    case failure(error: String)
  }
}

extension AnimalsAction.Data.PersistentSession {
  public enum AddAnimalResult: Hashable, Sendable {
    case success(animal: Animal)
    case failure(error: String)
  }
}

extension AnimalsAction.Data.PersistentSession {
  public enum UpdateAnimalResult: Hashable, Sendable {
    case success(animal: Animal)
    case failure(error: String)
  }
}

extension AnimalsAction.Data.PersistentSession {
  public enum DeleteAnimalResult: Hashable, Sendable {
    case success(animal: Animal)
    case failure(error: String)
  }
}
An alternative approach would be to use [Swift.Result]8 instead of custom types. We build custom types as a convention for our sample products, but we don’t have a very strong opinion about what would be best for your own products; if you prefer to use Swift.Result, you can use Swift.Result. We also take a very “lightweight” approach to error handling in these sample products: our error is just a String value. At production scale, error reporting would probably need to add extra payloads and context for improved debugging.
PersistentSession
Let’s turn our attention to building support for asynchronous operations. Our Animals product will perform asynchronous operations to persist state to the filesystem in a database. We model these operations as thunks.9 Let’s begin with a quick review: here is our Dispatcher protocol from our ImmutableData package:
//  Dispatcher.swift

public protocol Dispatcher<State, Action> : Sendable {
  associatedtype State : Sendable
  associatedtype Action : Sendable
  associatedtype Dispatcher : ImmutableData.Dispatcher<Self.State, Self.Action>
  associatedtype Selector : ImmutableData.Selector<Self.State>

  @MainActor func dispatch(action: Action) throws
  @MainActor func dispatch(thunk: @Sendable (Self.Dispatcher, Self.Selector) throws -> Void) rethrows
  @MainActor func dispatch(thunk: @Sendable (Self.Dispatcher, Self.Selector) async throws -> Void) async rethrows
}
Our dispatch function supports passing thunk closures. These closures take two arguments: a Dispatcher and a Selector. We will see these closures in action when we build our asynchronous operations to persist state. Let’s begin with a type to return these thunk closures. Add a new Swift file under Sources/AnimalsData. Name this file PersistentSession.swift. Here is the first step:
//  PersistentSession.swift

import ImmutableData

public protocol PersistentSessionPersistentStore: Sendable {
  func fetchAnimalsQuery() async throws -> Array<Animal>
  func addAnimalMutation(
    name: String,
    diet: Animal.Diet,
    categoryId: String
  ) async throws -> Animal
  func updateAnimalMutation(
    animalId: String,
    name: String,
    diet: Animal.Diet,
    categoryId: String
  ) async throws -> Animal
  func deleteAnimalMutation(animalId: String) async throws -> Animal
  func fetchCategoriesQuery() async throws -> Array<Category>
  func reloadSampleDataMutation() async throws -> (
    animals: Array<Animal>,
    categories: Array<Category>
  )
}

final actor PersistentSession<PersistentStore> where PersistentStore : PersistentSessionPersistentStore {
  private let store: PersistentStore

  init(store: PersistentStore) {
    self.store = store
  }
}
Our PersistentSession is an actor; this means that we can perform serialized asynchronous operations and deliver thunk closures which are Sendable. We create our PersistentSession instance with a PersistentStore, which is a type that conforms to the PersistentSessionPersistentStore protocol. Our PersistentSessionPersistentStore protocol defines the six operations (two queries and four mutations) we need to perform to keep our state persisted.
Let’s build our first thunk. We begin with fetchAnimalsQuery. This is a thunk that performs an asynchronous fetch from our PersistentStore to fetch an Array of Animal instances.
//  PersistentSession.swift

extension PersistentSession {
  func fetchAnimalsQuery<Dispatcher, Selector>() -> @Sendable (
    Dispatcher,
    Selector
  ) async throws -> Void where Dispatcher : ImmutableData.Dispatcher<AnimalsState, AnimalsAction>, Selector : ImmutableData.Selector<AnimalsState> {
    { dispatcher, selector in
      try await self.fetchAnimalsQuery(
        dispatcher: dispatcher,
        selector: selector
      )
    }
  }
}

extension PersistentSession {
  private func fetchAnimalsQuery(
    dispatcher: some ImmutableData.Dispatcher<AnimalsState, AnimalsAction>,
    selector: some ImmutableData.Selector<AnimalsState>
  ) async throws {
    let animals = try await {
      do {
        return try await self.store.fetchAnimalsQuery()
      } catch {
        try await dispatcher.dispatch(
          action: .data(
            .persistentSession(
              .didFetchAnimals(
                result: .failure(
                  error: error.localizedDescription
                )
              )
            )
          )
        )
        throw error
      }
    }()
    try await dispatcher.dispatch(
      action: .data(
        .persistentSession(
          .didFetchAnimals(
            result: .success(
              animals: animals
            )
          )
        )
      )
    )
  }
}
This might look like a lot of code, but it’s not so difficult if we break things down step-by-step:
- We attempt to run the
fetchAnimalsQueryoperation from ourPersistentStoreinstance. - If the
fetchAnimalsQueryoperation fails, we dispatch afailureaction value to ourdispatcher. In this product, we take a short-cut with our error handling: we only save thelocalizedDescriptionstring value. In a legit production application, this would be an opportunity to pass extra context that would be important for debugging this error at runtime. - If the
fetchAnimalsQueryoperation succeeds, we dispatch asuccessaction value to ourdispatcherwith theArrayofAnimalvalues as an associated value payload.
The closure returned by fetchAnimalsQuery is passed to our Dispatcher. We will see this in our next section when we build our Listener class.
Let’s see a more complex example. Our addAnimalMutation will accept four parameters:
//  PersistentSession.swift

extension PersistentSession {
  func addAnimalMutation<Dispatcher, Selector>(
    id: String,
    name: String,
    diet: Animal.Diet,
    categoryId: String
  ) -> @Sendable (
    Dispatcher,
    Selector
  ) async throws -> Void where Dispatcher : ImmutableData.Dispatcher<AnimalsState, AnimalsAction>, Selector : ImmutableData.Selector<AnimalsState> {
    { dispatcher, selector in
      try await self.addAnimalMutation(
        dispatcher: dispatcher,
        selector: selector,
        id: id,
        name: name,
        diet: diet,
        categoryId: categoryId
      )
    }
  }
}

extension PersistentSession {
  private func addAnimalMutation(
    dispatcher: some ImmutableData.Dispatcher<AnimalsState, AnimalsAction>,
    selector: some ImmutableData.Selector<AnimalsState>,
    id: String,
    name: String,
    diet: Animal.Diet,
    categoryId: String
  ) async throws {
    let animal = try await {
      do {
        return try await self.store.addAnimalMutation(
          name: name,
          diet: diet,
          categoryId: categoryId
        )
      } catch {
        try await dispatcher.dispatch(
          action: .data(
            .persistentSession(
              .didAddAnimal(
                id: id,
                result: .failure(
                  error: error.localizedDescription
                )
              )
            )
          )
        )
        throw error
      }
    }()
    try await dispatcher.dispatch(
      action: .data(
        .persistentSession(
          .didAddAnimal(
            id: id,
            result: .success(
              animal: animal
            )
          )
        )
      )
    )
  }
}
It looks like a lot of code, but let’s try and break things down step-by-step:
- The
addAnimalMutationthat isprivateis a helper. It accepts six parameters: aDispatcher, aSelector, and the four parameters passed from our component tree (id,name,diet, andcategoryId). We attempt to run theaddAnimalMutationoperation from ourPersistentStoreinstance withname,diet, andcategoryIdas parameters to the mutation. Theidpassed from our component tree is actually a “temp” id. We keep this for tracking a loading status. Our actual persistent store will be responsible for building its ownidproperty on this newAnimalinstance. - If the
addAnimalMutationoperation from ourPersistentStoreinstance fails, we dispatch afailureaction value to ourdispatcherwith theidanderror.localizedDescriptionas associated values. - If the
addAnimalMutationoperation succeeds, we dispatch asuccessaction value to ourdispatcherwith theidandAnimalvalue as associated values. - The
addAnimalMutationthat isinternalaccepts the four parameters passed from our component tree (id,name,diet, andcategoryId) and returns a closure that accepts two parameters: aDispatcher, aSelector. This closure can then be passed to ourDispatcher.
This functional style of programming — where functions return functions — is very common in Redux. The argument could be made that Swift is not a “true” functional programming language,10 but neither would be JavaScript. Like the original engineers behind React and Flux, we can bring ideas and concepts from functional programming to our preferred domain — even if our language is “multi-paradigm” and not exclusively functional.
Let’s continue with updateAnimalMutation:
//  PersistentSession.swift

extension PersistentSession {
  func updateAnimalMutation<Dispatcher, Selector>(
    animalId: String,
    name: String,
    diet: Animal.Diet,
    categoryId: String
  ) -> @Sendable (
    Dispatcher,
    Selector
  ) async throws -> Void where Dispatcher : ImmutableData.Dispatcher<AnimalsState, AnimalsAction>, Selector : ImmutableData.Selector<AnimalsState> {
    { dispatcher, selector in
      try await self.updateAnimalMutation(
        dispatcher: dispatcher,
        selector: selector,
        animalId: animalId,
        name: name,
        diet: diet,
        categoryId: categoryId
      )
    }
  }
}

extension PersistentSession {
  private func updateAnimalMutation(
    dispatcher: some ImmutableData.Dispatcher<AnimalsState, AnimalsAction>,
    selector: some ImmutableData.Selector<AnimalsState>,
    animalId: String,
    name: String,
    diet: Animal.Diet,
    categoryId: String
  ) async throws {
    let animal = try await {
      do {
        return try await self.store.updateAnimalMutation(
          animalId: animalId,
          name: name,
          diet: diet,
          categoryId: categoryId
        )
      } catch {
        try await dispatcher.dispatch(
          action: .data(
            .persistentSession(
              .didUpdateAnimal(
                animalId: animalId,
                result: .failure(
                  error: error.localizedDescription
                )
              )
            )
          )
        )
        throw error
      }
    }()
    try await dispatcher.dispatch(
      action: .data(
        .persistentSession(
          .didUpdateAnimal(
            animalId: animalId,
            result: .success(
              animal: animal
            )
          )
        )
      )
    )
  }
}
This should look familiar: we pass four parameters to our PersistentStore to update an Animal in our database. We dispatch a failure action when an error is thrown and we dispatch a success action when our updated Animal is returned.
Here is deleteAnimalMutation:
//  PersistentSession.swift

extension PersistentSession {
  func deleteAnimalMutation<Dispatcher, Selector>(
    animalId: String
  ) -> @Sendable (
    Dispatcher,
    Selector
  ) async throws -> Void where Dispatcher : ImmutableData.Dispatcher<AnimalsState, AnimalsAction>, Selector : ImmutableData.Selector<AnimalsState> {
    { dispatcher, selector in
      try await self.deleteAnimalMutation(
        dispatcher: dispatcher,
        selector: selector,
        animalId: animalId
      )
    }
  }
}

extension PersistentSession {
  private func deleteAnimalMutation(
    dispatcher: some ImmutableData.Dispatcher<AnimalsState, AnimalsAction>,
    selector: some ImmutableData.Selector<AnimalsState>,
    animalId: String
  ) async throws {
    let animal = try await {
      do {
        return try await self.store.deleteAnimalMutation(
          animalId: animalId
        )
      } catch {
        try await dispatcher.dispatch(
          action: .data(
            .persistentSession(
              .didDeleteAnimal(
                animalId: animalId,
                result: .failure(
                  error: error.localizedDescription
                )
              )
            )
          )
        )
        throw error
      }
    }()
    try await dispatcher.dispatch(
      action: .data(
        .persistentSession(
          .didDeleteAnimal(
            animalId: animalId,
            result: .success(
              animal: animal
            )
          )
        )
      )
    )
  }
}
Again, this looks like a lot of code, but we can think through things step-by-step. We await an operation on our PersistentStore database. We then dispatch a failure action when an error is thrown and we dispatch a success action when our Animal is deleted.
Here is fetchCategoriesQuery:
//  PersistentSession.swift

extension PersistentSession {
  func fetchCategoriesQuery<Dispatcher, Selector>() -> @Sendable (
    Dispatcher,
    Selector
  ) async throws -> Void where Dispatcher : ImmutableData.Dispatcher<AnimalsState, AnimalsAction>, Selector : ImmutableData.Selector<AnimalsState> {
    { dispatcher, selector in
      try await self.fetchCategoriesQuery(
        dispatcher: dispatcher,
        selector: selector
      )
    }
  }
}

extension PersistentSession {
  private func fetchCategoriesQuery(
    dispatcher: some ImmutableData.Dispatcher<AnimalsState, AnimalsAction>,
    selector: some ImmutableData.Selector<AnimalsState>
  ) async throws {
    let categories = try await {
      do {
        return try await self.store.fetchCategoriesQuery()
      } catch {
        try await dispatcher.dispatch(
          action: .data(
            .persistentSession(
              .didFetchCategories(
                result: .failure(
                  error: error.localizedDescription
                )
              )
            )
          )
        )
        throw error
      }
    }()
    try await dispatcher.dispatch(
      action: .data(
        .persistentSession(
          .didFetchCategories(
            result: .success(
              categories: categories
            )
          )
        )
      )
    )
  }
}
Here is reloadSampleDataMutation:
//  PersistentSession.swift

extension PersistentSession {
  func reloadSampleDataMutation<Dispatcher, Selector>() -> @Sendable (
    Dispatcher,
    Selector
  ) async throws -> Void where Dispatcher : ImmutableData.Dispatcher<AnimalsState, AnimalsAction>, Selector : ImmutableData.Selector<AnimalsState> {
    { dispatcher, selector in
      try await self.reloadSampleDataMutation(
        dispatcher: dispatcher,
        selector: selector
      )
    }
  }
}

extension PersistentSession {
  private func reloadSampleDataMutation(
    dispatcher: some ImmutableData.Dispatcher<AnimalsState, AnimalsAction>,
    selector: some ImmutableData.Selector<AnimalsState>
  ) async throws {
    let (animals, categories) = try await {
      do {
        return try await self.store.reloadSampleDataMutation()
      } catch {
        try await dispatcher.dispatch(
          action: .data(
            .persistentSession(
              .didReloadSampleData(
                result: .failure(
                  error: error.localizedDescription
                )
              )
            )
          )
        )
        throw error
      }
    }()
    try await dispatcher.dispatch(
      action: .data(
        .persistentSession(
          .didReloadSampleData(
            result: .success(
              animals: animals,
              categories: categories
            )
          )
        )
      )
    )
  }
}
We did write a fair amount of code, but we see that these functions are not as complex as they might seem. Our PersistentSession actor builds the thunk functions we need to pass to our Dispatcher. At this point, our PersistentSession does not know much about the implementation details of our PersistentStore type; this dependency is generic by design. We’ll come back to this later and build a concrete PersistentStore type before our chapter is complete.
Listener
When we built ImmutableUI.Listener, we created a type that could perform work when Action values were dispatched to our Store. We’re going to see what a Listener looks like for a product domain. This Listener type will be specific to our product; it will know about Animal and Category and the specific domain this product is built on. When actions are dispatched to our Store, we will then use our Listener — together with our PersistentSession — to perform asynchronous operations. Our Listener receives Action values after our Reducer has returned; but we can think of these two types “working together” to affect State transformations in our product. When an Action value is dispatched to our Store, our Reducer synchronously performs transformations on State. Our Listener then has the opportunity to use that Action value to begin asynchronous operations, which could then dispatch new Action values that affect more transformations on State.
Let’s see this in action. Add a new Swift file under Sources/AnimalsData. Name this file Listener.swift. Here is our main declaration:
//  Listener.swift

import Foundation
import ImmutableData

@MainActor final public class Listener<PersistentStore> where PersistentStore : PersistentSessionPersistentStore {
  private let session: PersistentSession<PersistentStore>

  private weak var store: AnyObject?
  private var task: Task<Void, any Error>?

  public init(store: PersistentStore) {
    self.session = PersistentSession(store: store)
  }

  deinit {
    self.task?.cancel()
  }
}
Our Listener class accepts a PersistentStore instance on creation. We save a PersistentSession as an instance property created from the PersistentStore parameter. Our Listener will begin listening to an ImmutableData.Streamer. We make our Listener a MainActor type to match the declarations on ImmutableData.Streamer.
Here is our declaration to begin listening for Action values:
//  Listener.swift

extension UserDefaults {
  fileprivate var isDebug: Bool {
    self.bool(forKey: "com.northbronson.AnimalsData.Debug")
  }
}

extension Listener {
  public func listen(to store: some ImmutableData.Dispatcher<AnimalsState, AnimalsAction> & ImmutableData.Selector<AnimalsState> & ImmutableData.Streamer<AnimalsState, AnimalsAction> & AnyObject) {
    if self.store !== store {
      self.store = store

      let stream = store.makeStream()

      self.task?.cancel()
      self.task = Task { [weak self] in
        for try await (oldState, action) in stream {
#if DEBUG
          if UserDefaults.standard.isDebug {
            print("[AnimalsData][Listener] Old State: \(oldState)")
            print("[AnimalsData][Listener] Action: \(action)")
            print("[AnimalsData][Listener] New State: \(store.state)")
          }
#endif
          guard let self = self else { return }
          await self.onReceive(from: store, oldState: oldState, action: action)
        }
      }
    }
  }
}
Our listen function takes a Store as a parameter. This Store is generic and adopts the important protocols we need to support our Listener. We save the Store to an instance property and begin a stream. We then save a task to an instance property and begin to await on that stream. The stream returns tuple values: a State indicating the previous state of our system and an Action indicating the Action that was just dispatched.
To share information for debugging, we add optional print statements in debug builds. Being able to see the previous and current states of our system on every Action value can be important when trying to debug unexpected behaviors in our product. Similar to ImmutableUI.AsyncListener, we add a custom key on UserDefaults for enabling this logging.
We then forward the store, the oldState, and the action to a new function. Here’s what that looks like:
//  Listener.swift

extension Listener {
  private func onReceive(
    from store: some ImmutableData.Dispatcher<AnimalsState, AnimalsAction> & ImmutableData.Selector<AnimalsState>,
    oldState: AnimalsState,
    action: AnimalsAction
  ) async {
    switch action {
    case .ui(action: let action):
      await self.onReceive(from: store, oldState: oldState, action: action)
    default:
      break
    }
  }
}
For our Listener, we don’t need to perform asynchronous operations when our PersistentSession dispatches Action values; it’s the other way around. When our component tree dispatches Action values, we read those values — after our Reducer has returned — and then begin our asynchronous operations on PersistentSession.
We can break over all the Action values that are not from the AnimalsAction.UI domain. For now, we only care about acting on the values from AnimalsAction.UI. Here is our next function:
//  Listener.swift

extension Listener {
  private func onReceive(
    from store: some ImmutableData.Dispatcher<AnimalsState, AnimalsAction> & ImmutableData.Selector<AnimalsState>,
    oldState: AnimalsState,
    action: AnimalsAction.UI
  ) async {
    switch action {
    case .categoryList(action: let action):
      await self.onReceive(from: store, oldState: oldState, action: action)
    case .animalList(action: let action):
      await self.onReceive(from: store, oldState: oldState, action: action)
    case .animalDetail(action: let action):
      await self.onReceive(from: store, oldState: oldState, action: action)
    case .animalEditor(action: let action):
      await self.onReceive(from: store, oldState: oldState, action: action)
    }
  }
}
As an engineering convention and style, we scope our Listener down by action domains. This code isn’t really needed; we could just do this in “one big” switch statement, but this approach lets us focus on composing smaller functions together. You can choose to follow this convention in your own products.
We now need four small functions to process action values across our AnimalsAction.UI domain. Here is AnimalsAction.UI.CategoryList:
//  Listener.swift

extension Listener {
  private func onReceive(
    from store: some ImmutableData.Dispatcher<AnimalsState, AnimalsAction> & ImmutableData.Selector<AnimalsState>,
    oldState: AnimalsState,
    action: AnimalsAction.UI.CategoryList
  ) async {
    switch action {
    case .onAppear:
      if oldState.categories.status == nil,
         store.state.categories.status == .waiting {
        do {
          try await store.dispatch(
            thunk: self.session.fetchCategoriesQuery()
          )
        } catch {
          print(error)
        }
      }
    case .onTapReloadSampleDataButton:
      if oldState.categories.status != .waiting,
         store.state.categories.status == .waiting,
         oldState.animals.status != .waiting,
         store.state.animals.status == .waiting {
        do {
          try await store.dispatch(
            thunk: self.session.reloadSampleDataMutation()
          )
        } catch {
          print(error)
        }
      }
    }
  }
}
There are two Action values under the AnimalsAction.UI.CategoryList domain. Let’s begin with onAppear. We will dispatch onAppear when our CategoryList is ready to display. Our goal is for this value to then begin an asynchronous operation to fetch Category values. For performance, we want to only perform that fetch once: we do not plan to “re-fetch” the second time the CategoryList is ready to display.
At this point, we already know a lot about the state of our system at the time this Action value was dispatched: we know the previous state of our system, we know the Action value, and we also have the ability to quickly find the current state of our system. This function receives its values after the Reducer has returned. Because store adopts ImmutableData.Selector, we can easily ask for store.state to know how our Reducer has transformed the previous state of our system.
When a CategoryList is ready to display, we begin by checking if the oldState.categories.status is nil. We expect this to indicate that a fetch has not been attempted; the next fetch will be our first. Next, we check if store.state.categories.status is waiting. We expect this to indicate that a fetch should be attempted.
If our system has transitioned from a categories.status equal to nil to categories.status equal to waiting, this implies that we are going to begin our initial fetch. We dispatch the fetchCategoriesQuery thunk we built in our previous section. In the event of an error, we log the error to print. In a production application, you should improve error handling and reporting. For the purposes of our tutorial, we will try to keep our focus on the ImmutableData architecture; you should explore error handling in a way that makes the most sense for your team and your product.
For onTapReloadSampleDataButton, we perform a similar operation. We can begin by checking if we are already waiting for a fetch to complete. If we are not waiting for a fetch to complete, we begin a new one. Unlike onAppear, we do want our user to have the option to dispatch this operation more than once. We perform this check against our Categories and Animals domains, then set both domains to waiting to indicate there is an active fetch.
That’s the basic idea of our Listener. We receive Action values after our Reducer has returned, and then have the option to perform asynchronous operations on our PersistentSession based on the state of our system.
Here is our AnimalList domain:
//  Listener.swift

extension Listener {
  private func onReceive(
    from store: some ImmutableData.Dispatcher<AnimalsState, AnimalsAction> & ImmutableData.Selector<AnimalsState>,
    oldState: AnimalsState,
    action: AnimalsAction.UI.AnimalList
  ) async {
    switch action {
    case .onAppear:
      if oldState.animals.status == nil,
         store.state.animals.status == .waiting {
        do {
          try await store.dispatch(
            thunk: self.session.fetchAnimalsQuery()
          )
        } catch {
          print(error)
        }
      }
    case .onTapDeleteSelectedAnimalButton(animalId: let animalId):
      if oldState.animals.queue[animalId] != .waiting,
         store.state.animals.queue[animalId] == .waiting {
        do {
          try await store.dispatch(
            thunk: self.session.deleteAnimalMutation(animalId: animalId)
          )
        } catch {
          print(error)
        }
      }
    }
  }
}
Our onAppear action value follows a similar pattern to CategoryList: if we transitioned from status equals nil to status equals waiting, then we dispatch a fetchAnimalsQuery thunk.
Our onTapDeleteSelectedAnimalButton should begin if we are not already waiting on an operation for this Animal. We check to see if the Status value saved for this Animal.ID transitioned to waiting before we dispatch our deleteAnimalMutation thunk.
Here is our AnimalDetail domain performing a similar dispatch to deleteAnimalMutation:
//  Listener.swift

extension Listener {
  private func onReceive(
    from store: some ImmutableData.Dispatcher<AnimalsState, AnimalsAction> & ImmutableData.Selector<AnimalsState>,
    oldState: AnimalsState,
    action: AnimalsAction.UI.AnimalDetail
  ) async {
    switch action {
    case .onTapDeleteSelectedAnimalButton(animalId: let animalId):
      if oldState.animals.queue[animalId] != .waiting,
         store.state.animals.queue[animalId] == .waiting {
        do {
          try await store.dispatch(
            thunk: self.session.deleteAnimalMutation(animalId: animalId)
          )
        } catch {
          print(error)
        }
      }
    }
  }
}
Here is our AnimalEditor domain:
//  Listener.swift

extension Listener {
  private func onReceive(
    from store: some ImmutableData.Dispatcher<AnimalsState, AnimalsAction> & ImmutableData.Selector<AnimalsState>,
    oldState: AnimalsState,
    action: AnimalsAction.UI.AnimalEditor
  ) async {
    switch action {
    case .onTapAddAnimalButton(id: let id, name: let name, diet: let diet, categoryId: let categoryId):
      if oldState.animals.queue[id] != .waiting,
         store.state.animals.queue[id] == .waiting {
        do {
          try await store.dispatch(
            thunk: self.session.addAnimalMutation(id: id, name: name, diet: diet, categoryId: categoryId)
          )
        } catch {
          print(error)
        }
      }
    case .onTapUpdateAnimalButton(animalId: let animalId, name: let name, diet: let diet, categoryId: let categoryId):
      if oldState.animals.queue[animalId] != .waiting,
         store.state.animals.queue[animalId] == .waiting {
        do {
          try await store.dispatch(
            thunk: self.session.updateAnimalMutation(animalId: animalId, name: name, diet: diet, categoryId: categoryId)
          )
        } catch {
          print(error)
        }
      }
    }
  }
}
This should look familiar: we check if the Status of the Animal value we are interested in just transitioned to waiting; this indicates we are ready to dispatch our thunk operation.
Our Listener will be created on app launch at the same time we create our Store. Our Listener is built for receiving action values, but you can think creatively about more use cases. Think about situations that need to receive events over time. We could build a PushListener that is designed to receive push notification payloads from Apple. We could build a WebSocketListener that is designed to receive web-socket data from our server. We could build a AppIntentListener or WidgetListener that is designed to listen to events from our system. These are outside the scope of this tutorial, but these Listener classes can be composed together in powerful ways when building complex products.
AnimalsReducer
For our previous product, our CounterReducer was a synchronous function without any side effects. Operating under those same constraints, our Animals product also needs to accommodate asynchronously fetching from and writing to a persistent store on our filesystem. We’re going to build a Reducer that operates under the constraints of our ImmutableData architecture; we will see how this fits together with our Listener class to handle side effects.
Our CounterReducer was one switch statement. Since our CounterAction was only two case values, this was easy. In complex products, the set of Action values can grow to the point that one big switch statement is no longer easy: we want a way to break this work into smaller pieces. We will see a few techniques that can help when you scale your own products to many Action values.
Add a new Swift file under Sources/AnimalsData. Name this file AnimalsReducer.swift. Here is the first reduce function:
//  AnimalsReducer.swift

public enum AnimalsReducer {
  @Sendable public static func reduce(
    state: AnimalsState,
    action: AnimalsAction
  ) throws -> AnimalsState {
    switch action {
    case .ui(action: let action):
      return try self.reduce(state: state, action: action)
    case .data(action: let action):
      return try self.reduce(state: state, action: action)
    }
  }
}
Our reduce function takes an AnimalsState and an AnimalsAction as parameters. The return value is an AnimalsState. Our reduce function also throws errors. We switch over the Action value. Our case statements then forwards the Action value to two new reduce functions (which we will build in our next step). This “pattern-matching” allows us one way to scope and compose together small functions; it’s an alternative to putting everything in one big reduce function. Our root reduce function forwards actions from the AnimalsAction.UI domain to the AnimalsAction.UI reducer and actions from the AnimalsAction.Data domain to the AnimalsAction.Data reducer.
Let’s build our next reduce function. This is the function that accepts a AnimalsAction.UI value:
//  AnimalsReducer.swift

extension AnimalsReducer {
  private static func reduce(
    state: AnimalsState,
    action: AnimalsAction.UI
  ) throws -> AnimalsState {
    switch action {
    case .categoryList(action: let action):
      return try self.reduce(state: state, action: action)
    case .animalList(action: let action):
      return try self.reduce(state: state, action: action)
    case .animalDetail(action: let action):
      return try self.reduce(state: state, action: action)
    case .animalEditor(action: let action):
      return try self.reduce(state: state, action: action)
    }
  }
}
Here, we perform another dimension of pattern-matching: this function knows that its Action value is scoped to the AnimalsAction.UI domain. We then forward each of those sub-domains to a new reduce function.
Here is our reduce function scoped to the AnimalsAction.UI.CategoryList domain:
//  AnimalsReducer.swift

extension AnimalsReducer {
  private static func reduce(
    state: AnimalsState,
    action: AnimalsAction.UI.CategoryList
  ) throws -> AnimalsState {
    switch action {
    case .onAppear:
      if state.categories.status == nil {
        var state = state
        state.categories.status = .waiting
        return state
      }
      return state
    case .onTapReloadSampleDataButton:
      if state.categories.status != .waiting,
         state.animals.status != .waiting {
        var state = state
        state.categories.status = .waiting
        state.animals.status = .waiting
        return state
      }
      return state
    }
  }
}
Our AnimalsAction.UI.CategoryList domain is a “leaf”; switching over the Action value does not produce additional sub-domains. This is our opportunity to transform our State.
We begin with onAppear. This value indicates the CategoryList component will display. This is when we would like to begin an asynchronous fetch of our Category values from our persistent store. We are blocked on asynchronous side effects in a Reducer. Our solution is to transform our State to indicate that we should fetch. If the status of the most recent fetch is nil, we set the status of categories to waiting. When we return from our Reducer, our Listener will receive the same State and Action values that were passed to our Reducer. Our Listener will then perform the asynchronous operation to fetch Category values.
Remember, our Reducer is not for performing asynchronous operations or side effects. Our Reducer is for performing synchronous operations without side effects. Our Reducer will transform our State in an appropriate way such that our Listener will then perform its asynchronous operations. This is an important concept we will see many times before our tutorial is complete.
Our onTapReloadSampleDataButton value is dispatched when a user has confirmed they wish to reload the sample data from initial launch. We set the status of our categories and our animals to waiting — after confirming we are not already waiting — to indicate we should fetch both domains. The State and Action will then forward to our Listener class for us to perform our asynchronous side effects. Remember, all we do for our reduce function is set the correct flags for our Listener.
Let’s build a Reducer for our UI.AnimalList domain:
//  AnimalsReducer.swift

extension AnimalsReducer {
  package struct Error: Swift.Error {
    package enum Code: Hashable, Sendable {
      case animalNotFound
    }

    package let code: Self.Code
  }
}

extension AnimalsState {
  fileprivate func onTapDeleteSelectedAnimalButton(animalId: Animal.ID) throws -> Self {
    guard let _ = self.animals.data[animalId] else {
      throw AnimalsReducer.Error(code: .animalNotFound)
    }
    var state = self
    state.animals.queue[animalId] = .waiting
    return state
  }
}

extension AnimalsReducer {
  private static func reduce(
    state: AnimalsState,
    action: AnimalsAction.UI.AnimalList
  ) throws -> AnimalsState {
    switch action {
    case .onAppear:
      if state.animals.status == nil {
        var state = state
        state.animals.status = .waiting
        return state
      }
      return state
    case .onTapDeleteSelectedAnimalButton(animalId: let animalId):
      return try state.onTapDeleteSelectedAnimalButton(animalId: animalId)
    }
  }
}
Our onAppear value performs similar work to what we saw from CategoryList. Our onTapDeleteSelectedAnimalButton value begins by confirming the Animal.ID is valid: an Animal instance exists for this Animal.ID. If no Animal instance is found, we throw an error. If we did find an Animal instance, we set a Status of waiting on our queue to indicate there is an asynchronous operation taking place on the Animal value.
Our onAppear logic appears “inline”: it’s right under our case statement. Our onTapDeleteSelectedAnimalButton logic appears in a helper function defined on AnimalsState. For simple logic that may only need to be defined in one place, writing it directly under your case statement might work best for you. For more complex logic, or logic that might be duplicated across multiple Action values, factoring that logic out to a helper function might be the best choice.
Let’s build a Reducer for our UI.AnimalDetail domain:
//  AnimalsReducer.swift

extension AnimalsReducer {
  private static func reduce(
    state: AnimalsState,
    action: AnimalsAction.UI.AnimalDetail
  ) throws -> AnimalsState {
    switch action {
    case .onTapDeleteSelectedAnimalButton(animalId: let animalId):
      return try state.onTapDeleteSelectedAnimalButton(animalId: animalId)
    }
  }
}
You can see why it is convenient to factor logic out of individual case statements: both of these Action values should map to the same transformation on our State.
A legit question here is why are we choosing to define two different Action values. Is the onTapDeleteSelectedAnimalButton value one action that happens from two different components, or is it two actions that happen from two different components?
In larger applications built from Flux and Redux, it is common to “reuse” action values across components. Two different components might display a Delete Animal button that dispatch the same action value. This is not an abuse of the architecture — this is ok.
For our tutorial, we continue with the convention that we name actions by the component where they happened from. We don’t have a strong opinion about whether or not your own products should follow this convention, but we have some reasons for preferring this approach in our tutorials. One of the biggest skills we want engineers to practice is thinking declaratively. For engineers with experience building SwiftUI and SwiftData together, the natural instinct might be to tightly couple presentational component logic — which is declarative — with the imperative mutations needed to transform their global state. This is a very different approach from what we teach in ImmutableData. Your component tree should declaratively dispatch action values on important user events. Your component tree should not be thinking about how this action value will transform state; your component tree should be thinking about communicating what just happened.
In complex products, you might map multiple component user events to just one action value. You must continue to think of your action value as a declarative event — not an imperative instruction. If you introduce an implicit “mental map” where multiple components dispatch one action value, that mental map should continue to tell the infra what happened — not how it should handle that event. If you try to map multiple components to one action value, and your action value subtly — or not so subtly — begins to look like an imperative instruction, slow down and think through what exactly this action value is communicating.
With more experience, engineers learn more about how to “feel” when action values skew too far in the direction of imperative thinking. For our tutorial, we attempt to help enforce declarative thinking. Naming action values after the component where they happened is an attempt to help teach this concept. If this convention works for you and is appropriate for your own products, you can bring this convention with you after our tutorial is complete.
Here is our UI.AnimalEditor domain reducer:
//  AnimalsReducer.swift

extension AnimalsState {
  fileprivate func onTapAddAnimalButton(
    id: Animal.ID,
    name: String,
    diet: Animal.Diet,
    categoryId: String
  ) -> Self {
    var state = self
    state.animals.queue[id] = .waiting
    return state
  }
}

extension AnimalsState {
  fileprivate func onTapUpdateAnimalButton(
    animalId: Animal.ID,
    name: String,
    diet: Animal.Diet,
    categoryId: Category.ID
  ) throws -> Self {
    guard let _ = self.animals.data[animalId] else {
      throw AnimalsReducer.Error(code: .animalNotFound)
    }
    var state = self
    state.animals.queue[animalId] = .waiting
    return state
  }
}

extension AnimalsReducer {
  private static func reduce(
    state: AnimalsState,
    action: AnimalsAction.UI.AnimalEditor
  ) throws -> AnimalsState {
    switch action {
    case .onTapAddAnimalButton(id: let id, name: let name, diet: let diet, categoryId: let categoryId):
      return state.onTapAddAnimalButton(id: id, name: name, diet: diet, categoryId: categoryId)
    case .onTapUpdateAnimalButton(animalId: let animalId, name: let name, diet: let diet, categoryId: let categoryId):
      return try state.onTapUpdateAnimalButton(animalId: animalId, name: name, diet: diet, categoryId: categoryId)
    }
  }
}
Our onTapAddAnimalButton action sets a Status of waiting on our queue for the id passed in as a temporary id. This will not be the same id once our Animal instance has been created from our PersistentStore; it is just for keeping track of the Status of this operation. Our onTapUpdateAnimalButton action throws an error if the Animal.ID is not found in our State. If the Animal.ID was found, we set a Status of waiting on our queue for this id.
These two functions on AnimalsState are only going to be used one place. Because this logic would not need to be duplicated across multiple case statements, you might choose to write this inline. Try to find the correct balance for code that is easy to read and easy to maintain for your product.
Let’s try building a AnimalsAction.Data Reducer with a slightly different approach:
//  AnimalsReducer.swift

extension AnimalsReducer {
  private static func reduce(
    state: AnimalsState,
    action: AnimalsAction.Data
  ) throws -> AnimalsState {
    switch action {
    case .persistentSession(.didFetchCategories(result: let result)):
      return self.persistentSessionDidFetchCategories(state: state, result: result)
    case .persistentSession(.didFetchAnimals(result: let result)):
      return self.persistentSessionDidFetchAnimals(state: state, result: result)
    case .persistentSession(.didReloadSampleData(result: let result)):
      return self.persistentSessionDidReloadSampleData(state: state, result: result)
    case .persistentSession(.didAddAnimal(id: let id, result: let result)):
      return self.persistentSessionDidAddAnimal(state: state, id: id, result: result)
    case .persistentSession(.didUpdateAnimal(animalId: let animalId, result: let result)):
      return try self.persistentSessionDidUpdateAnimal(state: state, animalId: animalId, result: result)
    case .persistentSession(.didDeleteAnimal(animalId: let animalId, result: let result)):
      return try self.persistentSessionDidDeleteAnimal(state: state, animalId: animalId, result: result)
    }
  }
}
Our AnimalsAction.Data domain has one sub-domain: AnimalsAction.Data.PersistentSession. One option here would be to switch over our Action, and then forward the AnimalsAction.Data.PersistentSession to a new reducer. An alternative is to directly pattern-match and switch over both dimensions at once. Is this the right approach for your product? It depends. Suppose we do need a new domain on AnimalsAction.Data: PushNotification or WebSocket. A single switch statement over all the action values across three domains might need several more case statements. How many case statements before one switch statement becomes “too big”? This is a question for you to answer when you build your own products.
In our previous Reducers, we mapped Action values to pure functions on AnimalsState to perform our imperative logic. Here, we see a different approach. We define additional pure functions on AnimalsReducer. There isn’t necessarily a strong argument in favor of either approach, but we can see them both together as an example of the different ways of building Reducers.
Here is our persistentSessionDidFetchCategories function:
//  AnimalsReducer.swift

extension AnimalsReducer {
  private static func persistentSessionDidFetchCategories(
    state: AnimalsState,
    result: AnimalsAction.Data.PersistentSession.FetchCategoriesResult
  ) -> AnimalsState {
    var state = state
    switch result {
    case .success(categories: let categories):
      var data = state.categories.data
      for category in categories {
        data[category.id] = category
      }
      state.categories.data = data
      state.categories.status = .success
    case .failure(error: let error):
      state.categories.status = .failure(error: error)
    }
    return state
  }
}
When our FetchCategoriesResult equals success, we insert every Category value in our categories.data property. We also set our categories.status property to success. On a failure, we set our categories.status property to failure with the String representation of our error.
Here is a similar function for Animal values:
//  AnimalsReducer.swift

extension AnimalsReducer {
  private static func persistentSessionDidFetchAnimals(
    state: AnimalsState,
    result: AnimalsAction.Data.PersistentSession.FetchAnimalsResult
  ) -> AnimalsState {
    var state = state
    switch result {
    case .success(animals: let animals):
      var data = state.animals.data
      for animal in animals {
        data[animal.id] = animal
      }
      state.animals.data = data
      state.animals.status = .success
    case .failure(error: let error):
      state.animals.status = .failure(error: error)
    }
    return state
  }
}
Here is persistentSessionDidReloadSampleData:
//  AnimalsReducer.swift

extension AnimalsReducer {
  private static func persistentSessionDidReloadSampleData(
    state: AnimalsState,
    result: AnimalsAction.Data.PersistentSession.ReloadSampleDataResult
  ) -> AnimalsState {
    var state = state
    switch result {
    case .success(animals: let animals, categories: let categories):
      do {
        var data: Dictionary<Animal.ID, Animal> = [:]
        for animal in animals {
          data[animal.id] = animal
        }
        state.animals.data = data
        state.animals.status = .success
      }
      do {
        var data: Dictionary<Category.ID, Category> = [:]
        for category in categories {
          data[category.id] = category
        }
        state.categories.data = data
        state.categories.status = .success
      }
    case .failure(error: let error):
      state.animals.status = .failure(error: error)
      state.categories.status = .failure(error: error)
    }
    return state
  }
}
Unlike our previous functions, our success case implies we should build new animals.data and categories.data values; we throw away the old values.
Here is persistentSessionDidAddAnimal:
//  AnimalsReducer.swift

extension AnimalsReducer {
  private static func persistentSessionDidAddAnimal(
    state: AnimalsState,
    id: Animal.ID,
    result: AnimalsAction.Data.PersistentSession.AddAnimalResult
  ) -> AnimalsState {
    var state = state
    switch result {
    case .success(animal: let animal):
      state.animals.data[animal.id] = animal
      state.animals.queue[id] = .success
    case .failure(error: let error):
      state.animals.queue[id] = .failure(error: error)
    }
    return state
  }
}
The id value is meant to be used as a “placeholder” identifier. We will see in our component tree where we generate this from. This does not map to the actual Animal.ID of this instance; that comes from our PersistentStore when the Animal is created. When we set our animal instance on our animals.data value, our key is the animal.id that came from our PersistentStore. Our Status values — success or failure — are saved on our animals.queue by the same id that was passed by our component tree.
Here is a very similar function when our Animal value has been updated:
//  AnimalsReducer.swift

extension AnimalsReducer {
  private static func persistentSessionDidUpdateAnimal(
    state: AnimalsState,
    animalId: Animal.ID,
    result: AnimalsAction.Data.PersistentSession.UpdateAnimalResult
  ) throws -> AnimalsState {
    guard let _ = state.animals.data[animalId] else {
      throw AnimalsReducer.Error(code: .animalNotFound)
    }
    var state = state
    switch result {
    case .success(animal: let animal):
      state.animals.data[animal.id] = animal
      state.animals.queue[animalId] = .success
    case .failure(error: let error):
      state.animals.queue[animalId] = .failure(error: error)
    }
    return state
  }
}
When this Action value is dispatched, the Animal.ID should map to a legit Animal instance. This is not a placeholder identifier; our Action should have dispatched with a real identifier. If this identifier is not valid, we should throw an error.
Here is our last function:
//  AnimalsReducer.swift

extension AnimalsReducer {
  private static func persistentSessionDidDeleteAnimal(
    state: AnimalsState,
    animalId: Animal.ID,
    result: AnimalsAction.Data.PersistentSession.DeleteAnimalResult
  ) throws -> AnimalsState {
    guard let _ = state.animals.data[animalId] else {
      throw AnimalsReducer.Error(code: .animalNotFound)
    }
    var state = state
    switch result {
    case .success(animal: let animal):
      state.animals.data[animal.id] = nil
      state.animals.queue[animal.id] = .success
    case .failure(error: let error):
      state.animals.queue[animalId] = .failure(error: error)
    }
    return state
  }
}
When products grow in scale, more Action values will be needed; this is just going to be a fact-of-life when engineering with the ImmutableData architecture. Your “root” Reducer accepts any Action value in your product domain; that doesn’t mean your root Reducer is just one function. Remember the constraints every root Reducer must follow:
- A root Reducer is a pure function with no side effects.
- A root Reducer returns synchronously.
Your root Reducer is public; this is passed to your Store instance at app launch. That still means you have a lot of ability to creatively compose private and fileprivate functions together to build your root Reducer. Building complex Reducers for large products is an advanced topic; covering every strategy and technique is outside the scope of this tutorial. For more thoughts and examples, try looking at how Redux approaches this problem in Javascript.11
One of the benefits of constraining our root Reducer to pure functions is improved testability. Side effects make testing difficult: tests become “flakey” and edge-casey behavior needs to be caught, documented, and tested for. When our root Reducer is a pure function, we can write unit tests against every Action value in our product domain and feel confident that our Reducer will behave correctly for our users.
If you have a complete set on unit tests written against your root Reducer, and those tests all pass, you have a lot of freedom to refactor your root Reducer. As you refactor, continue running your unit tests and confirming your tests pass.
AnimalsFilter
Our ImmutableUI.Selector added the ability to pass a filter to guard against unnecessary operations for improving performance. This might have felt a little abstract without a product domain; let’s build some examples to see how Filters work.
Our CategoryList component will display a sorted Array of Category values. This sorting operation is O(n log n). As an optimization, the Selector we use to sort Category values can add the Dictionary of all Category values as a Dependency. If an Action is dispatched to the Reducer, and the Dictionary Dependency has not changed, then our sorted Array must not have changed. What would have been an additional O(n log n) operation is no longer needed. The equality check performed by our Dictionary values is O(n) in the worst-case. As an optimization, we can build a Filter that prevents unnecessary Action values from performing extra equality checks on our Dictionary values; an O(1) operation can save us from performing an O(n) operation.
The exercise is to document what Action values might cause a change in our Dictionary of Category values. In the ImmutableData architecture, all transformations on state occur from dispatching State and Action values to a root Reducer. We built our Reducer and we can see for ourselves all possible transformations that can affect our Dictionary of Category values. There are only two times we write to this value:
- When our
PersistentSessionsuccessfully fetchedCategoryvalues from itsPersistentStore. - When our
PersistentSessionsuccessfully reloaded all sample data.
These are the only two Action values that could result in a sorted Array of Category values changing over time. If an Action value could only affect our Animals values, we don’t need that Action value to pass our Filter.
Add a new Swift file under Sources/AnimalsData. Name this file AnimalsFilter.swift. Here is the function to Filter on Category values:
//  AnimalsFilter.swift

public enum AnimalsFilter {

}

extension AnimalsFilter {
  public static func filterCategories() -> @Sendable (AnimalsState, AnimalsAction) -> Bool {
    { oldState, action in
      switch action {
      case .data(.persistentSession(.didFetchCategories(result: .success))):
        return true
      case .data(.persistentSession(.didReloadSampleData(result: .success))):
        return true
      default:
        return false
      }
    }
  }
}
Our Filter functions take two parameters: a State and an Action. Those two parameters will then tell us to return true, indicating our Selector should continue operating on this Action, or false, indicating our Selector should not continue operating on this Action. The State value parameter represents the previous state of our system; this Filter operates after our Reducer has returned.
There are only two Action values that should return true. Every other Action can return false.
We can build a similar Filter for our Animal values. Our AnimalList component displays all Animal values for a Category.ID value. These Animal values are sorted, which is an O(n log n) operation. Our Selector will have the ability to add the Dictionary of Animal values as a Dependency; the equality operator on these Dictionary values is O(n).
To improve performance, we can Filter Action values to control for values that would never transform our Dictionary of Animal values for a Category.ID value. Here are two values that we know can return true from a Filter:
- When our
PersistentSessionsuccessfully fetchedAnimalvalues from itsPersistentStore. - When our
PersistentSessionsuccessfully reloaded all sample data.
Unlike our Category values, our user has the ability to modify our Animal values. A user can add new Animal values, delete existing Animal values, and update existing Animal values. Let’s think through these three operations:
- When our
PersistentSessionsuccessfully added a newAnimalvalue and:- when the
Category.IDof theAnimalvalue is equal to theCategory.IDof our Selector.
- when the
- When our
PersistentSessionsuccessfully deleted anAnimalvalue and:- when the
Category.IDof theAnimalvalue is equal to theCategory.IDof our Selector.
- when the
- When our
PersistentSessionsuccessfully update anAnimalvalue and:- when the
Category.IDof theAnimalvalue is equal to theCategory.IDof our Selector or: - when the
Category.IDof the previousAnimalvalue is equal to theCategory.IDof our Selector.
- when the
If an Animal value is added or deleted, it would only affect our AnimalList component if the Category.ID of the Animal is equal to the Category.ID currently being used to display Animal values: if we are viewing all Mammal values, and a user adds or deletes a Reptile value, that would not affect the Mammal values currently displayed in this AnimalList component.
It’s a similar approach for updating Animal values, but we have one more condition to check for. We check for the Category.ID of the Animal value and the Category.ID of the Animal value before our Reducer returned and transformed state. If we are viewing all Mammal values, and a user transforms a Reptile to a Mammal, this would affect the Mammal values currently displayed in this AnimalList component. Similarly, if we are viewing all Mammal values, and a user transforms a Mammal to a Reptile, this would also affect the Mammal values currently displayed in this AnimalList component.
Here is what the implementation of this new Filter looks like:
//  AnimalsFilter.swift

extension AnimalsFilter {
  public static func filterAnimals(categoryId: Category.ID?) -> @Sendable (AnimalsState, AnimalsAction) -> Bool {
    { oldState, action in
      switch action {
      case .data(.persistentSession(.didFetchAnimals(result: .success))):
        return true
      case .data(.persistentSession(.didReloadSampleData(result: .success))):
        return true
      case .data(.persistentSession(.didAddAnimal(id: _, result: .success(animal: let animal)))):
        return animal.categoryId == categoryId
      case .data(.persistentSession(.didDeleteAnimal(animalId: _, result: .success(animal: let animal)))):
        return animal.categoryId == categoryId
      case .data(.persistentSession(.didUpdateAnimal(animalId: _, result: .success(animal: let animal)))):
        return animal.categoryId == categoryId || oldState.animals.data[animal.animalId]?.categoryId == categoryId
      default:
        return false
      }
    }
  }
}
Filters can be powerful tools to improve performance, but we recommend to build your Filters with caution and care. Shipping a bug in a Filter can lead to unexpected results in your component tree: an Action value that should update your component seems to “drop on the floor” with no effect.
If you choose to implement Filters in your own Products, we strongly recommend that every Filter comes with a complete set of unit tests. These tests should pass every Action value in your domain to confirm this Filter behaves as expected.
When in doubt, build your component tree without Filters. After you have tested and confirmed your component tree behaves as expected, you can then choose to introduce Filters.
Our recommendation is that all Filters should return in O(1) constant time. Use filters only for quick and efficient checks. This implies that Filters should be prioritized for optimizing Selectors that run above constant time; an example would be a O(n) equality operation or O(n log n) sorting operation. We don’t see much benefit to allocate engineering resources to build Filters to optimize Selectors that are already running in constant time. This is not your “low hanging fruit” when looking for impact. When we build our component tree, we will see examples of Selectors where we would recommend not to build Filters.
LocalStore
We built a PersistentSession class to perform operations on a generic PersistentStore type. Before we complete this chapter, we do want to provide an implementation of a PersistentStore.
To clone the functionality of the sample app from Apple, we need to persist our state across app launches. We have multiple technologies and options available to manage that:
- We could use SwiftData to persist our state. SwiftData tutorials often integrate directly from SwiftUI, but there is nothing stopping us from using SwiftData only from our Model Layer.
- We could use Core Data to persist our state. SwiftData is the more “modern” ORM solution from Apple, but there is nothing stopping us from continuing to use the “legacy” ORM.
- We could use SQLite to persist our state. Apple does not ship high-level “wrappers” to make this as easy as working with SwiftData, but we could choose to write all that code (or import an external dependency from the open-source community).
- We could use a flat file format like JSON to persist our state. This code might be simple, but comes with performance implications: writing any mutations to our filesystem is linear time. This is not an incremental store; it’s an atomic store.
When we built the ImmutableData architecture, one important goal is to offer product engineers an alternative to SwiftData for managing global state from their SwiftUI component tree. That does not mean we need to stop using SwiftData — we just recommend using it from a different place. Instead of performing imperative logic on shared mutable state from our component tree directly on SwiftData, we teach how to use declarative logic from our component tree to affect transformations on shared mutable state. The data models our component tree sees are immutable value types — as opposed to a component tree built on SwiftData and mutable reference types.
We’re going to see how SwiftData can be leveraged as a “back end” of our ImmutableData architecture. Inspired by Dave DeLong, our ImmutableData architecture can act as a legit abstraction-layer (or “front end”) on top of SwiftData.12
Let’s see an example of what this looks like. Add a new Swift file under Sources/AnimalsData. Name this file LocalStore.swift. We begin with defining a PersistentModel for our Category value:
//  LocalStore.swift

import Foundation
import SwiftData

@Model final package class CategoryModel {
  package var categoryId: Category.ID
  package var name: String

  package init(
    categoryId: Category.ID,
    name: String
  ) {
    self.categoryId = categoryId
    self.name = name
  }
}

extension CategoryModel {
  fileprivate func category() -> Category {
    Category(
      categoryId: self.categoryId,
      name: self.name
    )
  }
}

extension Category {
  fileprivate func model() -> CategoryModel {
    CategoryModel(
      categoryId: self.categoryId,
      name: self.name
    )
  }
}
Our CategoryModel class will represent one Category value in our SwiftData.ModelContext. We define a category function on CategoryModel for easy transformation to a Category value. We define a model function on Category for an easy transformation to a CategoryModel reference.
Let’s do this again for our Animal value:
//  LocalStore.swift

@Model final package class AnimalModel {
  package var animalId: Animal.ID
  package var name: String
  package var diet: String
  package var categoryId: Category.ID

  package init(
    animalId: Animal.ID,
    name: String,
    diet: String,
    categoryId: Category.ID
  ) {
    self.animalId = animalId
    self.name = name
    self.diet = diet
    self.categoryId = categoryId
  }
}

extension AnimalModel {
  fileprivate func animal() -> Animal {
    guard
      let diet = Animal.Diet(rawValue: self.diet)
    else {
      fatalError("missing diet")
    }
    return Animal(
      animalId: self.animalId,
      name: self.name,
      diet: diet,
      categoryId: self.categoryId
    )
  }
}

extension Animal {
  fileprivate func model() -> AnimalModel {
    AnimalModel(
      animalId: self.animalId,
      name: self.name,
      diet: self.diet.rawValue,
      categoryId: self.categoryId
    )
  }
}
Inspired by Fatbobman, we transform our Diet to its rawValue instead of saving the enum directly on our Model.13
Here are a few simple “utilities” on SwiftData.ModelContext that will save us some time when we perform our queries and mutations:
//  LocalStore.swift

extension ModelContext {
  fileprivate func fetch<T>(_ type: T.Type) throws -> Array<T> where T : PersistentModel {
    try self.fetch(
      FetchDescriptor<T>()
    )
  }
}

extension ModelContext {
  fileprivate func fetch<T>(_ predicate: Predicate<T>) throws -> Array<T> where T : PersistentModel {
    try self.fetch(
      FetchDescriptor(predicate: predicate)
    )
  }
}

extension ModelContext {
  fileprivate func fetchCount<T>(_ type: T.Type) throws -> Int where T : PersistentModel {
    try self.fetchCount(
      FetchDescriptor<T>()
    )
  }
}

extension ModelContext {
  fileprivate func fetchCount<T>(_ predicate: Predicate<T>) throws -> Int where T : PersistentModel {
    try self.fetchCount(
      FetchDescriptor(predicate: predicate)
    )
  }
}
Our LocalStore will be responsible for assigning identifiers to new Animal values as they are created. If you are experienced with writing unit tests, you would expect that generating random identifiers every time your test begins might not be the easiest behavior to test against. We would like a way to “inject” this dependency on our identifiers. For production code, we want a random identifier to be used. For test code, we want the ability to inject a “stub” generator. Let’s define a protocol that will help us:
//  LocalStore.swift

public protocol IncrementalStoreUUID {
  var uuidString: String { get }

  init()
}

extension UUID : IncrementalStoreUUID {

}
The Foundation.UUID type will be our production type used to generate identifiers. We will build our own IncrementalStoreUUID test double with a stub uuidString when testing.
Working on SwiftData can be expensive in terms of performance; we want to keep expensive work off our main thread. Let’s build an actor for managing our work on SwiftData. For the most part, we follow the implementation provided by the ModelActor macro. We are going to perform a little custom work in our constructor: we create a new actor and adopt ModelActor directly.
Here is the main declaration of our ModelActor class:
//  LocalStore.swift

final package actor ModelActor<UUID> : SwiftData.ModelActor where UUID : IncrementalStoreUUID {
  package nonisolated let modelContainer: ModelContainer
  package nonisolated let modelExecutor: any ModelExecutor

  fileprivate init(modelContainer: ModelContainer) {
    self.modelContainer = modelContainer
    let modelContext = ModelContext(modelContainer)
    modelContext.autosaveEnabled = false
    do {
      let count = try modelContext.fetchCount(CategoryModel.self)
      if count == .zero {
        modelContext.insert(Category.amphibian.model())
        modelContext.insert(Category.bird.model())
        modelContext.insert(Category.fish.model())
        modelContext.insert(Category.invertebrate.model())
        modelContext.insert(Category.mammal.model())
        modelContext.insert(Category.reptile.model())

        modelContext.insert(Animal.dog.model())
        modelContext.insert(Animal.cat.model())
        modelContext.insert(Animal.kangaroo.model())
        modelContext.insert(Animal.gibbon.model())
        modelContext.insert(Animal.sparrow.model())
        modelContext.insert(Animal.newt.model())

        try modelContext.save()
      }
    } catch {
      fatalError("\(error)")
    }
    self.modelExecutor = DefaultSerialModelExecutor(modelContext: modelContext)
  }
}
Our ModelContext will perform its operations off main, but this seems to lead to some unexpected behaviors in SwiftUI apps when autosaveEnabled is true.14 We set this property to false and perform our save operations manually as we dispatch mutations.
If our ModelContext returns zero CategoryModel references, this is the first time we launched our app: we insert the sample data and save.
Let’s turn our attention to the functions we defined on PersistentSessionPersistentStore. We have six functions to implement: two queries and four mutations. These six functions will map to the fetches and mutations on our ModelContext. Let’s begin with fetchCategoriesQuery:
//  LocalStore.swift

extension ModelActor {
  fileprivate func fetchCategoriesQuery() throws -> Array<Category> {
    let array = try self.modelContext.fetch(CategoryModel.self)
    return array.map { model in model.category() }
  }
}
Similar to an approach from Dave DeLong,12 we fetch all the CategoryModel references and transform them to immutable Category values. Our component tree does not know that there is any SwiftData business-logic happening behind the curtains. As far as our component tree is concerned, its data models are immutable value types.
Here is fetchAnimalsQuery:
//  LocalStore.swift

extension ModelActor {
  fileprivate func fetchAnimalsQuery() throws -> Array<Animal> {
    let array = try self.modelContext.fetch(AnimalModel.self)
    return array.map { model in model.animal() }
  }
}
At this point, you might notice an opportunity for an optimization. The SelectAnimalsValues Selector displays a sorted Array of Animal values for a Category.ID. Our fetchAnimalsQuery fetches all Animal values from our PersistentStore. When our AnimalList component will appear, an optimization would be to only fetch the Animal values for the Category.ID being displayed. This would be an important optimization at production scale. For our tutorial, we can track this optimization as a TODO.
Here is addAnimalMutation:
//  LocalStore.swift

extension ModelActor {
  fileprivate func addAnimalMutation(
    name: String,
    diet: Animal.Diet,
    categoryId: Category.ID
  ) throws -> Animal {
    let animal = Animal(
      animalId: UUID().uuidString,
      name: name,
      diet: diet,
      categoryId: categoryId
    )
    let model = animal.model()
    self.modelContext.insert(model)
    try self.modelContext.save()
    return animal
  }
}
We overloaded the UUID type with our generic constraint. In production code, we will use Foundation.UUID. Collisions on Foundation.UUID — where the same identifier is generated more than once — are possible at a non-zero probability, but optimizing for that scale is outside the scope of this tutorial. You are welcome to explore more robust solutions in your own products if you require more safety.
Here is updateAnimalMutation:
//  LocalStore.swift

extension ModelActor {
  package struct Error: Swift.Error {
    package enum Code: Hashable, Sendable {
      case animalNotFound
    }

    package let code: Self.Code
  }
}

extension ModelActor {
  fileprivate func updateAnimalMutation(
    animalId: Animal.ID,
    name: String,
    diet: Animal.Diet,
    categoryId: Category.ID
  ) throws -> Animal {
    let predicate = #Predicate<AnimalModel> { model in
      model.animalId == animalId
    }
    let array = try self.modelContext.fetch(predicate)
    guard
      let model = array.first
    else {
      throw Self.Error(code: .animalNotFound)
    }
    model.name = name
    model.diet = diet.rawValue
    model.categoryId = categoryId
    try self.modelContext.save()
    let animal = model.animal()
    return animal
  }
}
If we found an AnimalModel reference for this Animal.ID, we mutate its properties, save the model, and return the updated Animal value. If our Animal.ID returned no AnimalModel reference, we throw an error.
Here is deleteAnimalMutation:
//  LocalStore.swift

extension ModelActor {
  fileprivate func deleteAnimalMutation(animalId: Animal.ID) throws -> Animal {
    let predicate = #Predicate<AnimalModel> { model in
      model.animalId == animalId
    }
    let array = try self.modelContext.fetch(predicate)
    guard
      let model = array.first
    else {
      throw Self.Error(code: .animalNotFound)
    }
    self.modelContext.delete(model)
    try self.modelContext.save()
    return model.animal()
  }
}
Here is reloadSampleDataMutation:
//  LocalStore.swift

extension ModelActor {
  fileprivate func reloadSampleDataMutation() throws -> (
    animals: Array<Animal>,
    categories: Array<Category>
  ) {
    try self.modelContext.delete(model: CategoryModel.self)
    self.modelContext.insert(Category.amphibian.model())
    self.modelContext.insert(Category.bird.model())
    self.modelContext.insert(Category.fish.model())
    self.modelContext.insert(Category.invertebrate.model())
    self.modelContext.insert(Category.mammal.model())
    self.modelContext.insert(Category.reptile.model())

    try self.modelContext.delete(model: AnimalModel.self)
    self.modelContext.insert(Animal.dog.model())
    self.modelContext.insert(Animal.cat.model())
    self.modelContext.insert(Animal.kangaroo.model())
    self.modelContext.insert(Animal.gibbon.model())
    self.modelContext.insert(Animal.sparrow.model())
    self.modelContext.insert(Animal.newt.model())

    try self.modelContext.save()

    return (
      animals: [
        Animal.dog,
        Animal.cat,
        Animal.kangaroo,
        Animal.gibbon,
        Animal.sparrow,
        Animal.newt,
      ],
      categories: [
        Category.amphibian,
        Category.bird,
        Category.fish,
        Category.invertebrate,
        Category.mammal,
        Category.reptile,
      ]
    )
  }
}
We erase all CategoryModel and AnimalModel references, and then insert our sample data.
The ModelActor macro “eagerly” constructs its ModelContext. The implication is that SwiftData performs its work on the same thread that created the ModelActor.15 We are going to create LocalStore on main, but we do not want SwiftData to block main with expensive work. We can add more flexibility by building our ModelActor with lazy. After our LocalStore is constructed, we will then create our ModelActor — and our ModelContext — on demand and off main.
Here is the main declaration of our LocalStore:
//  LocalStore.swift

final public actor LocalStore<UUID> where UUID : IncrementalStoreUUID {
  lazy package var modelActor = ModelActor<UUID>(modelContainer: self.modelContainer)

  private let modelContainer: ModelContainer

  private init(modelContainer: ModelContainer) {
    self.modelContainer = modelContainer
  }
}
We expose our ModelActor as package for our unit tests — this will not be used directly from our component tree.
We can save ourselves some work with an additional constructor:
//  LocalStore.swift

extension LocalStore {
  private init(
    schema: Schema,
    configuration: ModelConfiguration
  ) throws {
    let container = try ModelContainer(
      for: schema,
      configurations: configuration
    )
    self.init(modelContainer: container)
  }
}
We will use this private constructor in two new public constructors:
//  LocalStore.swift

extension LocalStore {
  private static var models: Array<any PersistentModel.Type> {
    [AnimalModel.self, CategoryModel.self]
  }
}

extension LocalStore {
  public init(url: URL) throws {
    let schema = Schema(Self.models)
    let configuration = ModelConfiguration(url: url)
    try self.init(
      schema: schema,
      configuration: configuration
    )
  }
}

extension LocalStore {
  public init(isStoredInMemoryOnly: Bool = false) throws {
    let schema = Schema(Self.models)
    let configuration = ModelConfiguration(isStoredInMemoryOnly: isStoredInMemoryOnly)
    try self.init(
      schema: schema,
      configuration: configuration
    )
  }
}
Let’s turn our attention to PersistentSessionPersistentStore. We have six functions to implement: two queries and four mutations. All we have to do is forward these functions to our ModelActor:
//  LocalStore.swift

extension LocalStore: PersistentSessionPersistentStore {
  public func fetchAnimalsQuery() async throws -> Array<Animal> {
    try await self.modelActor.fetchAnimalsQuery()
  }

  public func addAnimalMutation(
    name: String,
    diet: Animal.Diet,
    categoryId: String
  ) async throws -> Animal {
    try await self.modelActor.addAnimalMutation(
      name: name,
      diet: diet,
      categoryId: categoryId
    )
  }

  public func updateAnimalMutation(
    animalId: String,
    name: String,
    diet: Animal.Diet,
    categoryId: String
  ) async throws -> Animal {
    try await self.modelActor.updateAnimalMutation(
      animalId: animalId,
      name: name,
      diet: diet,
      categoryId: categoryId
    )
  }

  public func deleteAnimalMutation(animalId: String) async throws -> Animal {
    try await self.modelActor.deleteAnimalMutation(animalId: animalId)
  }

  public func fetchCategoriesQuery() async throws -> Array<Category> {
    try await self.modelActor.fetchCategoriesQuery()
  }

  public func reloadSampleDataMutation() async throws -> (
    animals: Array<Animal>,
    categories: Array<Category>
  ) {
    try await self.modelActor.reloadSampleDataMutation()
  }
}
This tutorial is not intended to focus on teaching SwiftData, and we don’t intend to spend much time teaching advanced performance optimizations for SwiftData. Our LocalStore is a simple — but effective — demonstration of bringing the power of SwiftData and incremental database stores to our ImmutableData architecture. We don’t have to abandon SwiftData for good, we just keep it one place: out of our component tree.
You might decide to iterate on this approach. You might decide to update your model schema. You might decide to refactor this whole class on SQLite. Because our component tree only knows about immutable value types delivered through ImmutableData, you have a lot of freedom to experiment: your component tree is not locked-down with any kind of hard-coded dependency on any specific strategy to persist data on your filesystem.
Here is our AnimalsData package (including the tests available on our chapter-06 branch):
AnimalsData
├── Sources
│   └── AnimalsData
│       ├── Animal.swift
│       ├── AnimalsAction.swift
│       ├── AnimalsFilter.swift
│       ├── AnimalsReducer.swift
│       ├── AnimalsState.swift
│       ├── Category.swift
│       ├── Listener.swift
│       ├── LocalStore.swift
│       ├── PersistentSession.swift
│       └── Status.swift
└── Tests
    └── AnimalsDataTests
        ├── AnimalsFilterTests.swift
        ├── AnimalsReducerTests.swift
        ├── AnimalsStateTests.swift
        ├── ListenerTests.swift
        ├── LocalStoreTests.swift
        └── TestUtils.swift
We spent a lot of time completing this package, but we also learned a lot. Our Animals product shows us how the ImmutableData architecture scales to asynchronous operations and side effects that are not allowed from Reducer functions. We build a LocalStore implementation on SwiftData, but we could have chosen SQLite, Core Data, or another solution for a persistent database. In Chapter 14, we will even see how easy it is to implement this product on a remote store: we build a server for persisting state.
-
https://developer.apple.com/documentation/swiftdata/adding-and-editing-persistent-data-in-your-app ↩
-
https://redux.js.org/tutorials/fundamentals/part-7-standard-patterns#loading-state-enum-values ↩
-
https://redux.js.org/usage/structuring-reducers/normalizing-state-shape ↩ ↩2
-
https://redux.js.org/usage/deriving-data-selectors#encapsulating-state-shape-with-selectors ↩
-
https://redux.js.org/tutorials/fundamentals/part-5-ui-react#global-state-component-state-and-forms ↩
-
https://developer.apple.com/documentation/swiftdata/filtering-and-sorting-persistent-data#Add-a-sort-parameter-to-order-data ↩
-
https://redux.js.org/style-guide/#keep-state-minimal-and-derive-additional-values ↩
-
https://redux.js.org/usage/structuring-reducers/splitting-reducer-logic ↩
-
https://davedelong.com/blog/2021/04/03/core-data-and-swiftui/ ↩ ↩2
-
https://fatbobman.com/en/posts/reinventing-core-data-development-with-swiftdata-principles/#enums-and-codable ↩
-
https://fatbobman.com/en/posts/concurret-programming-in-swiftdata/#the-secret-of-the-modelactor-macro ↩
AnimalsDataClient
When building products with dependencies on complex services like SwiftData, it can be very handy to be able to run things “end-to-end” outside our UI. We can think of this as an “integration test”; this is in addition to — not a replacement for — conventional unit tests.
Before we build our component tree and put these data models on-screen, let’s build a simple command-line executable against our LocalStore. Our AnimalsDataClient executable will build against our production LocalStore class and persist its data on our filesystem. This means we can run our AnimalsDataClient executable, mutate our data, and see that new data the next time we run.
To run against SwiftData from a command-line executable, we need a little work to configure our module.1 The Workspace from the ImmutableData-Samples repo already includes this configuration to save us some time. All we have to do is select the AnimalsData package and open Sources/AnimalsDataClient/main.swift.
Here is all we need to begin operating on a LocalStore:
//  main.swift

import AnimalsData
import Foundation

func makeLocalStore() throws -> LocalStore<UUID> {
  if let url = Process().currentDirectoryURL?.appending(
    component: "default.store",
    directoryHint: .notDirectory
  ) {
    return try LocalStore<UUID>(url: url)
  }
  return try LocalStore<UUID>()
}

func main() async throws {
  let store = try makeLocalStore()

  let animals = try await store.fetchAnimalsQuery()
  print(animals)

  let categories = try await store.fetchCategoriesQuery()
  print(categories)
}

try await main()
Our main function builds a LocalStore instance. We can then read from our LocalStore and perform mutations.
Try it for yourself: think of this executable as a “playground”. Try adding mutations. Run your executable again and confirm the mutations were persisted.
AnimalsUI
We completed a lot of work to build the data models of our Animals product. Before we build our component tree, it might be helpful to rebuild the sample project from Apple to remember what we are cloning. We can count four main custom components for our product:
CategoryList: A component to display ourCategoryvalues sorted by name.AnimalList: A component to display ourAnimalvalues for oneCategorysorted by name.AnimalDetail: A component for displaying the properties of oneAnimalvalue.AnimalEditor: A component for adding a newAnimalvalues or updating an existing one.
Our Counter product was very simple. It was just one screen with just a few components. There are many more components we will compose together to build our Animals product, but much of the complexity has already been built in our AnimalsData module. Our AnimalsUI components will — for the most part — be “regular” SwiftUI. This is by design; you shouldn’t have to re-learn SwiftUI to build apps on ImmutableData. Most of what you already know about SwiftUI will still be relevant; you don’t have to “throw away” knowledge.
StoreKey
Similar to our Counter product, let’s begin with a little code to help us configure ImmutableData for our product domain. We begin with defining the Environment value where we will save our Store instance. Select the AnimalsUI package and add a new Swift file under Sources/AnimalsUI. Name this file StoreKey.swift.
Here is the first step:
//  StoreKey.swift

import AnimalsData
import ImmutableData
import ImmutableUI
import SwiftUI

@MainActor fileprivate struct StoreKey : @preconcurrency EnvironmentKey {
  static let defaultValue = ImmutableData.Store(
    initialState: AnimalsState(),
    reducer: AnimalsReducer.reduce
  )
}

extension EnvironmentValues {
  fileprivate var store: ImmutableData.Store<AnimalsState, AnimalsAction> {
    get {
      self[StoreKey.self]
    }
    set {
      self[StoreKey.self] = newValue
    }
  }
}
Once we define our Environment value, we can configure ImmutableUI to use this Store instance. Let’s begin with ImmutableUI.Provider:
//  StoreKey.swift

extension ImmutableUI.Provider {
  public init(
    _ store: Store,
    @ViewBuilder content: () -> Content
  ) where Store == ImmutableData.Store<AnimalsState, AnimalsAction> {
    self.init(
      \.store,
       store,
       content: content
    )
  }
}
Here is ImmutableUI.Dispatcher:
//  StoreKey.swift

extension ImmutableUI.Dispatcher {
  public init() where Store == ImmutableData.Store<AnimalsState, AnimalsAction> {
    self.init(\.store)
  }
}
Here is ImmutableUI.Selector:
//  StoreKey.swift

extension ImmutableUI.Selector {
  public init(
    id: some Hashable,
    label: String? = nil,
    filter isIncluded: (@Sendable (Store.State, Store.Action) -> Bool)? = nil,
    dependencySelector: repeat DependencySelector<Store.State, each Dependency>,
    outputSelector: OutputSelector<Store.State, Output>
  ) where Store == ImmutableData.Store<AnimalsState, AnimalsAction> {
    self.init(
      \.store,
       id: id,
       label: label,
       filter: isIncluded,
       dependencySelector: repeat each dependencySelector,
       outputSelector: outputSelector
    )
  }
}

extension ImmutableUI.Selector {
  public init(
    label: String? = nil,
    filter isIncluded: (@Sendable (Store.State, Store.Action) -> Bool)? = nil,
    dependencySelector: repeat DependencySelector<Store.State, each Dependency>,
    outputSelector: OutputSelector<Store.State, Output>
  ) where Store == ImmutableData.Store<AnimalsState, AnimalsAction> {
    self.init(
      \.store,
       label: label,
       filter: isIncluded,
       dependencySelector: repeat each dependencySelector,
       outputSelector: outputSelector
    )
  }
}
Our Animals product is simple enough that we will build our component tree all in one module. For larger projects, individual pieces of your product might have their own module: AnimalsMessengerUI, AnimalsPhotosUI, AnimalsFeedUI, and more. To save us from duplicating code, these extensions on ImmutableUI could live in just one place: AnimalsUICore or AnimalsUIInfra. Remember: the State of any product should save in just one Store instance; all components should be calling ImmutableUI with the same Environment value.
Dispatch
Our ImmutableUI.Dispatcher returns an ImmutableData.Dispatcher type. This means we can dispatch action values and thunks. Our convention is that our product should only dispatch action values from its component tree; thunks should be dispatched from a Listener. We saw a similar approach for our Counter product.
Add a new Swift file under Sources/AnimalsUI. Name this file Dispatch.swift.
//  Dispatch.swift

import AnimalsData
import ImmutableData
import ImmutableUI
import SwiftUI

@MainActor @propertyWrapper struct Dispatch: DynamicProperty {
  @ImmutableUI.Dispatcher() private var dispatcher

  init() {

  }

  var wrappedValue: (AnimalsAction) throws -> Void {
    self.dispatcher.dispatch
  }
}
There might be some interesting use cases for a component tree to dispatch thunks directly, but we strongly feel that the right approach will almost always be to keep that work in a proper Listener. If you really want to dispatch a thunk from a component, you do have that ability; we just strongly recommend you build a Listener.
Select
We defined several Selectors when we built AnimalsState. We will forward those Selectors to our component tree for displaying data. Add a new Swift file under Sources/AnimalsUI. Name this file Select.swift.
Our ImmutableUI.Selector requires us to define a didChange function to indicate that our slice of State has changed. Similar to our Counter product, we will define value equality to be our “default” didChange function.
//  Select.swift

import AnimalsData
import ImmutableData
import ImmutableUI
import SwiftUI

extension ImmutableUI.DependencySelector {
  init(select: @escaping @Sendable (State) -> Dependency) where Dependency : Equatable {
    self.init(select: select, didChange: { $0 != $1 })
  }
}

extension ImmutableUI.OutputSelector {
  init(select: @escaping @Sendable (State) -> Output) where Output : Equatable {
    self.init(select: select, didChange: { $0 != $1 })
  }
}

extension ImmutableUI.Selector {
  init(
    id: some Hashable,
    label: String? = nil,
    filter isIncluded: (@Sendable (Store.State, Store.Action) -> Bool)? = nil,
    dependencySelector: repeat @escaping @Sendable (Store.State) -> each Dependency,
    outputSelector: @escaping @Sendable (Store.State) -> Output
  ) where Store == ImmutableData.Store<AnimalsState, AnimalsAction>, repeat each Dependency : Equatable, Output : Equatable {
    self.init(
      id: id,
      label: label,
      filter: isIncluded,
      dependencySelector: repeat DependencySelector(select: each dependencySelector),
      outputSelector: OutputSelector(select: outputSelector)
    )
  }
}

extension ImmutableUI.Selector {
  init(
    label: String? = nil,
    filter isIncluded: (@Sendable (Store.State, Store.Action) -> Bool)? = nil,
    dependencySelector: repeat @escaping @Sendable (Store.State) -> each Dependency,
    outputSelector: @escaping @Sendable (Store.State) -> Output
  ) where Store == ImmutableData.Store<AnimalsState, AnimalsAction>, repeat each Dependency : Equatable, Output : Equatable {
    self.init(
      label: label,
      filter: isIncluded,
      dependencySelector: repeat DependencySelector(select: each dependencySelector),
      outputSelector: OutputSelector(select: outputSelector)
    )
  }
}
We can now begin to define the Selectors of our component tree. These will map to the Selectors we defined from AnimalsState. Let’s begin with SelectCategoriesValues:
//  Select.swift

@MainActor @propertyWrapper struct SelectCategoriesValues: DynamicProperty {
  @ImmutableUI.Selector(
    label: "SelectCategoriesValues",
    filter: AnimalsFilter.filterCategories(),
    dependencySelector: AnimalsState.selectCategories(),
    outputSelector: AnimalsState.selectCategoriesValues(sort: \AnimalsData.Category.name)
  ) var wrappedValue

  init() {

  }
}
Let’s think through this step-by-step. It might help if we look through these parameters from back-to-front:
- Our
outputSelectorto fetch the sortedCategoryvalues will beAnimalsState.selectCategoriesValues. This function takes a sort parameter, so we pass\AnimalsData.Category.nameto indicate we sortCategoryvalues by name. - Our
outputSelectorruns inO(n log n)time. To improve performance, ourdependencySelectorwill compare theDictionaryvalues returned byAnimalsState.selectCategories. - Our
dependencySelectorcomparesDictionaryvalues isO(n)time. To improve performance, ourfilterwill pass the Action and State values tofilterCategories. This means we can skip over Action values that would never affect the value returned byAnimalsState.selectCategories. - Our
labelvalue will be helpful when we enable debug logging in our next chapter.
Let’s define SelectCategoriesStatus:
//  Select.swift

@MainActor @propertyWrapper struct SelectCategoriesStatus: DynamicProperty {
  @ImmutableUI.Selector(
    label: "SelectCategoriesStatus",
    outputSelector: AnimalsState.selectCategoriesStatus()
  ) var wrappedValue: Status?

  init() {

  }
}
This one is easy: all we need is an outputSelector. Because this selector runs in constant time, we choose to skip defining a dependencySelector. We pass a label to enable debug logging.
Here is SelectCategory:
//  Select.swift

@MainActor @propertyWrapper struct SelectCategory: DynamicProperty {
  @ImmutableUI.Selector<ImmutableData.Store<AnimalsState, AnimalsAction>, AnimalsData.Category?> var wrappedValue: AnimalsData.Category?

  init(categoryId: AnimalsData.Category.ID?) {
    self._wrappedValue = ImmutableUI.Selector(
      id: categoryId,
      label: "SelectCategory(categoryId: \(categoryId ?? "nil"))",
      outputSelector: AnimalsState.selectCategory(categoryId: categoryId)
    )
  }

  init(animalId: Animal.ID?) {
    self._wrappedValue = ImmutableUI.Selector(
      id: animalId,
      label: "SelectCategory(animalId: \(animalId ?? "nil"))",
      outputSelector: AnimalsState.selectCategory(animalId: animalId)
    )
  }
}
The AnimalsState.selectCategory selector we defined takes a Category.ID as a parameter. We also built a selector that takes a Animal.ID as a parameter and returns the correct Category value for that Animal. We define SelectCategory to accept both: we can init with a Category.ID or a Animal.ID. We then forward that parameter to the correct version of AnimalsState.selectCategory.
When building SwiftUI components, it is common for the SwiftUI infra to keep the identity of a component consistent while the value of a component changes. Because our ImmutableUI.Selector is built on top of SwiftUI.State, the lifetime of its storage is tied to the lifetime of our component. Similar to a component built directly on SwiftUI.State, this can lead to problems. If the identity of our component remains the same, but the data we use to create that component changes, the values saved in our SwiftUI.State can look “stale”. If the value saved in our SwiftUI.State is derived from a parameter passed when our component value is created — which can happen multiple times without changing component identity — we need another way to “reset” that SwiftUI.State. The id parameter passed to ImmutableUI.Selector gives us that flexibility. If the identity of our component remains the same, but the Category.ID or Animal.ID changed, this will reset the SwiftUI.State used in ImmutableUI.Selector.
Here is SelectAnimalsValues:
//  Select.swift

@MainActor @propertyWrapper struct SelectAnimalsValues: DynamicProperty {
  @ImmutableUI.Selector<ImmutableData.Store<AnimalsState, AnimalsAction>, Dictionary<Animal.ID, Animal>, Array<Animal>> var wrappedValue: Array<Animal>

  init(categoryId: AnimalsData.Category.ID?) {
    self._wrappedValue = ImmutableUI.Selector(
      id: categoryId,
      label: "SelectAnimalsValues(categoryId: \(categoryId ?? "nil"))",
      filter: AnimalsFilter.filterAnimals(categoryId: categoryId),
      dependencySelector: AnimalsState.selectAnimals(categoryId: categoryId),
      outputSelector: AnimalsState.selectAnimalsValues(
        categoryId: categoryId,
        sort: \Animal.name
      )
    )
  }
}
This is very similar to what we built for SelectCategoriesValues. The biggest difference is that we need to pass a Category.ID. Similar to our previous example, this Category.ID should be passed as an id. If the identity of our component remains the same, but the Category.ID has been changed, we should reset our SwiftUI.State to prevent displaying stale data.
Here is SelectAnimalsStatus:
//  Select.swift

@MainActor @propertyWrapper struct SelectAnimalsStatus: DynamicProperty {
  @ImmutableUI.Selector(
    label: "SelectAnimalsStatus",
    outputSelector: AnimalsState.selectAnimalsStatus()
  ) var wrappedValue: Status?

  init() {

  }
}
This one is easy: all we need is an outputSelector. Similar to SelectCategoriesStatus, we skip defining a dependencySelector because we know this outputSelector will run in constant time.
Here is SelectAnimal:
//  Select.swift

@MainActor @propertyWrapper struct SelectAnimal: DynamicProperty {
  @ImmutableUI.Selector<ImmutableData.Store<AnimalsState, AnimalsAction>, Animal?> var wrappedValue: Animal?

  init(animalId: Animal.ID?) {
    self._wrappedValue = ImmutableUI.Selector(
      id: animalId,
      label: "SelectAnimal(animalId: \(animalId ?? "nil"))",
      outputSelector: AnimalsState.selectAnimal(animalId: animalId)
    )
  }
}
Here is SelectAnimalStatus:
//  Select.swift

@MainActor @propertyWrapper struct SelectAnimalStatus: DynamicProperty {
  @ImmutableUI.Selector<ImmutableData.Store<AnimalsState, AnimalsAction>, Status?> var wrappedValue: Status?

  init(animalId: Animal.ID?) {
    self._wrappedValue = ImmutableUI.Selector(
      id: animalId,
      label: "SelectAnimalStatus(animalId: \(animalId ?? "nil"))",
      outputSelector: AnimalsState.selectAnimalStatus(animalId: animalId)
    )
  }
}
There isn’t a rule telling you that Selectors have to be defined in one file away from the declaration of your components. Each Selector could be defined in the same place as the component that needs it — just keep in mind that we encourage you to reuse Selectors if you need the same data in more than one place. Do not define multiple Selectors that select the same identical slices of state; this can lead to unexpected behaviors if an engineer on your team ever updates one Selector but forgets to update the other ones. We also encourage you to think about discoverability when you organize these Selectors. Think about an engineer on your team building a new component that needs to display a sorted list of categories. Where would they go to search if that Selector has already been implemented? How could this Selector be placed in a way that your engineer would reuse the existing Selector before duplicating that work in a second place?
PreviewStore
Before we build and run our application, we will use Xcode Previews to see our component tree as we work. It will be helpful to build a way for Previews to run against a Store with our sample data already loaded. We already have this sample data loading in our LocalStore, but we would prefer something more lightweight just for Previews: LocalStore creates a SwiftData ModelContext. All we want is to load some data in-memory. We will only use this for Xcode Previews; we don’t plan to ship this to production.
Add a new Swift file under Sources/AnimalsUI. Name this file PreviewStore.swift. We’re going to build a component that forwards a Store to a Provider. We can then wrap the component we wish to preview with a PreviewStore component for it to read against sample data.
//  PreviewStore.swift

import AnimalsData
import ImmutableData
import ImmutableUI
import SwiftUI

@MainActor struct PreviewStore<Content> where Content : View {
  @State private var store: ImmutableData.Store<AnimalsState, AnimalsAction> = {
    do {
      let store = ImmutableData.Store(
        initialState: AnimalsState(),
        reducer: AnimalsReducer.reduce
      )
      try store.dispatch(
        action: .data(
          .persistentSession(
            .didFetchCategories(
              result: .success(
                categories: [
                  .amphibian,
                  .bird,
                  .fish,
                  .invertebrate,
                  .mammal,
                  .reptile,
                ]
              )
            )
          )
        )
      )
      try store.dispatch(
        action: .data(
          .persistentSession(
            .didFetchAnimals(
              result: .success(
                animals: [
                  .dog,
                  .cat,
                  .kangaroo,
                  .gibbon,
                  .sparrow,
                  .newt,
                ]
              )
            )
          )
        )
      )
      return store
    } catch {
      fatalError("\(error)")
    }
  }()
  private let content: Content

  init(@ViewBuilder content: () -> Content) {
    self.content = content()
  }
}

extension PreviewStore: View {
  var body: some View {
    Provider(self.store) {
      self.content
    }
  }
}
After we create our Store, we pass a didFetchCategories action with our Category values and a didFetchAnimals action with our Animal values. We use this to simulate what will happen in production without going to the trouble of building a real LocalStore.
Xcode Previews can be powerful tools for engineering your SwiftUI products, but your decision to build Previews can be orthogonal to your decision to build from ImmutableData. We use Xcode Previews as a convention for our tutorials, but we don’t have a very strong opinion about how you would choose to implement Xcode Previews in your own products. You might prefer to build and run your app live on-device. Choose the approach that works best for your team and your product.
Debug
Before we start building components, there is more little piece that will help for debugging. SwiftUI ships a function called _printChanges that can help us track when the infra is computing the body property of a component.1 Let’s add a way to turn this on and off from UserDefaults.
Add a new Swift file under Sources/AnimalsUI. Name this file Debug.swift.
//  Debug.swift

import SwiftUI

extension UserDefaults {
  fileprivate var isDebug: Bool {
    self.bool(forKey: "com.northbronson.AnimalsUI.Debug")
  }
}

extension View {
  static func debugPrint() {
#if DEBUG
    if UserDefaults.standard.isDebug {
      self._printChanges()
    }
#endif
  }
}
When we build our components, we can call debugPrint from our body property. If the com.northbronson.AnimalsUI.Debug flag is false, nothing happens.
We use the debugPrint function liberally for components in our sample products, but we don’t have a very strong opinion about bringing this to your own products. You might have a different pattern or convention to follow for tracking component lifecycle. Choose the approach that works best for your team and your product.
AnimalEditor
We’re about to build our first component for this product. Our AnimalEditor component will be displayed when the user requests to edit an existing Animal value or create a new Animal value. This is a simple form-style component with options to select a name, a category, and a diet. The Cancel button should dismiss the component with no mutations to our global state. The Save button should attempt to mutate our global state with the selected parameters.
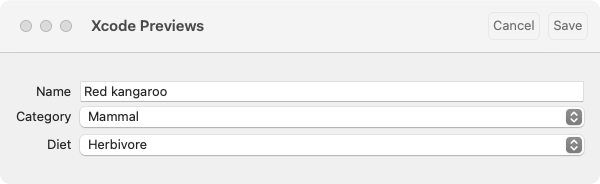
The components we build for this product will be much more complex that what we built for our Counter application. This makes sense: our Data Model is more complex. Before we begin writing code, let’s explain what our approach to components will look like.
Engineers from the ReactJS community had a pattern you might have heard about: Presenters and Containers.2 This patterns means different things to different people, but let’s just quickly focus on this observation from Dan Abramov:
- Presenter Components are concerned with how things look.
- Container Components are concerned with how things work.
As Dan mentions in this essay, presenters and containers are not explicitly encouraged in “modern” React applications, but this pattern can still be available and legit as a matter of personal engineering style.
Our pattern for building components in the ImmutableData tutorial will follow a similar pattern: Presenter Components for how things look and Container Components for how things work. We follow this convention for our sample products, but we don’t have a strong opinion whether or not this belongs in your own products. One advantage we do like about this pattern is that breaking apart our mental model between Presenters and Containers gives us two “domains” to think about. Since our Presenter Domains are regular SwiftUI, it gives us a chance to focus our attention on making ImmutableData work alongside the traditional SwiftUI you already know about.
In addition to Presenters and Containers, we also build a “root” component, which is responsible for building our Container. There are three basic roles we plan to use these three categories for:
- Root Components build Container Components. Root Components also manage component state that is needed for our Selectors. This is “local” state that we do not choose to save in our
Store, but it is local state that our Selectors depend on. An example could be a component that displays aListofPersonvalues. We might have the ability to sort these values by first name or last name. The state to manage what parameter is used for our sorting algorithm is local state: this belongs in our component and not in ourStore. Because our Selector to return the sortedArrayofPersonvalues needs the parameter to use for sorting, we manage this in our Root Component and pass it to our Container Component. - Container Components build Presenter Components. Container Components are where we concentrate on integrating SwiftUI with
ImmutableData. Here is where we define the Selectors this component will depend on, and here is where wedispatchAction values back to ourStorewhen an important user event occurs. - Presenter Components build Presenter Components. Presenter Components can also leverage SwiftUI navigation to bring the user to new Root Components. What we want to concentrate on is keeping
ImmutableDataout of our Presenter Components. Building Presenter Components should look like regular SwiftUI as much as possible. Presenter Components will also manage local state that does not drive our Selectors. An example would be aFormcomponent with options to select new parameters on aPersonvalue. When the user selects to save thatFormdata, we shoulddispatchthat data to ourStorewith an Action value, but the ephemeral state of thatFormdata does not drive our Selectors while it is being edited.
This might sound a little abstract, but it will make more sense once we see some examples. Let’s get started and see what this looks like. Add a new Swift file under Sources/AnimalsUI. Name this file AnimalEditor.swift.
Let’s begin with a AnimalEditor Root Component:
//  AnimalEditor.swift

import AnimalsData
import SwiftUI

@MainActor struct AnimalEditor {
  @State private var id: Animal.ID
  @Binding private var isPresented: Bool

  init(
    id: Animal.ID?,
    isPresented: Binding<Bool>
  ) {
    self._id = State(initialValue: id ?? UUID().uuidString)
    self._isPresented = isPresented
  }
}

extension AnimalEditor: View {
  var body: some View {
    let _ = Self.debugPrint()
    Container(
      id: self.id,
      isPresented: self.$isPresented
    )
  }
}
We create our Root Component with two parameters: a Animal.ID value and a SwiftUI.Binding to a Bool. Our id parameter represents the Animal value being edited. Our isPresented binding will be used to dismiss this component when our Animal value is saved.
Before we construct our Container Component, we perform one extra step on our Animal.ID value. When a user chooses to begin creating a new Animal value, we don’t have an Animal.ID. If the user passed a nil value for id when this Root Component was created, we still would like a “placeholder” value here for us to use when tracking the Status of our asynchronous operation to save the new Animal to our PersistentStore. We save this placeholder values as a UUID value in SwiftUI.State. We use SwiftUI.State to keep this placeholder value consistent if the infra recreates this component value: we don’t want this value to change out from underneath us before our PersistentStore has completed its asynchronous operation.
There is a small performance optimization we can discuss for a future fix. The lifetime of this SwiftUI.State value is tied to the lifetime of our component identity. The value of our component could be created many times for one identity. The work in init should be kept as small — and as fast — as possible. Even though the lifetime of our SwiftUI.State could outlive the lifetime of our component value, creating a new component value can still produce a new UUID value. Because the identity of our component has not changed, this value was not needed; it’s just thrown away. An optimization would be to not have created it at all when the component identity has not changed.3 This is something that happens to any SwiftUI component that creates SwiftUI.State with a default value. There’s nothing specific to ImmutableData about why this happens, and strategies and techniques to optimize this can be orthogonal to our work on ImmutableData. This would be good to optimize in a production application, but for our purposes — keeping a tutorial moving to teach the ImmutableData architecture — we will optimize for keeping this code short and file a mental TODO to investigate this more another day.
Let’s turn our attention to our Container Component. This will be where we integrate with the ImmutableData architecture. This is where our Selectors will live and where we dispatch action values back to our Store. Here is our first step:
//  AnimalEditor.swift

extension AnimalEditor {
  @MainActor fileprivate struct Container {
    @SelectAnimal private var animal: Animal?
    @SelectAnimalStatus private var status: Status?
    @SelectCategoriesValues private var categories: Array<AnimalsData.Category>

    private let id: Animal.ID
    @Binding private var isPresented: Bool

    @Dispatch private var dispatch

    init(
      id: Animal.ID,
      isPresented: Binding<Bool>
    ) {
      self._animal = SelectAnimal(animalId: id)
      self._status = SelectAnimalStatus(animalId: id)
      self._categories = SelectCategoriesValues()

      self.id = id
      self._isPresented = isPresented
    }
  }
}
Our Container Component is constructed with an id value — which will be a placeholder value when we create a new Animal value — and a isPresented binding that will be used to dismiss this component.
This container constructs three selectors:
SelectAnimal: Theidvalue is passed toSelectAnimal. If our user is creating a newAnimalvalue, thisidwill be a placeholder value. That implies thatSelectAnimalwill returnnil. As an optimization, we could pass some extra context when our Container is constructed to indicate that thisidis a placeholder. Since we builtSelectAnimalto return in constant time, we will not spend too much time optimizing this.SelectAnimalStatus: Editing anAnimalvalue or creating a new one will begin an asynchronous operation on ourPersistentSession. We can track theStatusvalue of that operation here.SelectCategoriesValues: OurFormwill give users the ability to choose aCategoryvalue for thisAnimal. This selector will return allCategoryvalues sorted by name. This Selector takes no parameters, which means we could choose to skip an explicit construct ininitto save some space.
In addition to our Selectors, our Container Component also constructs a Dispatch value. We will use this to respond to user events. Let’s begin with a user event to indicate we want to add a new Animal value:
//  AnimalEditor.swift

extension AnimalEditor.Container {
  private func onTapAddAnimalButton(data: AnimalEditor.Presenter.AddAnimalData) {
    do {
      try self.dispatch(
        .ui(
          .animalEditor(
            .onTapAddAnimalButton(
              id: data.id,
              name: data.name,
              diet: data.diet,
              categoryId: data.categoryId
            )
          )
        )
      )
    } catch {
      print(error)
    }
  }
}
The AnimalEditor.Presenter.AddAnimalData type will be added later. This is just a payload to deliver the data our user selected for this new Animal.
As previously discussed, a robust discussion about error handling in production SwiftUI applications is outside the scope of this tutorial. Our focus is on teaching ImmutableData; error handling can be learned independently in a separate tutorial. For now, we just print an error if our dispatch failed.
Remember, our goal here is to think declaratively. Our action values are not imperative instructions. Our component tree is not telling our Store what to do. Our component tree is telling our Store what just happened.
Here is the next action value:
//  AnimalEditor.swift

extension AnimalEditor.Container {
  private func onTapUpdateAnimalButton(data: AnimalEditor.Presenter.UpdateAnimalData) {
    do {
      try self.dispatch(
        .ui(
          .animalEditor(
            .onTapUpdateAnimalButton(
              animalId: data.animalId,
              name: data.name,
              diet: data.diet,
              categoryId: data.categoryId
            )
          )
        )
      )
    } catch {
      print(error)
    }
  }
}
Now, we can build our body and our Presenter Component:
//  AnimalEditor.swift

extension AnimalEditor.Container: View {
  var body: some View {
    let _ = Self.debugPrint()
    AnimalEditor.Presenter(
      animal: self.animal,
      status: self.status,
      categories: self.categories,
      id: self.id,
      isPresented: self.$isPresented,
      onTapAddAnimalButton: self.onTapAddAnimalButton,
      onTapUpdateAnimalButton: self.onTapUpdateAnimalButton
    )
  }
}
Because our Presenter Component does not know about ImmutableData — we keep that out of Presenters by design — our Presenter Component does not know how to dispatch actions on user events. We pass our onTapAddAnimalButton and onTapUpdateAnimalButton functions as parameters; these will be called when user events happen.
Let’s build our Presenter. Here is the main declaration:
//  AnimalEditor.swift

extension AnimalEditor {
  @MainActor fileprivate struct Presenter {
    @State private var name: String
    @State private var diet: Animal.Diet?
    @State private var categoryId: AnimalsData.Category.ID?

    private let animal: Animal?
    private let status: Status?
    private let categories: Array<AnimalsData.Category>
    private let id: Animal.ID
    @Binding private var isPresented: Bool
    private let onTapAddAnimalButton: (AddAnimalData) -> Void
    private let onTapUpdateAnimalButton: (UpdateAnimalData) -> Void

    init(
      animal: Animal?,
      status: Status?,
      categories: Array<AnimalsData.Category>,
      id: Animal.ID,
      isPresented: Binding<Bool>,
      onTapAddAnimalButton: @escaping (AddAnimalData) -> Void,
      onTapUpdateAnimalButton: @escaping (UpdateAnimalData) -> Void
    ) {
      self._name = State(initialValue: animal?.name ?? "")
      self._diet = State(initialValue: animal?.diet)
      self._categoryId = State(initialValue: animal?.categoryId)

      self.animal = animal
      self.status = status
      self.categories = categories
      self._isPresented = isPresented
      self.id = id
      self.onTapAddAnimalButton = onTapAddAnimalButton
      self.onTapUpdateAnimalButton = onTapUpdateAnimalButton
    }
  }
}
The parameters we recognize from our Container Component. We add three SwiftUI.State properties for saving the current selections from our Form. This is local component state: before a save operation takes place, this state is not part of our global Store. Because our Selectors do not need this local state for deriving data, we can define it here in Presenter (as opposed to the Root Component).
Let’s build the two types we use for passing data on user events:
//  AnimalEditor.swift

extension AnimalEditor.Presenter {
  struct AddAnimalData: Hashable, Sendable {
    let id: Animal.ID
    let name: String
    let diet: Animal.Diet
    let categoryId: AnimalsData.Category.ID
  }
}

extension AnimalEditor.Presenter {
  struct UpdateAnimalData: Hashable, Sendable {
    let animalId: Animal.ID
    let name: String
    let diet: Animal.Diet
    let categoryId: AnimalsData.Category.ID
  }
}
We could choose to pass all these parameters directly to the closures from our Container (without building an extra type), but we lose the ability to use argument labels to help keep these parameters in the correct place.4 Using custom types to pass this data to our closure gives us a little stricter compile time checking that we are doing the correct thing. You are free to follow this pattern in your own products if you choose.
Our Presenter component is regular SwiftUI: there’s nothing here that needs to know about ImmutableData. We assume a familiarity with SwiftUI components and we’re going to go a little fast when we build our Presenters. If any of these SwiftUI components are new to you, please reference the documentation and sample code projects from Apple to learn more.
Here is a Form for capturing user selections:
//  AnimalEditor.swift

extension AnimalEditor.Presenter {
  private var form: some View {
    Form {
      TextField("Name", text: self.$name)
      Picker("Category", selection: self.$categoryId) {
        Text("Select a category").tag(nil as String?)
        ForEach(self.categories) { category in
          Text(category.name).tag(category.categoryId as String?)
        }
      }
      Picker("Diet", selection: self.$diet) {
        Text("Select a diet").tag(nil as Animal.Diet?)
        ForEach(Animal.Diet.allCases, id: \.self) { diet in
          Text(diet.rawValue).tag(diet as Animal.Diet?)
        }
      }
    }
  }
}
Here is a Button to cancel our edits:
//  AnimalEditor.swift

extension AnimalEditor.Presenter {
  private var cancelButton: some ToolbarContent {
    ToolbarItem(placement: .cancellationAction) {
      Button("Cancel", role: .cancel) {
        self.isPresented = false
      }
    }
  }
}
Here is a Button to attempt to save our edits:
//  AnimalEditor.swift

extension AnimalEditor.Presenter {
  private var saveButton: some ToolbarContent {
    ToolbarItem(placement: .confirmationAction) {
      Button("Save") {
        if let diet = self.diet,
           let categoryId = self.categoryId {
          if self.animal != nil {
            self.onTapUpdateAnimalButton(
              UpdateAnimalData(
                animalId: self.id,
                name: self.name,
                diet: diet,
                categoryId: categoryId
              )
            )
          } else {
            self.onTapAddAnimalButton(
              AddAnimalData(
                id: self.id,
                name: self.name,
                diet: diet,
                categoryId: categoryId
              )
            )
          }
        }
      }
      .disabled(self.isSaveDisabled)
    }
  }
}
Our AnimalEditor component handles both adding a new Animal and editing an existing Animal. This means we have some conditional logic to confirm if our user is adding or editing. An alternative would be two different components: a Creator and a Editor. We don’t have a very strong opinion about the tradeoffs — this is a SwiftUI question, not a ImmutableData question. You can choose to design components for your own products using the pattern that works best for you.
There are going to be times we want to prevent the user from attempting a save:
- A save operation is already in progress for this
Animal. - The
namefield is empty. - The
dietfield is empty. - The
categoryfield is empty.
Here is what that looks like:
//  AnimalEditor.swift

extension AnimalEditor.Presenter {
  private var isSaveDisabled: Bool {
    if self.status == .waiting {
      return true
    }
    if self.name.isEmpty {
      return true
    }
    if self.diet == nil {
      return true
    }
    if self.categoryId == nil {
      return true
    }
    return false
  }
}
Now, we are ready to build our body property:
//  AnimalEditor.swift

extension AnimalEditor.Presenter: View {
  var body: some View {
    let _ = Self.debugPrint()
    self.form
      .navigationTitle(self.animal != nil ? "Edit Animal" : "Add Animal")
      .onChange(of: self.status) {
        if self.status == .success {
          self.isPresented = false
        }
      }
      .toolbar {
        self.cancelButton
        self.saveButton
      }
      .padding()
  }
}
Because our save operation is asynchronous, we don’t dismiss our component as soon as the user taps the save button. If the save completes successfully, our component will refresh with status equal to success. We can then dismiss our component with the isPresented value.
We use Containers and Presenters for teaching ImmutableData, but we don’t have a very strong opinion about recommending this pattern for your own products. Could we have merged our Containers and Presenter? There’s nothing stopping us. We did need a Root Component to save a SwiftUI.State variable for passing to our Selectors, but there are other SwiftUI patterns you might find for this same situation.
One advantage we see with this approach is Presenters are “free” of ImmutableData by design. If you have an engineer on your team who is brand-new to ImmutableData and experienced in SwiftUI, having them focus on building Presenters would be one way to keep them shipping measurable impact while they ramp up on learning ImmutableData. If you have an engineer that is brand-new to ImmutableData and SwiftUI, breaking components apart with Containers and Presenters is a way to avoid trying to teach them “two things at once”.
Let’s build some Xcode Previews to see what this component looks like. Here is our Root Component created with an existing Animal.ID:
//  AnimalEditor.swift

#Preview {
  @Previewable @State var isPresented: Bool = true
  NavigationStack {
    PreviewStore {
      AnimalEditor(
        id: Animal.kangaroo.animalId,
        isPresented: $isPresented
      )
    }
  }
}
We remember to wrap our AnimalEditor component with PreviewStore to make the sample data available.
Here is our AnimalEditor with no Animal.ID to indicate we are creating a new Animal:
//  AnimalEditor.swift

#Preview {
  @Previewable @State var isPresented: Bool = true
  NavigationStack {
    PreviewStore {
      AnimalEditor(
        id: nil,
        isPresented: $isPresented
      )
    }
  }
}
Because our Presenter Component has no dependencies on ImmutableData, we can build an Xcode Preview for our Presenter without any PreviewStore:
//  AnimalEditor.swift

#Preview {
  @Previewable @State var isPresented: Bool = true
  NavigationStack {
    AnimalEditor.Presenter(
      animal: .kangaroo,
      status: nil,
      categories: [
        .amphibian,
        .bird,
        .fish,
        .invertebrate,
        .mammal,
        .reptile,
      ],
      id: Animal.kangaroo.animalId,
      isPresented: $isPresented,
      onTapAddAnimalButton: { data in
        print("onTapAddAnimalButton: \(data)")
      },
      onTapUpdateAnimalButton: { data in
        print("onTapUpdateAnimalButton: \(data)")
      }
    )
  }
}

#Preview {
  @Previewable @State var isPresented: Bool = true
  NavigationStack {
    AnimalEditor.Presenter(
      animal: nil,
      status: nil,
      categories: [
        .amphibian,
        .bird,
        .fish,
        .invertebrate,
        .mammal,
        .reptile,
      ],
      id: "1234",
      isPresented: $isPresented,
      onTapAddAnimalButton: { data in
        print("onTapAddAnimalButton: \(data)")
      },
      onTapUpdateAnimalButton: { data in
        print("onTapUpdateAnimalButton: \(data)")
      }
    )
  }
}
AnimalDetail
Our AnimalDetail component will display the name, category, and diet values of an Animal. We also build buttons to edit or delete the Animal.
We follow a similar pattern: our Root Component constructs a Container Component, our Container Component constructs Presenter Components, and our Presenter Component constructs Presenter Components. We will also leverage standard SwiftUI navigation to construct a Root Component from our Presenter Component.
Add a new Swift file under Sources/AnimalsUI. Name this file AnimalDetail.swift. Here is our Root Component:
//  AnimalDetail.swift

import AnimalsData
import SwiftUI

@MainActor struct AnimalDetail {
  private let selectedAnimalId: Animal.ID?

  init(selectedAnimalId: Animal.ID?) {
    self.selectedAnimalId = selectedAnimalId
  }
}

extension AnimalDetail : View {
  var body: some View {
    let _ = Self.debugPrint()
    Container(selectedAnimalId: self.selectedAnimalId)
  }
}
We construct our AnimalDetail with an optional Animal.ID. We pass our Animal.ID to our Container:
//  AnimalDetail.swift

extension AnimalDetail {
  @MainActor fileprivate struct Container {
    @SelectAnimal private var animal: Animal?
    @SelectCategory private var category: AnimalsData.Category?
    @SelectAnimalStatus private var status: Status?

    @Dispatch private var dispatch

    init(selectedAnimalId: Animal.ID?) {
      self._animal = SelectAnimal(animalId: selectedAnimalId)
      self._category = SelectCategory(animalId: selectedAnimalId)
      self._status = SelectAnimalStatus(animalId: selectedAnimalId)
    }
  }
}
For a given Animal.ID value, we can select the Animal, the Category, and the Status through ImmutableData. On app launch, our Animal.ID is nil; these values returned by our Selectors will also be nil. When that happens, we will build our Presenter to display a special message to the user.
There is one action value we can dispatch to our Store:
//  AnimalDetail.swift

extension AnimalDetail.Container {
  private func onTapDeleteSelectedAnimalButton(animal: Animal) {
    do {
      try self.dispatch(
        .ui(
          .animalDetail(
            .onTapDeleteSelectedAnimalButton(
              animalId: animal.id
            )
          )
        )
      )
    } catch {
      print(error)
    }
  }
}
Here is our body:
//  AnimalDetail.swift

extension AnimalDetail.Container: View {
  var body: some View {
    let _ = Self.debugPrint()
    AnimalDetail.Presenter(
      animal: self.animal,
      category: self.category,
      status: self.status,
      onTapDeleteSelectedAnimalButton: self.onTapDeleteSelectedAnimalButton
    )
  }
}
Here is our Presenter:
//  AnimalDetail.swift

extension AnimalDetail {
  @MainActor fileprivate struct Presenter {
    @State private var isAlertPresented = false
    @State private var isSheetPresented = false

    private let animal: Animal?
    private let category: AnimalsData.Category?
    private let status: Status?
    private let onTapDeleteSelectedAnimalButton: (Animal) -> Void

    init(
      animal: Animal?,
      category: AnimalsData.Category?,
      status: Status?,
      onTapDeleteSelectedAnimalButton: @escaping (Animal) -> Void
    ) {
      self.animal = animal
      self.category = category
      self.status = status
      self.onTapDeleteSelectedAnimalButton = onTapDeleteSelectedAnimalButton
    }
  }
}
Here is our body:
//  AnimalDetail.swift

extension AnimalDetail.Presenter: View {
  var body: some View {
    let _ = Self.debugPrint()
    if let animal = self.animal,
       let category = self.category {
      VStack {
        Text(animal.name)
          .font(.title)
          .padding()
        List {
          HStack {
            Text("Category")
            Spacer()
            Text(category.name)
          }
          HStack {
            Text("Diet")
            Spacer()
            Text(animal.diet.rawValue)
          }
        }
      }
      .alert("Delete \(animal.name)?", isPresented: self.$isAlertPresented) {
        Button("Yes, delete \(animal.name)", role: .destructive) {
          self.onTapDeleteSelectedAnimalButton(animal)
        }
      }
      .sheet(isPresented: self.$isSheetPresented) {
        NavigationStack {
          AnimalEditor(
            id: animal.id,
            isPresented: self.$isSheetPresented
          )
        }
      }
      .toolbar {
        Button { self.isSheetPresented = true } label: {
          Label("Edit \(animal.name)", systemImage: "pencil")
        }
        .disabled(self.status == .waiting)
        Button { self.isAlertPresented = true } label: {
          Label("Delete \(animal.name)", systemImage: "trash")
        }
        .disabled(self.status == .waiting)
      }
    } else {
      ContentUnavailableView("Select an animal", systemImage: "pawprint")
    }
  }
}
This is a lot of code, but we are looking at some standard SwiftUI; there is no ImmutableData in our Presenter. You might choose to compose this Presenter from additional components to improve readability. Our goal with this tutorial is to teach ImmutableData; for the most part, we don’t have very strong opinions about how you build your Presenter Components in your own Products.
Here are two Previews of our Root Component:
//  AnimalDetail.swift

#Preview {
  NavigationStack {
    PreviewStore {
      AnimalDetail(selectedAnimalId: Animal.kangaroo.animalId)
    }
  }
}

#Preview {
  NavigationStack {
    PreviewStore {
      AnimalDetail(selectedAnimalId: nil)
    }
  }
}
Here are two Previews of our Presenter Component:
//  AnimalDetail.swift

#Preview {
  NavigationStack {
    AnimalDetail.Presenter(
      animal: .kangaroo,
      category: .mammal,
      status: nil,
      onTapDeleteSelectedAnimalButton: { animal in
        print("onTapDeleteSelectedAnimalButton: \(animal)")
      }
    )
  }
}

#Preview {
  NavigationStack {
    AnimalDetail.Presenter(
      animal: nil,
      category: nil,
      status: nil,
      onTapDeleteSelectedAnimalButton: { animal in
        print("onTapDeleteSelectedAnimalButton: \(animal)")
      }
    )
  }
}
AnimalList
Our AnimalList component will display the Animal values for a given Category.ID sorted by name. We also construct a button to add a new Animal to our Store.
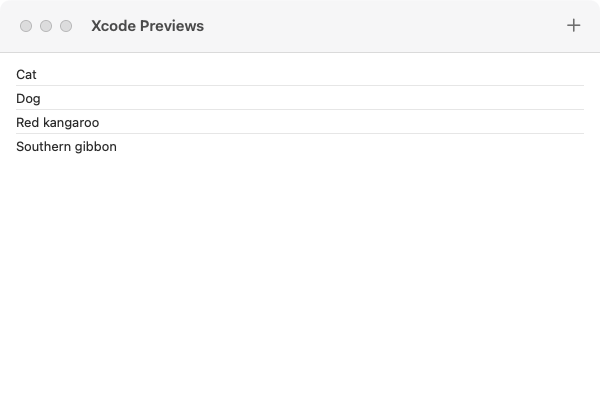
Add a new Swift file under Sources/AnimalsUI. Name this file AnimalList.swift. Here is our Root Component:
//  AnimalList.swift

import AnimalsData
import SwiftUI

@MainActor struct AnimalList {
  private let selectedCategoryId: AnimalsData.Category.ID?
  @Binding private var selectedAnimalId: Animal.ID?

  init(
    selectedCategoryId: AnimalsData.Category.ID?,
    selectedAnimalId: Binding<Animal.ID?>
  ) {
    self.selectedCategoryId = selectedCategoryId
    self._selectedAnimalId = selectedAnimalId
  }
}

extension AnimalList : View {
  var body: some View {
    Container(
      selectedCategoryId: self.selectedCategoryId,
      selectedAnimalId: self.$selectedAnimalId
    )
  }
}
We construct our Root Component with a Category.ID and a SwiftUI.Binding to a Animal.ID. We choose a SwiftUI.Binding because selecting a new Animal in this component should also update the Animal we display in our AnimalDetail component.
Here is our Container:
//  AnimalList.swift

extension AnimalList {
  @MainActor fileprivate struct Container {
    @SelectAnimalsValues private var animals: Array<Animal>
    @SelectCategory private var category: AnimalsData.Category?
    @SelectAnimalsStatus private var status: Status?

    @Binding private var selectedAnimalId: Animal.ID?

    @Dispatch private var dispatch

    init(
      selectedCategoryId: AnimalsData.Category.ID?,
      selectedAnimalId: Binding<Animal.ID?>
    ) {
      self._animals = SelectAnimalsValues(categoryId: selectedCategoryId)
      self._category = SelectCategory(categoryId: selectedCategoryId)
      self._status = SelectAnimalsStatus()

      self._selectedAnimalId = selectedAnimalId
    }
  }
}
We pass our Category.ID to two selectors: we select the sorted Animal values and we select the Category value itself. We also select the Status of the last time Animal values were fetched from our PersistentStore, but we don’t pass a Category.ID for that.
Our Category.ID value will be nil on app launch; we will display a special message in our Presenter if that happens.
A legit optimization would be to update this fetch to fetch only the Animal values for a specific Category.ID. If we are about to display all Reptile values, we might not need to fetch all Mammal values. For larger products with large amounts of data, this optimization would be very important to conserve CPU and Battery. For now, we keep things simple and file a mental TODO to improve this with a more efficient option in the future.
There are two action values we can dispatch to our Store:
//  AnimalList.swift

extension AnimalList.Container {
  private func onAppear() {
    do {
      try self.dispatch(
        .ui(
          .animalList(
            .onAppear
          )
        )
      )
    } catch {
      print(error)
    }
  }
}

extension AnimalList.Container {
  private func onTapDeleteSelectedAnimalButton(animal: Animal) {
    do {
      try self.dispatch(
        .ui(
          .animalList(
            .onTapDeleteSelectedAnimalButton(
              animalId: animal.id
            )
          )
        )
      )
    } catch {
      print(error)
    }
  }
}
Here is our body:
//  AnimalList.swift

extension AnimalList.Container: View {
  var body: some View {
    let _ = Self.debugPrint()
    AnimalList.Presenter(
      animals: self.animals,
      category: self.category,
      status: self.status,
      selectedAnimalId: self.$selectedAnimalId,
      onAppear: self.onAppear,
      onTapDeleteSelectedAnimalButton: self.onTapDeleteSelectedAnimalButton
    )
  }
}
Our next step is our Presenter:
//  AnimalList.swift

extension AnimalList {
  @MainActor fileprivate struct Presenter {
    @State private var isSheetPresented = false

    private let animals: Array<Animal>
    private let category: AnimalsData.Category?
    private let status: Status?
    @Binding private var selectedAnimalId: Animal.ID?
    private let onAppear: () -> Void
    private let onTapDeleteSelectedAnimalButton: (Animal) -> Void

    init(
      animals: Array<Animal>,
      category: AnimalsData.Category?,
      status: Status?,
      selectedAnimalId: Binding<Animal.ID?>,
      onAppear: @escaping () -> Void,
      onTapDeleteSelectedAnimalButton: @escaping (Animal) -> Void
    ) {
      self.animals = animals
      self.category = category
      self.status = status
      self._selectedAnimalId = selectedAnimalId
      self.onAppear = onAppear
      self.onTapDeleteSelectedAnimalButton = onTapDeleteSelectedAnimalButton
    }
  }
}
Here is our List component:
//  AnimalList.swift

extension AnimalList.Presenter {
  var list: some View {
    List(selection: self.$selectedAnimalId) {
      ForEach(self.animals) { animal in
        NavigationLink(animal.name, value: animal.id)
          .deleteDisabled(false)
      }
      .onDelete { indexSet in
        for index in indexSet {
          let animal = self.animals[index]
          self.onTapDeleteSelectedAnimalButton(animal)
        }
      }
    }
  }
}
Our List component displays our sorted Animal values. Every value is built with a NavigationLink to indicate we leverage standard SwiftUI navigation patterns when this Animal is selected. We also save the value of our Animal selection to our SwiftUI.Binding.
Swiping on an Animal value gives users the opportunity to delete the Animal. A potential edge-casey behavior to defend against would be to guarantee that a given Animal is not currently waiting on an asynchronous operation before attempting to delete. A potential solution to this would be to define a selector to return all Animal.ID values that are currently waiting on an asynchronous operation, and then use those values to set deleteDisabled to true when our user should not have the option to delete this Animal value. For now, we file a mental TODO to keep this in mind for a future update.
Here is a button to add a new Animal:
//  AnimalList.swift

extension AnimalList.Presenter {
  var addButton: some View {
    Button { self.isSheetPresented = true } label: {
      Label("Add an animal", systemImage: "plus")
    }
    .disabled(self.status == .waiting)
  }
}
Here is our body:
//  AnimalList.swift

extension AnimalList.Presenter: View {
  var body: some View {
    let _ = Self.debugPrint()
    if let category = self.category {
      self.list
        .navigationTitle(category.name)
        .onAppear {
          self.onAppear()
        }
        .overlay {
          if self.animals.isEmpty {
            ContentUnavailableView {
              Label("No animals in this category", systemImage: "pawprint")
            } description: {
              self.addButton
            }
          }
        }
        .sheet(isPresented: self.$isSheetPresented) {
          NavigationStack {
            AnimalEditor(
              id: nil,
              isPresented: self.$isSheetPresented
            )
          }
        }
        .toolbar {
          ToolbarItem(placement: .primaryAction) {
            self.addButton
          }
        }
    } else {
      ContentUnavailableView("Select a category", systemImage: "sidebar.left")
    }
  }
}
Here are two previews:
//  AnimalList.swift

#Preview {
  @Previewable @State var selectedAnimal: Animal.ID?
  NavigationStack {
    PreviewStore {
      AnimalList(
        selectedCategoryId: Category.mammal.id,
        selectedAnimalId: $selectedAnimal
      )
    }
  }
}

#Preview {
  @Previewable @State var selectedAnimalId: Animal.ID?
  NavigationStack {
    AnimalList.Presenter(
      animals: [
        Animal.cat,
        Animal.dog,
        Animal.kangaroo,
        Animal.gibbon,
      ],
      category: .mammal,
      status: nil,
      selectedAnimalId: $selectedAnimalId,
      onAppear: {
        print("onAppear")
      },
      onTapDeleteSelectedAnimalButton: { animal in
        print("onTapDeleteSelectedAnimalButton: \(animal)")
      }
    )
  }
}
CategoryList
Our CategoryList component will display the Category values sorted by name. We also construct a button to refresh our application with the sample data built on the initial launch.

Add a new Swift file under Sources/AnimalsUI. Name this file CategoryList.swift. Here is our Root Component:
//  CategoryList.swift

import AnimalsData
import SwiftUI

@MainActor struct CategoryList {
  @Binding private var selectedCategoryId: AnimalsData.Category.ID?

  init(selectedCategoryId: Binding<AnimalsData.Category.ID?>) {
    self._selectedCategoryId = selectedCategoryId
  }
}

extension CategoryList : View {
  var body: some View {
    let _ = CategoryList.debugPrint()
    Container(selectedCategoryId: self.$selectedCategoryId)
  }
}
Our Category.ID is a SwiftUI.Binding; we will change this selection in our CategoryList and this will update the value used to build our AnimalList.
Here is our Container:
//  CategoryList.swift

extension CategoryList {
  @MainActor fileprivate struct Container {
    @SelectCategoriesValues private var categories: Array<AnimalsData.Category>
    @SelectCategoriesStatus private var status: Status?

    @Binding private var selectedCategoryId: AnimalsData.Category.ID?

    @Dispatch private var dispatch

    init(selectedCategoryId: Binding<AnimalsData.Category.ID?>) {
      self._categories = SelectCategoriesValues()
      self._status = SelectCategoriesStatus()

      self._selectedCategoryId = selectedCategoryId
    }
  }
}
Our Container selects the sorted Category values and the Status of our most recent attempt to fetch Category values.
There are two action values we can dispatch to our Store:
//  CategoryList.swift

extension CategoryList.Container {
  private func onAppear() {
    do {
      try self.dispatch(
        .ui(
          .categoryList(
            .onAppear
          )
        )
      )
    } catch {
      print(error)
    }
  }
}

extension CategoryList.Container {
  private func onReloadSampleData() {
    do {
      try self.dispatch(
        .ui(
          .categoryList(
            .onTapReloadSampleDataButton
          )
        )
      )
    } catch {
      print(error)
    }
  }
}
Here is our Container body:
//  CategoryList.swift

extension CategoryList.Container: View {
  var body: some View {
    let _ = Self.debugPrint()
    CategoryList.Presenter(
      categories: self.categories,
      status: self.status,
      selectedCategoryId: self.$selectedCategoryId,
      onAppear: self.onAppear,
      onReloadSampleData: self.onReloadSampleData
    )
  }
}
Here is the main declaration of our Presenter:
//  CategoryList.swift

extension CategoryList {
  @MainActor fileprivate struct Presenter {
    @State private var isAlertPresented = false

    private let categories: Array<AnimalsData.Category>
    private let status: Status?
    @Binding private var selectedCategoryId: AnimalsData.Category.ID?
    private let onAppear: () -> Void
    private let onReloadSampleData: () -> Void

    init(
      categories: Array<AnimalsData.Category>,
      status: Status?,
      selectedCategoryId: Binding<AnimalsData.Category.ID?>,
      onAppear: @escaping () -> Void,
      onReloadSampleData: @escaping () -> Void
    ) {
      self.categories = categories
      self.status = status
      self._selectedCategoryId = selectedCategoryId
      self.onAppear = onAppear
      self.onReloadSampleData = onReloadSampleData
    }
  }
}
Here is our List component:
//  CategoryList.swift

extension CategoryList.Presenter {
  var list: some View {
    List(selection: self.$selectedCategoryId) {
      Section("Categories") {
        ForEach(self.categories) { category in
          NavigationLink(category.name, value: category.id)
        }
      }
    }
  }
}
Similar to our AnimalList, we use NavigationLink for the standard SwiftUI navigation pattern when this Category is selected.
Here is our body:
//  CategoryList.swift

extension CategoryList.Presenter: View {
  var body: some View {
    let _ = Self.debugPrint()
    self.list
      .alert("Reload Sample Data?", isPresented: self.$isAlertPresented) {
        Button("Yes, reload sample data", role: .destructive) {
          self.onReloadSampleData()
        }
      } message: {
        Text("Reloading the sample data deletes all changes to the current data.")
      }
      .onAppear {
        self.onAppear()
      }
      .toolbar {
        Button { self.isAlertPresented = true } label: {
          Label("Reload sample data", systemImage: "arrow.clockwise")
        }
        .disabled(self.status == .waiting)
      }
  }
}
We disable the refresh button when the Status of our Category values is waiting. This prevents a user from beginning a new fetch if the previous fetch is still not complete. A potential edge-case we might think about defending against is disabling the reload button when any asynchronous operation is happening in our PersistentSession. This could include operations to edit or save Animal values. If the user attempts to edit an existing Animal and then immediately tries to reload sample data, there could be unexpected behavior when these two operations complete. A potential solution to this would be to define a Selector to return a Bool value indicating if any Animal value is currently waiting on an asynchronous operation, and then use that value to disable the refresh button. For now, we file a mental TODO to test this behavior more carefully in a future update.
Here are two previews:
//  CategoryList.swift

#Preview {
  @Previewable @State var selectedCategoryId: AnimalsData.Category.ID?
  NavigationStack {
    PreviewStore {
      CategoryList(selectedCategoryId: $selectedCategoryId)
    }
  }
}

#Preview {
  @Previewable @State var selectedCategoryId: AnimalsData.Category.ID?
  NavigationStack {
    CategoryList.Presenter(
      categories: [
        Category.amphibian,
        Category.bird,
        Category.fish,
        Category.invertebrate,
        Category.mammal,
        Category.reptile,
      ],
      status: nil,
      selectedCategoryId: $selectedCategoryId,
      onAppear: {
        print("onAppear")
      },
      onReloadSampleData: {
        print("onReloadSampleData")
      }
    )
  }
}
Content
We’re almost done with AnimalsUI. All we need is a Content component to stitch things together. This is the component we construct from app launch. Add a new Swift file under Sources/AnimalsUI. Name this file Content.swift. Here is our component:
//  Content.swift

import AnimalsData
import SwiftUI

@MainActor public struct Content {
  @State private var selectedCategoryId: AnimalsData.Category.ID?
  @State private var selectedAnimalId: Animal.ID?

  public init() {

  }
}

extension Content: View {
  public var body: some View {
    let _ = Self.debugPrint()
    NavigationSplitView {
      CategoryList(selectedCategoryId: self.$selectedCategoryId)
    } content: {
      AnimalList(
        selectedCategoryId: self.selectedCategoryId,
        selectedAnimalId: self.$selectedAnimalId
      )
    } detail: {
      AnimalDetail(selectedAnimalId: self.selectedAnimalId)
    }
  }
}

#Preview {
  PreviewStore {
    Content()
  }
}
We save selectedCategoryId and selectedAnimalId as local component state. When we change selectedCategoryId from CategoryList, we pass our new value to AnimalList and we update the Animal values displayed. When we change selectedAnimalId from AnimalList, we pass our new value to AnimalDetail and we update the Animal value displayed.
Here is our AnimalsUI package:
AnimalsUI
└── Sources
    └── AnimalsUI
        ├── AnimalDetail.swift
        ├── AnimalEditor.swift
        ├── AnimalList.swift
        ├── CategoryList.swift
        ├── Content.swift
        ├── Debug.swift
        ├── Dispatch.swift
        ├── PreviewStore.swift
        ├── Select.swift
        └── StoreKey.swift
We wrote a lot of code, but you saw for yourself that a lot of what we built was really just standard SwiftUI. Learning ImmutableData does not mean throwing away the knowledge you already have. The biggest difference you would probably notice is that none of these components perform imperative mutations on data model objects to transform our global state — we’re programming with a very different mental-model. We think declaratively: our components dispatch actions to our Store when something happens. Our components do not tell our Store how to behave; our components tell our Store what just happened.
-
https://medium.com/@dan_abramov/smart-and-dumb-components-7ca2f9a7c7d0 ↩
-
https://developer.apple.com/documentation/swiftui/state#Store-observable-objects ↩
-
https://github.com/swiftlang/swift-evolution/blob/main/proposals/0111-remove-arg-label-type-significance.md ↩
Animals.app
Our AnimalsData and AnimalsUI modules are complete. We just need an App to tie everything together.
Select Animals.xcodeproj and open AnimalsApp.swift. We can delete the original “Hello World” template. Let’s begin by defining our AnimalsApp type:
//  AnimalsApp.swift

import AnimalsData
import AnimalsUI
import ImmutableData
import ImmutableUI
import SwiftUI

@main @MainActor struct AnimalsApp {
  @State private var store = Store(
    initialState: AnimalsState(),
    reducer: AnimalsReducer.reduce
  )
  @State private var listener = Listener(store: Self.makeLocalStore())

  init() {
    self.listener.listen(to: self.store)
  }
}
We construct our AnimalsApp with a Store and a Listener. Our Store is constructed with AnimalsState and AnimalsReducer. Our Listener will be constructed with a LocalStore as its PersistentStore. We pass our Store to our Listener; when action values are dispatched to our Store and our AnimalsReducer returns, this Listener will perform asynchronous side effects.
Here is where we construct our LocalStore:
//  AnimalsApp.swift

extension AnimalsApp {
  private static func makeLocalStore() -> LocalStore<UUID> {
    do {
      return try LocalStore<UUID>()
    } catch {
      fatalError("\(error)")
    }
  }
}
If we fail to construct a LocalStore, we crash our sample product. A full discussion about how and why SwiftData might fail to initialize is outside the scope of this tutorial. You can explore the documentation and determine for yourself if your own products should perform any work here to “fail gracefully” and inform the user about what just happened.
Our final step is body:
//  AnimalsApp.swift

extension AnimalsApp: App {
  var body: some Scene {
    WindowGroup {
      Provider(self.store) {
        Content()
      }
    }
  }
}
We can now build and run (⌘ R). Our application is now a working clone of the original Animals sample application from Apple. We preserved the core functionality: Animal values can be created, edited, and deleted. We also save our global state on our filesystem in a persistent database. You can also create a new window (⌘ N) and watch as edits from one window are reflected in the other.
Both applications are built from SwiftUI, and both application leverage SwiftData to manage their persistent database. The big difference here is that the original sample application built SwiftUI components that respond to user events with imperative logic to mutate SwiftData model objects. Our new sample application built SwiftUI components that respond to user events with declarative logic; the imperative logic to mutate SwiftData model objects is abstracted out of our component tree. Instead of passing mutable model objects to our component tree — and living with the unpredictable nature of shared mutable state — we pass immutable model values — our component tree can’t mutate shared state unpredictably.
Let’s experiment with some of the tools we built for improved debugging. Inspired by Antoine van der Lee, we’re going to leverage launch arguments from Xcode to enable some of the print statements we built earlier.1 Let’s begin with our AnimalsUI module. We added a debugPrint function that we call when components construct a body property. Let’s add a launch argument to our scheme to see how this looks:
-com.northbronson.AnimalsUI.Debug 1
When we enable this argument and run our application, we now see logging from SwiftUI when our body properties are built:
Content: @self, @identity, _selectedCategoryId, _selectedAnimalId changed.
CategoryList: @self, @identity, _selectedCategoryId changed.
CategoryList.Container: @self, @identity, _categories, @16, _status, @184, _selectedCategoryId, _dispatch changed.
CategoryList.Presenter: @self, @identity, _isAlertPresented, _selectedCategoryId changed.
AnimalList.Container: @self, @identity, _animals, @16, _category, @184, _status, @320, _selectedAnimalId, _dispatch changed.
AnimalList.Presenter: @self, @identity, _isSheetPresented, _selectedAnimalId changed.
AnimalDetail: @self changed.
AnimalDetail.Container: @self, @identity, _animal, @16, _category, @152, _status, @288, _dispatch changed.
AnimalDetail.Presenter: @self, @identity, _isAlertPresented, _isSheetPresented changed.
CategoryList.Container: \Storage<Optional<Status>>.output changed.
CategoryList.Presenter: @self changed.
CategoryList.Container: \Storage<Array<Category>>.output changed.
CategoryList.Presenter: @self changed.
While we perform user events and transform our global state, we can watch as our component tree is rebuilt. To optimize for performance, we can choose to reduce the amount of unnecessary time spent computing body properties. Our ImmutableData architecture helps us here: our component tree is built against Selectors that return data scoped to the needs of our component. Our Selectors use Filters and Dependencies to reduce the amount of times we then return new data to our component.
If we select the Fish category and add a new Animal value to the Mammal category, we do not see our AnimalList component compute its body again. If we select the Fish category and add a new Animal values to the Fish category, we do see our AnimalList component compute its body again.
Let’s enable the logging we built in AnimalsData. Here is our new launch argument:
-com.northbronson.AnimalsData.Debug 1
When we enable this argument and run our application, we now see logging from AnimalsData:
[AnimalsData][Listener] Old State: AnimalsState(categories: AnimalsData.AnimalsState.Categories(data: [:], status: nil), animals: AnimalsData.AnimalsState.Animals(data: [:], status: nil, queue: [:]))
[AnimalsData][Listener] Action: ui(AnimalsData.AnimalsAction.UI.categoryList(AnimalsData.AnimalsAction.UI.CategoryList.onAppear))
[AnimalsData][Listener] New State: AnimalsState(categories: AnimalsData.AnimalsState.Categories(data: [:], status: Optional(AnimalsData.Status.waiting)), animals: AnimalsData.AnimalsState.Animals(data: [:], status: nil, queue: [:]))
[AnimalsData][Listener] Old State: AnimalsState(categories: AnimalsData.AnimalsState.Categories(data: [:], status: Optional(AnimalsData.Status.waiting)), animals: AnimalsData.AnimalsState.Animals(data: [:], status: nil, queue: [:]))
[AnimalsData][Listener] Action: data(AnimalsData.AnimalsAction.Data.persistentSession(AnimalsData.AnimalsAction.Data.PersistentSession.didFetchCategories(result: AnimalsData.AnimalsAction.Data.PersistentSession.FetchCategoriesResult.success(categories: [AnimalsData.Category(categoryId: "Invertebrate", name: "Invertebrate"), AnimalsData.Category(categoryId: "Mammal", name: "Mammal"), AnimalsData.Category(categoryId: "Reptile", name: "Reptile"), AnimalsData.Category(categoryId: "Fish", name: "Fish"), AnimalsData.Category(categoryId: "Bird", name: "Bird"), AnimalsData.Category(categoryId: "Amphibian", name: "Amphibian")]))))
[AnimalsData][Listener] New State: AnimalsState(categories: AnimalsData.AnimalsState.Categories(data: ["Bird": AnimalsData.Category(categoryId: "Bird", name: "Bird"), "Fish": AnimalsData.Category(categoryId: "Fish", name: "Fish"), "Reptile": AnimalsData.Category(categoryId: "Reptile", name: "Reptile"), "Invertebrate": AnimalsData.Category(categoryId: "Invertebrate", name: "Invertebrate"), "Mammal": AnimalsData.Category(categoryId: "Mammal", name: "Mammal"), "Amphibian": AnimalsData.Category(categoryId: "Amphibian", name: "Amphibian")], status: Optional(AnimalsData.Status.success)), animals: AnimalsData.AnimalsState.Animals(data: [:], status: nil, queue: [:]))
For every action dispatched to our Store, our Listener instance is now logging the global state, the action value, and the state returned from our Reducer. This can log a lot of data when application state grows large and complex, but it can be a very useful tool for investigating unexpected behaviors.
Let’s enable the logging we built in ImmutableUI. Here is our new launch argument:
-com.northbronson.ImmutableUI.Debug 1
When we enable this argument and run our application, we now see logging from Listener:
[ImmutableUI][AsyncListener]: 0x0000600000514870 Update: SelectCategoriesValues
[ImmutableUI][AsyncListener]: 0x0000600000514870 Update Dependency: SelectCategoriesValues
[ImmutableUI][AsyncListener]: 0x0000600000514870 Update Output: SelectCategoriesValues
[ImmutableUI][AsyncListener]: 0x0000600001c34ee0 Update: SelectCategoriesStatus
[ImmutableUI][AsyncListener]: 0x0000600001c34ee0 Update Output: SelectCategoriesStatus
[ImmutableUI][AsyncListener]: 0x00006000005150e0 Update: SelectAnimalsValues(categoryId: nil)
[ImmutableUI][AsyncListener]: 0x00006000005150e0 Update Dependency: SelectAnimalsValues(categoryId: nil)
[ImmutableUI][AsyncListener]: 0x00006000005150e0 Update Output: SelectAnimalsValues(categoryId: nil)
[ImmutableUI][AsyncListener]: 0x000060000190e980 Update: SelectCategory(categoryId: nil)
[ImmutableUI][AsyncListener]: 0x000060000190e980 Update Output: SelectCategory(categoryId: nil)
[ImmutableUI][AsyncListener]: 0x0000600001c35ab0 Update: SelectAnimalsStatus
[ImmutableUI][AsyncListener]: 0x0000600001c35ab0 Update Output: SelectAnimalsStatus
[ImmutableUI][AsyncListener]: 0x00006000006300a0 Update: SelectAnimal(animalId: nil)
[ImmutableUI][AsyncListener]: 0x00006000006300a0 Update Output: SelectAnimal(animalId: nil)
[ImmutableUI][AsyncListener]: 0x000060000190ba80 Update: SelectCategory(animalId: nil)
[ImmutableUI][AsyncListener]: 0x000060000190ba80 Update Output: SelectCategory(animalId: nil)
[ImmutableUI][AsyncListener]: 0x0000600001c20070 Update: SelectAnimalStatus(animalId: nil)
[ImmutableUI][AsyncListener]: 0x0000600001c20070 Update Output: SelectAnimalStatus(animalId: nil)
[ImmutableUI][AsyncListener]: 0x0000600001c34ee0 Update: SelectCategoriesStatus
[ImmutableUI][AsyncListener]: 0x0000600001c34ee0 Update Output: SelectCategoriesStatus
[ImmutableUI][AsyncListener]: 0x0000600001c35ab0 Update: SelectAnimalsStatus
[ImmutableUI][AsyncListener]: 0x0000600001c35ab0 Update Output: SelectAnimalsStatus
[ImmutableUI][AsyncListener]: 0x00006000006300a0 Update: SelectAnimal(animalId: nil)
[ImmutableUI][AsyncListener]: 0x00006000006300a0 Update Output: SelectAnimal(animalId: nil)
[ImmutableUI][AsyncListener]: 0x000060000190ba80 Update: SelectCategory(animalId: nil)
[ImmutableUI][AsyncListener]: 0x000060000190ba80 Update Output: SelectCategory(animalId: nil)
[ImmutableUI][AsyncListener]: 0x0000600001c20070 Update: SelectAnimalStatus(animalId: nil)
[ImmutableUI][AsyncListener]: 0x0000600001c20070 Update Output: SelectAnimalStatus(animalId: nil)
[ImmutableUI][AsyncListener]: 0x000060000190e980 Update: SelectCategory(categoryId: nil)
[ImmutableUI][AsyncListener]: 0x000060000190e980 Update Output: SelectCategory(categoryId: nil)
[ImmutableUI][AsyncListener]: 0x0000600001c35ab0 Update: SelectAnimalsStatus
[ImmutableUI][AsyncListener]: 0x0000600001c35ab0 Update Output: SelectAnimalsStatus
[ImmutableUI][AsyncListener]: 0x0000600000514870 Update: SelectCategoriesValues
[ImmutableUI][AsyncListener]: 0x0000600000514870 Update Dependency: SelectCategoriesValues
[ImmutableUI][AsyncListener]: 0x0000600000514870 Update Output: SelectCategoriesValues
[ImmutableUI][AsyncListener]: 0x000060000190ba80 Update: SelectCategory(animalId: nil)
[ImmutableUI][AsyncListener]: 0x000060000190ba80 Update Output: SelectCategory(animalId: nil)
[ImmutableUI][AsyncListener]: 0x000060000190e980 Update: SelectCategory(categoryId: nil)
[ImmutableUI][AsyncListener]: 0x000060000190e980 Update Output: SelectCategory(categoryId: nil)
[ImmutableUI][AsyncListener]: 0x00006000006300a0 Update: SelectAnimal(animalId: nil)
[ImmutableUI][AsyncListener]: 0x00006000006300a0 Update Output: SelectAnimal(animalId: nil)
[ImmutableUI][AsyncListener]: 0x0000600001c20070 Update: SelectAnimalStatus(animalId: nil)
[ImmutableUI][AsyncListener]: 0x0000600001c20070 Update Output: SelectAnimalStatus(animalId: nil)
[ImmutableUI][AsyncListener]: 0x0000600001c34ee0 Update: SelectCategoriesStatus
[ImmutableUI][AsyncListener]: 0x0000600001c34ee0 Update Output: SelectCategoriesStatus
These look like a lot of selectors to launch our application, but most of these run in constant time. The only selectors here that run above-constant time are SelectCategoriesValues and SelectAnimalsValues, and SelectAnimalsValues returns an empty Array in constant time when we pass nil for Category.ID. Our first SelectCategoriesValues returns an empty Array; there is no time spent sorting because there are no Category values before our asynchronous fetch operations has completed. The good news here is displaying our components performs just one O(n log n) operation.
Our focus is on teaching the ImmutableData architecture. We do teach how to leverage SwiftData, but a complete tutorial on debugging and optimizing SwiftData is outside the scope of this tutorial. We would like to recommend two more launch arguments you might be interested in:
-com.apple.CoreData.SQLDebug 1
-com.apple.CoreData.ConcurrencyDebug 1
As of this writing, these launch arguments — which were originally built for CoreData — enable extra logging and stricter concurrency checking.2 Try these for yourself as you build products on SwiftData to help defend against bugs before they ship in your production application.
We completed two sample products: Counter and Animals. Both applications are built from ImmutableData. We specify our product domain when we construct our Store, but the ImmutableData infra itself did not change. Our infra deployed to both products without additional work. We’re going to use that same infra — without making changes to that infra — to begin a new sample product in our next chapter.
QuakesData
Our next sample application product is another clone from Apple. The application is called Quakes and demonstrates using SwiftData to save a collection of earthquakes to a persistent store on our filesystem.1 Unlike the Animals sample application product, Quakes fetches its data from a remote server. We fetch data from a remote server before caching the data to a persistent database on our filesystem.
Like our Animals product, our Quakes product adds side effects to ImmutableData. Unlike our Animals product, our Quakes products needs a Local and a Remote Store to manage its data. There is a little more complexity here, but it’s not going to be very difficult to manage.
Go ahead and clone the Apple project repo, build the application, and look around to see the functionality. The Apple project supports multiple platforms, but we are going to focus our attention on macOS.

The application launches with an empty list of earthquakes and a map. Tapping the refresh button requests the list of recent earthquakes from the US Geological Survey. After those earthquakes are downloaded from USGS, they are saved to a SwiftData store. If we quit the application and run again, we display the cached Quake values on app launch.
Once we display a list of earthquakes, we have the ability to sort and filter. We can sort by time and magnitude; both properties come with the option to sort forward or reverse. We also have the option to type in our search bar to filter on names.
We also have the ability to filter by calendar date: we display a component to choose a calendar date and this will filter for earthquakes that occurred on that date.
Our map component displays earthquakes consistent with what we view in our list. As we type in our search bar, we can see the earthquakes filtered in our map component. Each earthquake is displays with a circle. The color and size of the circle represent different magnitude values.
Selecting an earthquake from our list component draws its map marker component opaque. We also have the option to delete this selected earthquake from our persistent store from our toolbar. This button also gives us the ability to delete all earthquakes from our persistent store.
The original sample application product from Apple fetches all earthquakes from the previous day. To see for ourselves how well this product performs with large amounts of data, we can hack our sample application to fetch all earthquakes from the previous month:
// GeoFeatureCollection.swift
static func fetchFeatures() async throws -> GeoFeatureCollection {
/// Geological data provided by the U.S. Geological Survey (USGS). See ACKNOWLEDGMENTS.txt for additional details.
- let url = URL(string: "https://earthquake.usgs.gov/earthquakes/feed/v1.0/summary/all_day.geojson")!
+ let url = URL(string: "https://earthquake.usgs.gov/earthquakes/feed/v1.0/summary/all_month.geojson")!
When we build and run our application again, we can fetch all earthquakes from the previous month. With all these earthquakes saved in SwiftData, our application feels slow. This sample application product works with SwiftData on its main thread. Loading earthquakes, filtering earthquakes, and deleting earthquakes now freezes the interface; the spinning wait cursor indicates our main thread is blocked.2
We clone the application with the ImmutableData architecture. Instead of delivering mutable model objects to our component tree, we deliver immutable model values. Instead of performing imperative mutations to transform global state from our component tree, we dispatch action values when user events happen. Once we abstract our SwiftData models out of our component tree, it will be very easy to perform all that expensive work on a background thread. When our component tree is no longer waiting on expensive operations from SwiftData, we can work with much larger amounts of data without blocking our interface.
Quake
Unlike our Animals product, our data model is only one entity: earthquakes. Let’s begin with the type to model one earthquake in our global state. Select the QuakesData package and add a new Swift file under Sources/QuakesData. Name this file Quake.swift.
Here is the main declaration:
// Quake.swift
import Foundation
public struct Quake: Hashable, Sendable {
public let quakeId: String
public let magnitude: Double
public let time: Date
public let updated: Date
public let name: String
public let longitude: Double
public let latitude: Double
package init(
quakeId: String,
magnitude: Double,
time: Date,
updated: Date,
name: String,
longitude: Double,
latitude: Double
) {
self.quakeId = quakeId
self.magnitude = magnitude
self.time = time
self.updated = updated
self.name = name
self.longitude = longitude
self.latitude = latitude
}
}
extension Quake: Identifiable {
public var id: String {
self.quakeId
}
}
Here are our properties:
quakeId: A unique identifier for this earthquake.magnitude: The magnitude of this earthquake.time: The UNIX timestamp when this earthquake occurred.updated: Fetching remote data can return new data for earthquake values. Theupdatedproperty returns the UNIX timestamp when this earthquake was last updated with new data.name: AStringwe use to display the location of this earthquake.longitude: The longitude where this earthquake occurred.latitude: The latitude where this earthquake occurred.
Similar to our Animals product, we create some sample data for our Xcode Previews:
// Quake.swift
extension Quake {
public static var xxsmall: Self {
Self(
quakeId: "xxsmall",
magnitude: 0.5,
time: .now,
updated: .now,
name: "West of California",
longitude: -125,
latitude: 35
)
}
public static var xsmall: Self {
Self(
quakeId: "xsmall",
magnitude: 1.5,
time: .now,
updated: .now,
name: "West of California",
longitude: -125,
latitude: 35
)
}
public static var small: Self {
Self(
quakeId: "small",
magnitude: 2.5,
time: .now,
updated: .now,
name: "West of California",
longitude: -125,
latitude: 35
)
}
public static var medium: Self {
Self(
quakeId: "medium",
magnitude: 3.5,
time: .now,
updated: .now,
name: "West of California",
longitude: -125,
latitude: 35
)
}
public static var large: Self {
Self(
quakeId: "large",
magnitude: 4.5,
time: .now,
updated: .now,
name: "West of California",
longitude: -125,
latitude: 35
)
}
public static var xlarge: Self {
Self(
quakeId: "xlarge",
magnitude: 5.5,
time: .now,
updated: .now,
name: "West of California",
longitude: -125,
latitude: 35
)
}
public static var xxlarge: Self {
Self(
quakeId: "xxlarge",
magnitude: 6.5,
time: .now,
updated: .now,
name: "West of California",
longitude: -125,
latitude: 35
)
}
public static var xxxlarge: Self {
Self(
quakeId: "xxxlarge",
magnitude: 7.5,
time: .now,
updated: .now,
name: "West of California",
longitude: -125,
latitude: 35
)
}
}
Status
Our operation to fetch earthquake data is asynchronous. Similar to our Animals product, we would like to define a data value to track the status of this operation. Add a new Swift file under Sources/QuakesData. Name this file Status.swift.
// Status.swift
public enum Status: Hashable, Sendable {
case empty
case waiting
case success
case failure(error: String)
}
QuakesState
Similar to our Animals product, we define a data type to model the root state of our global system. We pass this state instance to our Store at app launch. Add a new Swift file under Sources/QuakesData. Name this file QuakesState.swift.
// QuakesState.swift
import Foundation
public struct QuakesState: Hashable, Sendable {
package var quakes: Quakes
package init(quakes: Quakes) {
self.quakes = quakes
}
}
extension QuakesState {
public init() {
self.init(
quakes: Quakes()
)
}
}
Our state has only one domain: Quakes. Here is our declaration:
// QuakesState.swift
extension QuakesState {
package struct Quakes: Hashable, Sendable {
package var data: Dictionary<Quake.ID, Quake> = [:]
package var status: Status? = nil
package init(
data: Dictionary<Quake.ID, Quake> = [:],
status: Status? = nil
) {
self.data = data
self.status = status
}
}
}
We can now construct the selectors needed for our component tree. Let’s think through the data we need to display:
SelectQuakesValues: OurQuakeListcomponent displays a subset of all theQuakevalue in our system: we filter for earthquakes occurring on a specific calendar day with anameproperty that contains theStringvalue in our search bar. OurQuakeListcomponent displays those earthquakes sorted by magnitude or time: we return anArrayof sorted values.SelectQuakes: OurQuakeMapcomponent should display the same earthquakes as ourQuakeList, but we don’t need to perform a sort operation on this data: our selector will return aDictionaryofQuakevalues without sorting operations.SelectQuakesCount: OurQuakeListcomponent displays the total count of allQuakevalues in our system.SelectQuakesStatus: We return theStatusof our most recent fetch to returnQuakevalues. We use this in our component tree to defend against edge-casey behavior and disable certain user events when a fetch operation is taking place.SelectQuake: Selecting aQuakevalue from ourQuakeListcomponent should highlight that sameQuakevalue. This selector will return aQuakevalue for a givenQuake.ID.
Let’s begin with an extension on Quake that we will use for filter operations:
// QuakesState.swift
extension Quake {
fileprivate static func filter(
searchText: String,
searchDate: Date
) -> @Sendable (Self) -> Bool {
let calendar = Calendar.autoupdatingCurrent
let start = calendar.startOfDay(for: searchDate)
let end = calendar.date(byAdding: DateComponents(day: 1), to: start) ?? start
let range = start...end
return { quake in
if range.contains(quake.time) {
if searchText.isEmpty {
return true
}
if quake.name.contains(searchText) {
return true
}
}
return false
}
}
}
Our searchText parameter is a String from our search bar. We want to return Quake values if their name contains that String. We also want to return Quake values if their time occurs the same calendar date as our searchDate parameter. We use Calendar from Foundation to transform system times to wall times, then return a closure that we can use for filtering Quake values.
One potential edge-case with this approach is that we don’t control for diacritics or case: "san jose" would not match as equal against "San José". There are more advanced string-matching operations from Swift and Foundation that could help. This is an interesting topic, but it is not blocking us on learning ImmutableData. For now, we continue with the simple approach — strict matching with no transformations applied — and file a mental TODO to investigate this in the future.
Here is our selector for returning a sorted Array of Quake values:
// QuakesState.swift
extension QuakesState {
fileprivate func selectQuakesValues(
filter isIncluded: (Quake) -> Bool,
sort descriptor: SortDescriptor<Quake>
) -> Array<Quake> {
self.quakes.data.values.filter(isIncluded).sorted(using: descriptor)
}
}
extension QuakesState {
fileprivate func selectQuakesValues(
searchText: String,
searchDate: Date,
sort keyPath: KeyPath<Quake, some Comparable> & Sendable,
order: SortOrder = .forward
) -> Array<Quake> {
self.selectQuakesValues(
filter: Quake.filter(
searchText: searchText,
searchDate: searchDate
),
sort: SortDescriptor(
keyPath,
order: order
)
)
}
}
extension QuakesState {
public static func selectQuakesValues(
searchText: String,
searchDate: Date,
sort keyPath: KeyPath<Quake, some Comparable> & Sendable,
order: SortOrder = .forward
) -> @Sendable (Self) -> Array<Quake> {
{ state in
state.selectQuakesValues(
searchText: searchText,
searchDate: searchDate,
sort: keyPath,
order: order
)
}
}
}
We also want a selector for returning the same Quake values without any sorting applied; we return a Dictionary value:
// QuakesState.swift
extension QuakesState {
fileprivate func selectQuakes(filter isIncluded: (Quake) -> Bool) -> Dictionary<Quake.ID, Quake> {
self.quakes.data.filter { isIncluded($0.value) }
}
}
extension QuakesState {
fileprivate func selectQuakes(
searchText: String,
searchDate: Date
) -> Dictionary<Quake.ID, Quake> {
self.selectQuakes(
filter: Quake.filter(
searchText: searchText,
searchDate: searchDate
)
)
}
}
extension QuakesState {
public static func selectQuakes(
searchText: String,
searchDate: Date
) -> @Sendable (Self) -> Dictionary<Quake.ID, Quake> {
{ state in
state.selectQuakes(
searchText: searchText,
searchDate: searchDate
)
}
}
}
Here is SelectQuakesCount:
// QuakesState.swift
extension QuakesState {
fileprivate func selectQuakesCount() -> Int {
self.quakes.data.count
}
}
extension QuakesState {
public static func selectQuakesCount() -> @Sendable (Self) -> Int {
{ state in state.selectQuakesCount() }
}
}
Here is SelectQuakesStatus:
// QuakesState.swift
extension QuakesState {
fileprivate func selectQuakesStatus() -> Status? {
self.quakes.status
}
}
extension QuakesState {
public static func selectQuakesStatus() -> @Sendable (Self) -> Status? {
{ state in state.selectQuakesStatus() }
}
}
Here is SelectQuake:
// QuakesState.swift
extension QuakesState {
fileprivate func selectQuake(quakeId: Quake.ID?) -> Quake? {
guard
let quakeId = quakeId
else {
return nil
}
return self.quakes.data[quakeId]
}
}
extension QuakesState {
public static func selectQuake(quakeId: Quake.ID?) -> @Sendable (Self) -> Quake? {
{ state in state.selectQuake(quakeId: quakeId) }
}
}
QuakesAction
Our QuakesAction values will look similar to our AnimalsAction values. Our application needs to perform asynchronous operations. Similar to our Animals product, our Quakes product will construct a Listener type to dispatch thunk operations and a PersistentSession type to dispatch action values after those operations have completed.
We will define two “domains” of actions for our Quakes product: UI and Data. Similar to our Animals product, our UI domain will define action values that come from our component tree and our Data domain will define action values that come from our PersistentSession.
Let’s try running the application from Apple again. Let’s start by documenting the actions we can dispatch from our component tree:
- The
QuakeListcomponent displays a button to fetch the most recent earthquakes from USGS. In the sample project from Apple, this operation fetches the earthquakes from the current day. Let’s make this a little more interesting and add options to fetch earthquakes from the current hour, the current day, the current week, and the current month. - The
QuakeListcomponent displays a button to delete the selectedQuakevalue from our local database. This has no effect on the data from USGS; this is just a local operation. - The
QuakeListcomponent displays a button to delete allQuakevalues from our local database.
In addition, our QuakeList component should dispatch an action will be displayed; this will indicate we are ready to fetch our cached Quake values from our local database.
For our Data domain, there are two action we want to dispatch from our PersistentSession:
- The
Quakevalues were fetched from our local database. - The
Quakevalues were fetched from the USGS database.
Compared to our Animals product, there is a little additional complexity to manage; we now have actions coming from a “local” store and a “remote” store. Let’s see what this looks like. Add a new Swift file under Sources/QuakesData. Name this file QuakesAction.swift.
Here is the main declaration:
// QuakesAction.swift
public enum QuakesAction: Hashable, Sendable {
case ui(_ action: UI)
case data(_ action: Data)
}
Here is our UI domain:
// QuakesAction.swift
extension QuakesAction {
public enum UI: Hashable, Sendable {
case quakeList(_ action: QuakeList)
}
}
extension QuakesAction.UI {
public enum QuakeList: Hashable, Sendable {
case onAppear
case onTapRefreshQuakesButton(range: RefreshQuakesRange)
case onTapDeleteSelectedQuakeButton(quakeId: Quake.ID)
case onTapDeleteAllQuakesButton
}
}
extension QuakesAction.UI.QuakeList {
public enum RefreshQuakesRange: Hashable, Sendable {
case allHour
case allDay
case allWeek
case allMonth
}
}
Here is our Data domain:
// QuakesAction.swift
extension QuakesAction {
public enum Data: Hashable, Sendable {
case persistentSession(_ action: PersistentSession)
}
}
extension QuakesAction.Data {
public enum PersistentSession: Hashable, Sendable {
case localStore(_ action: LocalStore)
case remoteStore(_ action: RemoteStore)
}
}
We define a PersistentSession subdomain with two additional domains below that: LocalStore is for fetches from our local database and RemoteStore is for fetches from the USGS database.
Here is our LocalStore domain:
// QuakesAction.swift
extension QuakesAction.Data.PersistentSession {
public enum LocalStore: Hashable, Sendable {
case didFetchQuakes(result: FetchQuakesResult)
}
}
extension QuakesAction.Data.PersistentSession.LocalStore {
public enum FetchQuakesResult: Hashable, Sendable {
case success(quakes: Array<Quake>)
case failure(error: String)
}
}
Here is our RemoteStore domain:
// QuakesAction.swift
extension QuakesAction.Data.PersistentSession {
public enum RemoteStore: Hashable, Sendable {
case didFetchQuakes(result: FetchQuakesResult)
}
}
extension QuakesAction.Data.PersistentSession.RemoteStore {
public enum FetchQuakesResult: Hashable, Sendable {
case success(quakes: Array<Quake>)
case failure(error: String)
}
}
PersistentSession
Similar to our Animals product, our PersistentSession will be responsible for performing asynchronous operations on a PersistentStore.
When our query operations succeed or fail, our PersistentSession will then dispatch action values back to our Reducer.
Our mutation operations take a different approach than our Animals product. Our mutation operations return no value. We will see where we transform our global state when we build our Reducer.
Our Animals product constructed a PersistentSession against just one PersistentStore. Our Quakes product needs two: a local store and a remote store.
Add a new Swift file under Sources/QuakesData. Name this file PersistentSession.swift. Let’s start with building two protocols to define the interface of our persistent stores:
// PersistentSession.swift
import ImmutableData
public protocol PersistentSessionLocalStore: Sendable {
func fetchLocalQuakesQuery() async throws -> Array<Quake>
func didFetchRemoteQuakesMutation(
inserted: Array<Quake>,
updated: Array<Quake>,
deleted: Array<Quake>
) async throws
func deleteLocalQuakeMutation(quakeId: Quake.ID) async throws
func deleteLocalQuakesMutation() async throws
}
public protocol PersistentSessionRemoteStore: Sendable {
func fetchRemoteQuakesQuery(range: QuakesAction.UI.QuakeList.RefreshQuakesRange) async throws -> Array<Quake>
}
Our LocalStore performs one query and three mutations. Our RemoteStore performs one query. Let’s think through where we need these operations from:
- Our
fetchLocalQuakesQueryoperation should be performed on app launch when ourQuakeListis ready to display. - Our
didFetchRemoteQuakesMutationoperation should be performed when our remote server returnsQuakevalues. TheseQuakevalues will then be merged with the values in our local database. Our Reducer will return for us whichQuakevalues areinserted(new values),updated(existing values with new data), anddeleted(existing values which should be removed). - Our
deleteLocalQuakeMutationoperation should be performed when our user attempts to delete oneQuakevalue from our local database. - Our
deleteLocalQuakesMutationoperation should be performed when our user attempts to delete allQuakevalues from our local database. - Our
fetchRemoteQuakesQueryoperation should be performed when our user attempts to fetchQuakevalues from our remote server. Ourrangeparameter indicates how far back we should request values for.
Here is our PersistentSession built on these two protocols:
// PersistentSession.swift
final actor PersistentSession<LocalStore, RemoteStore> where LocalStore : PersistentSessionLocalStore, RemoteStore : PersistentSessionRemoteStore {
private let localStore: LocalStore
private let remoteStore: RemoteStore
init(
localStore: LocalStore,
remoteStore: RemoteStore
) {
self.localStore = localStore
self.remoteStore = remoteStore
}
}
We can now begin to implement the two queries and three mutations that our Listener will need to dispatch. This will all look very similar to what we built for our Animals product. Let’s begin with our thunk operation to fetch the local Quake instances that were persisted to our local database:
// PersistentSession.swift
extension PersistentSession {
private func fetchLocalQuakesQuery(
dispatcher: some ImmutableData.Dispatcher<QuakesState, QuakesAction>,
selector: some ImmutableData.Selector<QuakesState>
) async throws {
let quakes = try await {
do {
return try await self.localStore.fetchLocalQuakesQuery()
} catch {
try await dispatcher.dispatch(
action: .data(
.persistentSession(
.localStore(
.didFetchQuakes(
result: .failure(
error: error.localizedDescription
)
)
)
)
)
)
throw error
}
}()
try await dispatcher.dispatch(
action: .data(
.persistentSession(
.localStore(
.didFetchQuakes(
result: .success(
quakes: quakes
)
)
)
)
)
)
}
}
extension PersistentSession {
func fetchLocalQuakesQuery<Dispatcher, Selector>() -> @Sendable (
Dispatcher,
Selector
) async throws -> Void where Dispatcher: ImmutableData.Dispatcher<QuakesState, QuakesAction>, Selector: ImmutableData.Selector<QuakesState> {
{ dispatcher, selector in
try await self.fetchLocalQuakesQuery(
dispatcher: dispatcher,
selector: selector
)
}
}
}
This should all look similar to what happened in our Animals product. We attempt a query on our LocalStore instance. If that query succeeds, we dispatch a success action to our Dispatcher. If that query fails, we dispatch a failure action.
Here is our thunk operation when our remote server returns Quake values:
// PersistentSession.swift
extension PersistentSession {
private func didFetchRemoteQuakesMutation(
dispatcher: some ImmutableData.Dispatcher<QuakesState, QuakesAction>,
selector: some ImmutableData.Selector<QuakesState>,
inserted: Array<Quake>,
updated: Array<Quake>,
deleted: Array<Quake>
) async throws {
try await self.localStore.didFetchRemoteQuakesMutation(
inserted: inserted,
updated: updated,
deleted: deleted
)
}
}
extension PersistentSession {
func didFetchRemoteQuakesMutation<Dispatcher, Selector>(
inserted: Array<Quake>,
updated: Array<Quake>,
deleted: Array<Quake>
) -> @Sendable (
Dispatcher,
Selector
) async throws -> Void where Dispatcher: ImmutableData.Dispatcher<QuakesState, QuakesAction>, Selector: ImmutableData.Selector<QuakesState> {
{ dispatcher, selector in
try await self.didFetchRemoteQuakesMutation(
dispatcher: dispatcher,
selector: selector,
inserted: inserted,
updated: updated,
deleted: deleted
)
}
}
}
When our operation to save these Quake values to our LocalStore returns, we do not dispatch an extra action to indicate success or failure. We could choose to define an extra action on QuakesAction.Data.PersistentSession.LocalStore for tracking this operation. Our Reducer and our Listener could then perform any necessary work to manage that error. Since we don’t need more work to happen when this operation was successful, we can skip on dispatching a new action. Error-handling is an important topic that will be very important once you ship complex products at scale. Our tutorial is going to be lightweight on error-handling to keep things focused on teaching ImmutableData, but we encourage you to think creatively about using ImmutableData in ways that would also support your own conventions for robust error-handing.
When we build our Reducer, we will see how we transform our global state “optimistically”: we transform our global state before returning from our persistent database. This is a different approach than our Animals product, where we transformed our global state after returning from our persistent database.
Here is our thunk operation to delete one Quake value:
// PersistentSession.swift
extension PersistentSession {
private func deleteLocalQuakeMutation(
dispatcher: some ImmutableData.Dispatcher<QuakesState, QuakesAction>,
selector: some ImmutableData.Selector<QuakesState>,
quakeId: Quake.ID
) async throws {
try await self.localStore.deleteLocalQuakeMutation(quakeId: quakeId)
}
}
extension PersistentSession {
func deleteLocalQuakeMutation<Dispatcher, Selector>(quakeId: Quake.ID) async throws -> @Sendable (
Dispatcher,
Selector
) async throws -> Void where Dispatcher: ImmutableData.Dispatcher<QuakesState, QuakesAction>, Selector: ImmutableData.Selector<QuakesState> {
{ dispatcher, selector in
try await self.deleteLocalQuakeMutation(
dispatcher: dispatcher,
selector: selector,
quakeId: quakeId
)
}
}
}
Similar to our previous mutation, we do not dispatch an extra action to indicate success or failure.
Here is our thunk operation to delete all Quake values:
// PersistentSession.swift
extension PersistentSession {
private func deleteLocalQuakesMutation(
dispatcher: some ImmutableData.Dispatcher<QuakesState, QuakesAction>,
selector: some ImmutableData.Selector<QuakesState>
) async throws {
try await self.localStore.deleteLocalQuakesMutation()
}
}
extension PersistentSession {
func deleteLocalQuakesMutation<Dispatcher, Selector>() -> @Sendable (
Dispatcher,
Selector
) async throws -> Void where Dispatcher: ImmutableData.Dispatcher<QuakesState, QuakesAction>, Selector: ImmutableData.Selector<QuakesState> {
{ dispatcher, selector in
try await self.deleteLocalQuakesMutation(
dispatcher: dispatcher,
selector: selector
)
}
}
}
These three mutations follow a similar pattern: we don’t dispatch an extra action to indicate success or failure.
Here is our thunk operation to fetch Quake values from USGS:
// PersistentSession.swift
extension PersistentSession {
private func fetchRemoteQuakesQuery(
dispatcher: some ImmutableData.Dispatcher<QuakesState, QuakesAction>,
selector: some ImmutableData.Selector<QuakesState>,
range: QuakesAction.UI.QuakeList.RefreshQuakesRange
) async throws {
let quakes = try await {
do {
return try await self.remoteStore.fetchRemoteQuakesQuery(range: range)
} catch {
try await dispatcher.dispatch(
action: .data(
.persistentSession(
.remoteStore(
.didFetchQuakes(
result: .failure(
error: error.localizedDescription
)
)
))
)
)
throw error
}
}()
try await dispatcher.dispatch(
action: .data(
.persistentSession(
.remoteStore(
.didFetchQuakes(
result: .success(
quakes: quakes
)
)
)
)
)
)
}
}
extension PersistentSession {
func fetchRemoteQuakesQuery<Dispatcher, Selector>(
range: QuakesAction.UI.QuakeList.RefreshQuakesRange
) -> @Sendable (
Dispatcher,
Selector
) async throws -> Void where Dispatcher: ImmutableData.Dispatcher<QuakesState, QuakesAction>, Selector: ImmutableData.Selector<QuakesState> {
{ dispatcher, selector in
try await self.fetchRemoteQuakesQuery(
dispatcher: dispatcher,
selector: selector,
range: range
)
}
}
}
Listener
Our Listener class will perform similar work to what we built for our Animals product. After our Reducer returns, our Listener will receive those action values and dispatch thunk operations to perform asynchronous side effects.
Add a new Swift file under Sources/QuakesData. Name this file Listener.swift.
Here is our main declaration:
// Listener.swift
import ImmutableData
import Foundation
@MainActor final public class Listener<LocalStore, RemoteStore> where LocalStore : PersistentSessionLocalStore, RemoteStore : PersistentSessionRemoteStore {
private let session: PersistentSession<LocalStore, RemoteStore>
private weak var store: AnyObject?
private var task: Task<Void, any Error>?
public init(
localStore: LocalStore,
remoteStore: RemoteStore
) {
self.session = PersistentSession(
localStore: localStore,
remoteStore: remoteStore
)
}
deinit {
self.task?.cancel()
}
}
Here is our function to begin listening for Action values:
// Listener.swift
extension UserDefaults {
fileprivate var isDebug: Bool {
self.bool(forKey: "com.northbronson.QuakesData.Debug")
}
}
extension Listener {
public func listen(to store: some ImmutableData.Dispatcher<QuakesState, QuakesAction> & ImmutableData.Selector<QuakesState> & ImmutableData.Streamer<QuakesState, QuakesAction> & AnyObject) {
if self.store !== store {
self.store = store
let stream = store.makeStream()
self.task?.cancel()
self.task = Task { [weak self] in
for try await (oldState, action) in stream {
#if DEBUG
if UserDefaults.standard.isDebug {
print("[QuakesData][Listener] Old State: \(oldState)")
print("[QuakesData][Listener] Action: \(action)")
let newState = store.select({ state in state })
print("[QuakesData][Listener] New State: \(newState)")
}
#endif
guard let self = self else { return }
await self.onReceive(from: store, oldState: oldState, action: action)
}
}
}
}
}
This should look familiar. We use the AsyncSequence returned by ImmutableData.Streamer to listen for Action values after our Reducer has returned. We also define a isDebug property on UserDefaults for enabling extra debug logging.
We can now construct receivers for consuming Action values. We can scope and construct receiver functions to keep us from putting all our code in just one function. Here is our first receiver function:
// Listener.swift
extension Listener {
private func onReceive(
from store: some ImmutableData.Dispatcher<QuakesState, QuakesAction> & ImmutableData.Selector<QuakesState>,
oldState: QuakesState,
action: QuakesAction
) async {
switch action {
case .ui(.quakeList(action: let action)):
await self.onReceive(from: store, oldState: oldState, action: action)
case .data(.persistentSession(action: let action)):
await self.onReceive(from: store, oldState: oldState, action: action)
}
}
}
Here is a receiver function for our QuakeList domain:
// Listener.swift
extension Listener {
private func onReceive(
from store: some ImmutableData.Dispatcher<QuakesState, QuakesAction> & ImmutableData.Selector<QuakesState>,
oldState: QuakesState,
action: QuakesAction.UI.QuakeList
) async {
switch action {
case .onAppear:
if oldState.quakes.status == nil,
store.state.quakes.status == .waiting {
do {
try await store.dispatch(
thunk: self.session.fetchLocalQuakesQuery()
)
} catch {
print(error)
}
}
case .onTapRefreshQuakesButton(range: let range):
if oldState.quakes.status != .waiting,
store.state.quakes.status == .waiting {
do {
try await store.dispatch(
thunk: self.session.fetchRemoteQuakesQuery(range: range)
)
} catch {
print(error)
}
}
case .onTapDeleteSelectedQuakeButton(quakeId: let quakeId):
do {
try await store.dispatch(
thunk: self.session.deleteLocalQuakeMutation(quakeId: quakeId)
)
} catch {
print(error)
}
case .onTapDeleteAllQuakesButton:
do {
try await store.dispatch(
thunk: self.session.deleteLocalQuakesMutation()
)
} catch {
print(error)
}
}
}
}
There are four Action values we can use for dispatching thunk operations:
- Our
onAppearaction should dispatch a thunk operation to fetchQuakevalues from our local database on app launch. We check againststatusto confirm we are transitioning fromniltowaiting— indicating this is our first attempt. - Our
onTapRefreshQuakesButtonaction should dispatch a thunk operation to fetchQuakevalues from our remote server. We check againststatusto confirm a fetch was not currentlywaiting. - Our
onTapDeleteSelectedQuakeButtonaction should dispatch a thunk operation to delete aQuakevalue from our local database. - Our
onTapDeleteAllQuakesButtonaction should dispatch a thunk operation to delete allQuakevalues from our local database.
We also need to receive Action values from our PersistentSession domain:
// Listener.swift
extension Listener {
private func onReceive(
from store: some ImmutableData.Dispatcher<QuakesState, QuakesAction> & ImmutableData.Selector<QuakesState>,
oldState: QuakesState,
action: QuakesAction.Data.PersistentSession
) async {
switch action {
case .localStore(action: let action):
await self.onReceive(from: store, oldState: oldState, action: action)
case .remoteStore(action: let action):
await self.onReceive(from: store, oldState: oldState, action: action)
}
}
}
Here are the next two receivers:
// Listener.swift
extension Listener {
private func onReceive(
from store: some ImmutableData.Dispatcher<QuakesState, QuakesAction> & ImmutableData.Selector<QuakesState>,
oldState: QuakesState,
action: QuakesAction.Data.PersistentSession.LocalStore
) async {
switch action {
default:
break
}
}
}
extension Listener {
private func onReceive(
from store: some ImmutableData.Dispatcher<QuakesState, QuakesAction> & ImmutableData.Selector<QuakesState>,
oldState: QuakesState,
action: QuakesAction.Data.PersistentSession.RemoteStore
) async {
switch action {
case .didFetchQuakes(result: let result):
switch result {
case .success(quakes: let quakes):
var inserted = Array<Quake>()
var updated = Array<Quake>()
var deleted = Array<Quake>()
for quake in quakes {
if oldState.quakes.data[quake.id] == nil,
store.state.quakes.data[quake.id] != nil {
inserted.append(quake)
}
if let oldQuake = oldState.quakes.data[quake.id],
let quake = store.state.quakes.data[quake.id],
oldQuake != quake {
updated.append(quake)
}
if oldState.quakes.data[quake.id] != nil,
store.state.quakes.data[quake.id] == nil {
deleted.append(quake)
}
}
do {
try await store.dispatch(
thunk: self.session.didFetchRemoteQuakesMutation(
inserted: inserted,
updated: updated,
deleted: deleted
)
)
} catch {
print(error)
}
default:
break
}
}
}
}
Our Listener class does not need to perform any work when an action from the LocalStore domain is received. We do need to perform work from RemoteStore. Our didFetchQuakes action returns with an Array of Quake values that should be merged into our local database. Instead of passing that Array directly to our PersistentSession, we perform some work to organize the changes: Quake values that were inserted, Quake values that were updated, and Quake values that were deleted. Performing this work here will reduce the amount of work we need to perform in from our SwiftData ModelContext when we save our local database. There are different options for optimizing this work — our biggest concern, for now, is something simple that also runs in linear time.
QuakesReducer
Our next step is to build our Reducer. Remember, a Reducer does not produce side effects itself. Reducers are pure functions: free of side effects. After our Reducer returns, our Listener class will have the opportunity to dispatch thunk operations.
Add a new Swift file under Sources/QuakesData. Name this file QuakesReducer.swift.
Here is our main declaration:
// QuakesReducer.swift
public enum QuakesReducer {
@Sendable public static func reduce(
state: QuakesState,
action: QuakesAction
) throws -> QuakesState {
switch action {
case .ui(.quakeList(action: let action)):
return try self.reduce(state: state, action: action)
case .data(.persistentSession(action: let action)):
return try self.reduce(state: state, action: action)
}
}
}
As an alternative to “one big switch statement”, we’re going to compose additional reducers once we scope down our Action values. Here is a Reducer just for our QuakeList domain:
// QuakesReducer.swift
extension QuakesReducer {
private static func reduce(
state: QuakesState,
action: QuakesAction.UI.QuakeList
) throws -> QuakesState {
switch action {
case .onAppear:
return self.onAppear(state: state)
case .onTapRefreshQuakesButton:
return self.onTapRefreshQuakesButton(state: state)
case .onTapDeleteSelectedQuakeButton(quakeId: let quakeId):
return self.deleteSelectedQuake(state: state, quakeId: quakeId)
case .onTapDeleteAllQuakesButton:
return self.deleteAllQuakes(state: state)
}
}
}
We need to switch over four Action values. We could have written more code in each case, but we choose to construct four smaller functions to keep our switch compact. Here is our onAppear function:
// QuakesReducer.swift
extension QuakesReducer {
private static func onAppear(state: QuakesState) -> QuakesState {
if state.quakes.status == nil {
var state = state
state.quakes.status = .waiting
return state
}
return state
}
}
If our status value is equal to nil, this means we are launching our application. We set our status to waiting to indicate our Listener should begin fetching Quake values from our local database.
Here is our onTapRefreshQuakesButton function:
// QuakesReducer.swift
extension QuakesReducer {
private static func onTapRefreshQuakesButton(state: QuakesState) -> QuakesState {
if state.quakes.status != .waiting {
var state = state
state.quakes.status = .waiting
return state
}
return state
}
}
If we are not currently waiting on a fetch operation, we set the status to be waiting. Our Listener will then begin fetching Quake values from our remote server.
Here is our deleteSelectedQuake function:
// QuakesReducer.swift
extension QuakesReducer {
package struct Error: Swift.Error {
package enum Code: Hashable, Sendable {
case quakeNotFound
}
package let code: Self.Code
}
}
extension QuakesReducer {
private static func deleteSelectedQuake(
state: QuakesState,
quakeId: Quake.ID
) throws -> QuakesState {
guard let _ = state.quakes.data[quakeId] else {
throw Error(code: .quakeNotFound)
}
var state = state
state.quakes.data[quakeId] = nil
return state
}
}
If our Quake.ID does not return a Quake value, we throw an error. If our Quake.ID does return a Quake value, we delete it.
Let’s think about the different approach we take here compared to our Animals product. Our user action removes the Quake value immediately. This happens before our Listener receives this same user action and before we attempt to remove the Quake value from PersistentSession. This is an example of an optimistic update: we optimistically remove the Quake value from our global state before dispatching an operation to our local database.
When our database contains many Quake values, optimistic updates can help keep our user interface fresh. If our database contains many Quake values, and a user attempts to delete one Quake value, waiting for that operation to return from our local database could lead to our user interface looking “stale” while we wait for the operation to return.
There’s a tradeoff: if we optimistically update our global state, and our local database somehow fails to delete its Quake value, we now have a problem. If the set of Quake values in our global state is no longer the same as the set of Quake values saved in our local database, we would want some way to “roll back” the optimistic update so that our global state once again reflects the local database.
For this product, we assume our local database will not fail. We choose to update our user interface optimistically and expect the operation on our local database to succeed. Is this the right choice for your products? Our updates are very optimistic: we don’t even have a way to roll back the optimistic update if the operation on our local database fails. Before you ship an optimistic update on your own product, think through how you plan to roll back the optimistic update if something goes wrong.
Here is our deleteAllQuakes function:
// QuakesReducer.swift
extension QuakesReducer {
private static func deleteAllQuakes(state: QuakesState) -> QuakesState {
var state = state
state.quakes.data = [:]
return state
}
}
This is another example of an optimistic update: we immediately remove all Quake values from our global state before waiting for our local database to return.
Here is a Reducer for our PersistentSession domain:
// QuakesReducer.swift
extension QuakesReducer {
private static func reduce(
state: QuakesState,
action: QuakesAction.Data.PersistentSession
) throws -> QuakesState {
switch action {
case .localStore(.didFetchQuakes(result: let result)):
return self.didFetchQuakes(state: state, result: result)
case .remoteStore(.didFetchQuakes(result: let result)):
return self.didFetchQuakes(state: state, result: result)
}
}
}
Here is our function after fetching Quake values from our local database:
extension QuakesReducer {
private static func didFetchQuakes(
state: QuakesState,
result: QuakesAction.Data.PersistentSession.LocalStore.FetchQuakesResult
) -> QuakesState {
var state = state
switch result {
case .success(quakes: let quakes):
var data = state.quakes.data
for quake in quakes {
data[quake.id] = quake
}
state.quakes.data = data
state.quakes.status = .success
case .failure(error: let error):
state.quakes.status = .failure(error: error)
}
return state
}
}
Here is our function after fetching Quake values from our remote server:
// QuakesReducer.swift
extension QuakesReducer {
private static func didFetchQuakes(
state: QuakesState,
result: QuakesAction.Data.PersistentSession.RemoteStore.FetchQuakesResult
) -> QuakesState {
var state = state
switch result {
case .success(quakes: let quakes):
var data = state.quakes.data
for quake in quakes {
if .zero < quake.magnitude {
data[quake.id] = quake
} else {
data[quake.id] = nil
}
}
state.quakes.data = data
state.quakes.status = .success
case .failure(error: let error):
state.quakes.status = .failure(error: error)
}
return state
}
}
The USGS database can return earthquakes with magnitude less than or equal to zero. We filter these earthquake results out of our state. For our purposes, we only care about displaying earthquakes with a magnitude greater than zero.
QuakesFilter
Our Selector to display Quake values in our QuakeList component runs in O(n log n) time. We do have the option to include a Dependency on our Selector, but this Dependency then performs an equality check that runs in O(n) time. We can pass a Filter to our Selector and reduce the set of Action values that lead to our Selector performing work. Our Filter will return in O(1) time, which is much faster than the O(n) time needed to check if our Dependencies have changed.
Our Reducer defines exactly what Action values can lead to Quake values changing in our State. Let’s construct a Filter for these. Add a new Swift file under Sources/QuakesData. Name this file QuakesFilter.swift.
// QuakesFilter.swift
public enum QuakesFilter {
}
extension QuakesFilter {
public static func filterQuakes() -> @Sendable (QuakesState, QuakesAction) -> Bool {
{ oldState, action in
switch action {
case .ui(.quakeList(.onTapDeleteSelectedQuakeButton)):
return true
case .ui(.quakeList(.onTapDeleteAllQuakesButton)):
return true
case .data(.persistentSession(.localStore(.didFetchQuakes(.success)))):
return true
case .data(.persistentSession(.remoteStore(.didFetchQuakes(.success)))):
return true
default:
return false
}
}
}
}
Remember to build Filters that return in constant time. We don’t recommend performing expensive computations in Filters — just quick operations over State and Action values. Because Filters return in constant time, prioritize writing Filters to optimize Selectors that need to perform expensive computations in greater than constant time.
LocalStore
Our PersistentSession class depended on the PersistentSessionLocalStore protocol for its local database. Let’s construct an implementation of this protocol we can use when running our application. We have multiple technologies that can read and write data to our filesystem; we’re going to continue using SwiftData. We already have some practice building against SwiftData from our Animals product. Our new LocalStore will function in similar ways.
Remember, our goal is not to teach SwiftData: our goal is to teach ImmutableData. We want to write efficient SwiftData, but we don’t spend too much time or energy blocking our tutorial on writing the most optimized SwiftData possible. Let’s build something simple and straight forward. If we want to think creatively about optimizing this work in the future, we can always come back to improve what we built.
Add a new Swift file under Sources/QuakesData. Name this file LocalStore.swift.
We begin with a PersistentModel to shadow our Quake values:
// LocalStore.swift
import Foundation
import SwiftData
@Model final package class QuakeModel {
package var quakeId: String
package var magnitude: Double
package var time: Date
package var updatedTime: Date
package var name: String
package var longitude: Double
package var latitude: Double
package init(
quakeId: String,
magnitude: Double,
time: Date,
updatedTime: Date,
name: String,
longitude: Double,
latitude: Double
) {
self.quakeId = quakeId
self.magnitude = magnitude
self.time = time
self.updatedTime = updatedTime
self.name = name
self.longitude = longitude
self.latitude = latitude
}
}
There seems to be a known issue in SwiftData that leads to unexpected behaviors when properties are named updated.3 We workaround this issue by renaming our updated property to updatedTime.
Here is a function for returning an immutable Quake value from QuakeModel:
// LocalStore.swift
extension QuakeModel {
fileprivate func quake() -> Quake {
Quake(
quakeId: self.quakeId,
magnitude: self.magnitude,
time: self.time,
updated: self.updatedTime,
name: self.name,
longitude: self.longitude,
latitude: self.latitude
)
}
}
Here is the other direction: returning a QuakeModel from an immutable Quake value:
// LocalStore.swift
extension Quake {
fileprivate func model() -> QuakeModel {
QuakeModel(
quakeId: self.quakeId,
magnitude: self.magnitude,
time: self.time,
updatedTime: self.updated,
name: self.name,
longitude: self.longitude,
latitude: self.latitude
)
}
}
We would also like a function for updating an existing QuakeModel reference with a new Quake value:
// LocalStore.swift
extension QuakeModel {
fileprivate func update(with quake: Quake) {
self.quakeId = quake.quakeId
self.magnitude = quake.magnitude
self.time = quake.time
self.updatedTime = quake.updated
self.name = quake.name
self.longitude = quake.longitude
self.latitude = quake.latitude
}
}
Here are two utilities on ModelContext that will save us some time when we perform our queries and mutations:
// LocalStore.swift
extension ModelContext {
fileprivate func fetch<T>(_ type: T.Type) throws -> Array<T> where T : PersistentModel {
try self.fetch(
FetchDescriptor<T>()
)
}
}
extension ModelContext {
fileprivate func fetch<T>(_ predicate: Predicate<T>) throws -> Array<T> where T : PersistentModel {
try self.fetch(
FetchDescriptor(predicate: predicate)
)
}
}
Similar to our Animals product, we construct a ModelActor for performing work on SwiftData:
// LocalStore.swift
final package actor ModelActor: SwiftData.ModelActor {
package nonisolated let modelContainer: ModelContainer
package nonisolated let modelExecutor: any ModelExecutor
fileprivate init(modelContainer: ModelContainer) {
self.modelContainer = modelContainer
let modelContext = ModelContext(modelContainer)
modelContext.autosaveEnabled = false
self.modelExecutor = DefaultSerialModelExecutor(modelContext: modelContext)
}
}
We set autosaveEnabled to false to workaround a potential issue from SwiftUI.4
Let’s turn our attention to the functions declared from PersistentSessionLocalStore. Here is our query to fetch all Quake values saved in our local database:
// LocalStore.swift
extension ModelActor {
fileprivate func fetchLocalQuakesQuery() throws -> Array<Quake> {
let array = try self.modelContext.fetch(QuakeModel.self)
return array.map { model in model.quake() }
}
}
This should look familiar to what we built for our Animals product. Our LocalStore operates on QuakeModel classes, but we return immutable Quake values to our component tree. Our component tree does not need to know about QuakeModel: this is an implementation detail.
Here is our mutation for updating our local database with Quake values from our remote server:
// LocalStore.swift
extension ModelActor {
package struct Error: Swift.Error {
package enum Code: Equatable {
case quakeNotFound
}
package let code: Self.Code
}
}
extension ModelActor {
fileprivate func didFetchRemoteQuakesMutation(
inserted: Array<Quake>,
updated: Array<Quake>,
deleted: Array<Quake>
) throws {
for quake in inserted {
let model = quake.model()
self.modelContext.insert(model)
}
if updated.isEmpty == false {
let set = Set(updated.map { $0.quakeId })
let predicate = #Predicate<QuakeModel> { model in
set.contains(model.quakeId)
}
let dictionary = Dictionary(uniqueKeysWithValues: updated.map { ($0.quakeId, $0) })
for model in try self.modelContext.fetch(predicate) {
guard
let quake = dictionary[model.quakeId]
else {
throw Error(code: .quakeNotFound)
}
model.update(with: quake)
}
}
if deleted.isEmpty == false {
let set = Set(deleted.map { $0.quakeId })
let predicate = #Predicate<QuakeModel> { model in
set.contains(model.quakeId)
}
try self.modelContext.delete(
model: QuakeModel.self,
where: predicate
)
}
try self.modelContext.save()
}
}
Let’s think through what we are trying to accomplish:
- We begin by iterating through our
insertedvalues. These are newQuakevalues that did not previously exist in our state. We iterate through everyQuakevalue, create aQuakeModel, and insert that model in ourModelContext. - We iterate through our
updatedvalues. These are existingQuakevalues with some new data that should be saved. We fetch the necessaryQuakeModelreferences and update each one with the new data. To defend against an “unnecessary quadratic”, we transform ourArrayofQuakevalues to aDictionaryin linear time. We can then select aQuakevalue for aQuake.IDin constant time. - We iterate through our
deletedvalues. These are existingQuakevalues that should be deleted. We construct aPredicateto delete the necessaryQuakeModelreferences and forward that to ourModelContext. - We save our
ModelContext.
In a production application, we would spend a lot more time profiling and optimizing this function to continue improving performance. Since our goal is continue focusing on ImmutableData, we do not spend much more time focusing on SwiftData performance. This is an important topic; it’s just not the right topic for us at this time. The good news is that LocalStore is an actor: all this work will be performed off our main thread.
Here is our mutation for deleting one Quake value:
// LocalStore.swift
extension ModelActor {
fileprivate func deleteLocalQuakeMutation(quakeId: Quake.ID) throws {
let predicate = #Predicate<QuakeModel> { model in
model.quakeId == quakeId
}
try self.modelContext.delete(
model: QuakeModel.self,
where: predicate
)
try self.modelContext.save()
}
}
Here is our mutation for deleting all Quake values:
// LocalStore.swift
extension ModelActor {
fileprivate func deleteLocalQuakesMutation() throws {
try self.modelContext.delete(model: QuakeModel.self)
try self.modelContext.save()
}
}
We can now build our LocalStore with a similar pattern to our Animals product:
// LocalStore.swift
final public actor LocalStore {
lazy package var modelActor = ModelActor(modelContainer: self.modelContainer)
private let modelContainer: ModelContainer
private init(modelContainer: ModelContainer) {
self.modelContainer = modelContainer
}
}
Here is a new private constructor to help us in our next steps:
// LocalStore.swift
extension LocalStore {
private init(
schema: Schema,
configuration: ModelConfiguration
) throws {
let container = try ModelContainer(
for: schema,
configurations: configuration
)
self.init(modelContainer: container)
}
}
Here are two new public constructors:
// LocalStore.swift
extension LocalStore {
private static var models: Array<any PersistentModel.Type> {
[QuakeModel.self]
}
}
extension LocalStore {
public init(url: URL) throws {
let schema = Schema(Self.models)
let configuration = ModelConfiguration(url: url)
try self.init(
schema: schema,
configuration: configuration
)
}
}
extension LocalStore {
public init(isStoredInMemoryOnly: Bool = false) throws {
let schema = Schema(Self.models)
let configuration = ModelConfiguration(isStoredInMemoryOnly: isStoredInMemoryOnly)
try self.init(
schema: schema,
configuration: configuration
)
}
}
Here are the functions declared from PersistentSessionLocalStore forwarded to our ModelActor:
// LocalStore.swift
extension LocalStore: PersistentSessionLocalStore {
public func fetchLocalQuakesQuery() async throws -> Array<Quake> {
try await self.modelActor.fetchLocalQuakesQuery()
}
public func didFetchRemoteQuakesMutation(
inserted: Array<Quake>,
updated: Array<Quake>,
deleted: Array<Quake>
) async throws {
try await self.modelActor.didFetchRemoteQuakesMutation(
inserted: inserted,
updated: updated,
deleted: deleted
)
}
public func deleteLocalQuakeMutation(quakeId: Quake.ID) async throws {
try await self.modelActor.deleteLocalQuakeMutation(quakeId: quakeId)
}
public func deleteLocalQuakesMutation() async throws {
try await self.modelActor.deleteLocalQuakesMutation()
}
}
RemoteStore
Before we launch our application, we need to construct a type that adopts PersistentSessionRemoteStore. This will be our type for fetching Quake values from USGS using a network request.
Add a new Swift file under Sources/QuakesData. Name this file RemoteStore.swift. Our data schema is defined for us by USGS.5 Because the data is well-defined, we can leverage Codable and JSONDecoder for serialization. Let’s begin with some types we will use for modeling our remote response from USGS:
// RemoteStore.swift
import Foundation
package struct RemoteResponse: Hashable, Codable, Sendable {
private let features: Array<Feature>
}
extension RemoteResponse {
fileprivate struct Feature: Hashable, Codable, Sendable {
let properties: Properties
let geometry: Geometry
let id: String
}
}
extension RemoteResponse.Feature {
struct Properties: Hashable, Codable, Sendable {
// Earthquakes from USGS can have null magnitudes.
// ¯\_(ツ)_/¯
let mag: Double?
let place: String
let time: Date
let updated: Date
}
}
extension RemoteResponse.Feature {
struct Geometry: Hashable, Codable, Sendable {
let coordinates: Array<Double>
}
}
We have to code defensively around magnitude: USGS can return null for this property.6
Here is a function to transform a Feature from USGS to one of our own Quake values:
// RemoteStore.swift
extension RemoteResponse.Feature {
var quake: Quake {
Quake(
quakeId: self.id,
magnitude: self.properties.mag ?? 0.0,
time: self.properties.time,
updated: self.properties.updated,
name: self.properties.place,
longitude: self.geometry.coordinates[0],
latitude: self.geometry.coordinates[1]
)
}
}
Here is a function to return an Array of Quake values from a remote response:
// RemoteStore.swift
extension RemoteResponse {
fileprivate func quakes() -> Array<Quake> {
self.features.map { $0.quake }
}
}
Our RemoteStore will perform a network request. We could add a dependency on URLSession directly in our implementation, but that would limit our ability to run unit tests against all of this. It would be better to define our networking requirements in a protocol that our RemoteStore can depend on. To save ourselves time, we define a protocol that returns typed data from a JSON response. We provide the type and the protocol will perform a network request, serialize the data, and throw and error if something went wrong:
// RemoteStore.swift
public protocol RemoteStoreNetworkSession: Sendable {
func json<T>(
for request: URLRequest,
from decoder: JSONDecoder
) async throws -> T where T : Decodable
}
Now, we can build our RemoteStore. Here is the main declaration:
// RemoteStore.swift
final public actor RemoteStore<NetworkSession>: PersistentSessionRemoteStore where NetworkSession : RemoteStoreNetworkSession {
private let session: NetworkSession
public init(session: NetworkSession) {
self.session = session
}
}
Our user has the ability to request earthquakes for the current hour, the current day, the current week, and the current month. Fortunately, USGS makes this easy: there are custom endpoints just for delivering these four options:
// RemoteStore.swift
extension RemoteStore {
private static func url(range: QuakesAction.UI.QuakeList.RefreshQuakesRange) -> URL? {
switch range {
case .allHour:
return URL(string: "https://earthquake.usgs.gov/earthquakes/feed/v1.0/summary/all_hour.geojson")
case .allDay:
return URL(string: "https://earthquake.usgs.gov/earthquakes/feed/v1.0/summary/all_day.geojson")
case .allWeek:
return URL(string: "https://earthquake.usgs.gov/earthquakes/feed/v1.0/summary/all_week.geojson")
case .allMonth:
return URL(string: "https://earthquake.usgs.gov/earthquakes/feed/v1.0/summary/all_month.geojson")
}
}
}
We can use this URL to construct a URLRequest:
// RemoteStore.swift
extension RemoteStore {
package struct Error : Swift.Error {
package enum Code: Equatable {
case urlError
}
package let code: Self.Code
}
}
extension RemoteStore {
private static func networkRequest(range: QuakesAction.UI.QuakeList.RefreshQuakesRange) throws -> URLRequest {
guard
let url = Self.url(range: range)
else {
throw Error(code: .urlError)
}
return URLRequest(url: url)
}
}
We can use this URLRequest to perform our query against our NetworkSession:
// RemoteStore.swift
extension RemoteStore {
public func fetchRemoteQuakesQuery(range: QuakesAction.UI.QuakeList.RefreshQuakesRange) async throws -> Array<Quake> {
let networkRequest = try Self.networkRequest(range: range)
let decoder = JSONDecoder()
decoder.dateDecodingStrategy = .millisecondsSince1970
let response: RemoteResponse = try await self.session.json(
for: networkRequest,
from: decoder
)
return response.quakes()
}
}
Here is our QuakesData package (including the tests available on our chapter-10 branch):
QuakesData
├── Sources
│ └── QuakesData
│ ├── Listener.swift
│ ├── LocalStore.swift
│ ├── PersistentSession.swift
│ ├── Quake.swift
│ ├── QuakesAction.swift
│ ├── QuakesFilter.swift
│ ├── QuakesReducer.swift
│ ├── QuakesState.swift
│ ├── RemoteStore.swift
│ └── Status.swift
└── Tests
└── QuakesDataTests
├── ListenerTests.swift
├── LocalStoreTests.swift
├── QuakesFilterTests.swift
├── QuakesReducerTests.swift
├── QuakesStateTests.swift
├── RemoteStoreTests.swift
└── TestUtils.swift
We wrote a lot of code, but most of these ideas and concepts are also built in our Animals product. Our biggest difference is we are now supporting a data model with a local database and a remote server.
-
https://developer.apple.com/documentation/swiftdata/maintaining-a-local-copy-of-server-data ↩
-
https://developer.apple.com/documentation/xcode/understanding-hangs-in-your-app ↩
-
https://earthquake.usgs.gov/earthquakes/feed/v1.0/geojson.php ↩
QuakesDataClient
Similar to our AnimalsDataClient executable, we can build a QuakesDataClient executable for testing against a “real” SwiftData database. Select the QuakesData package and open Sources/QuakesDataClient/main.swift.
Here is our work to construct a LocalStore and a RemoteStore:
// main.swift
import Foundation
import QuakesData
import Services
extension NetworkSession: RemoteStoreNetworkSession {
}
func makeLocalStore() throws -> LocalStore {
if let url = Process().currentDirectoryURL?.appending(
component: "default.store",
directoryHint: .notDirectory
) {
return try LocalStore(url: url)
}
return try LocalStore()
}
func makeRemoteStore() -> RemoteStore<NetworkSession<URLSession>> {
let session = NetworkSession(urlSession: URLSession.shared)
return RemoteStore(session: session)
}
func main() async throws {
let localStore = try makeLocalStore()
let remoteStore = makeRemoteStore()
let localQuakes = try await localStore.fetchLocalQuakesQuery()
print(localQuakes)
let remoteQuakes = try await remoteStore.fetchRemoteQuakesQuery(range: .allHour)
print(remoteQuakes)
}
try await main()
The Services module is provided along with our Workspace from the ImmutableData-Samples repo. This module provides a NetworkSession class that simplifies fetching and serializing data models from a remote server. Our goal with this tutorial is to teach the ImmutableData architecture. Networking code is interesting, but does not really need to block that main goal. You are welcome to explore other solutions for networking in your own products. We provide the Services module just to keep things easy for our tutorial.
Once we have a NetworkSession instance, we use that to create a RemoteStore. We create a LocalStore using a similar pattern to what we saw in AnimalsDataClient.
Our main function constructs a LocalStore and a RemoteStore. We now have the option to begin performing queries and mutations. Try it for yourself. You can fetch earthquakes from USGS, insert those earthquakes in a local database, then run your executable again and confirm the mutations were persisted.
QuakesUI
Before we build the component tree of our Quakes product, it might be helpful to rebuild the sample project from Apple. There are two main custom components for our product:
QuakeList: A component to display ourQuakevalues in aSwiftUI.List. We give users the ability to control how they want their values to be sorted. We also give users the ability to filter by name with a search bar.QuakeMap: A component to display ourQuakevalues in aMapKit.Map. These values should match the values displayed inQuakeList.
We will follow a similar pattern to how we built our Animals product:
- Presenter Components are for “regular” SwiftUI: we don’t integrate with
ImmutableData. - Container Components are for integrating with
ImmutableData.
QuakeUtils
There are a few utilities on Quake that will be helpful for us. Select the QuakesUI package and add a new Swift file under Sources/QuakesUI. Name this file QuakeUtils.swift.
Here is an Array of sample values:
// QuakeUtils.swift
import CoreLocation
import MapKit
import QuakesData
import SwiftUI
extension Quake {
static var previewQuakes: Array<Self> {
[
.xxsmall,
.xsmall,
.small,
.medium,
.large,
.xlarge,
.xxlarge,
.xxxlarge
]
}
}
Here is a utility to format our magnitude property as a String:
// QuakeUtils.swift
extension Quake {
var magnitudeString: String {
self.magnitude.formatted(.number.precision(.fractionLength(1)))
}
}
Here is a utility to format our time property as a String:
// QuakeUtils.swift
extension Quake {
var fullDate: String {
self.time.formatted(date: .complete, time: .complete)
}
}
Here is a utility to construct a coordinate:
// QuakeUtils.swift
extension Quake {
var coordinate: CLLocationCoordinate2D {
CLLocationCoordinate2D(
latitude: self.latitude,
longitude: self.longitude
)
}
}
Here’s a utility to map our magnitude property to Color values:
// QuakeUtils.swift
extension Quake {
var color: Color {
switch self.magnitude {
case 0..<1:
return .green
case 1..<2:
return .yellow
case 2..<3:
return .orange
case 3..<5:
return .red
case 5..<7:
return .purple
case 7..<Double.greatestFiniteMagnitude:
return .indigo
default:
return .gray
}
}
}
StoreKey
Similar to our Animals product, we need to define an Environment variable where our Store instance will be saved. Add a new Swift file under Sources/QuakesUI. Name this file StoreKey.swift.
// StoreKey.swift
import ImmutableData
import ImmutableUI
import QuakesData
import SwiftUI
@MainActor fileprivate struct StoreKey : @preconcurrency EnvironmentKey {
static let defaultValue = ImmutableData.Store(
initialState: QuakesState(),
reducer: QuakesReducer.reduce
)
}
extension EnvironmentValues {
fileprivate var store: ImmutableData.Store<QuakesState, QuakesAction> {
get {
self[StoreKey.self]
}
set {
self[StoreKey.self] = newValue
}
}
}
We can now use this Store instance as the value of our ImmutableUI.Provider:
// StoreKey.swift
extension ImmutableUI.Provider {
public init(
_ store: Store,
@ViewBuilder content: () -> Content
) where Store == ImmutableData.Store<QuakesState, QuakesAction> {
self.init(
\.store,
store,
content: content
)
}
}
Here is our ImmutableUI.Dispatcher:
// StoreKey.swift
extension ImmutableUI.Dispatcher {
public init() where Store == ImmutableData.Store<QuakesState, QuakesAction> {
self.init(\.store)
}
}
Here is our ImmutableUI.Selector:
// StoreKey.swift
extension ImmutableUI.Selector {
public init(
id: some Hashable,
label: String? = nil,
filter isIncluded: (@Sendable (Store.State, Store.Action) -> Bool)? = nil,
dependencySelector: repeat DependencySelector<Store.State, each Dependency>,
outputSelector: OutputSelector<Store.State, Output>
) where Store == ImmutableData.Store<QuakesState, QuakesAction> {
self.init(
\.store,
id: id,
label: label,
filter: isIncluded,
dependencySelector: repeat each dependencySelector,
outputSelector: outputSelector
)
}
}
extension ImmutableUI.Selector {
public init(
label: String? = nil,
filter isIncluded: (@Sendable (Store.State, Store.Action) -> Bool)? = nil,
dependencySelector: repeat DependencySelector<Store.State, each Dependency>,
outputSelector: OutputSelector<Store.State, Output>
) where Store == ImmutableData.Store<QuakesState, QuakesAction> {
self.init(
\.store,
label: label,
filter: isIncluded,
dependencySelector: repeat each dependencySelector,
outputSelector: outputSelector
)
}
}
These extensions are optional; we could build our component tree without them, but we would be passing the Store key path in all these different places by-hand. It would add extra work for our product engineers. Defining these extension also helps prevent product engineers from shipping a bug and accidentally passing an incorrect key path.
Dispatch
Let’s define a Dispatch type for our component tree to dispatch action values. Add a new Swift file under Sources/QuakesUI. Name this file Dispatch.swift.
// Dispatch.swift
import ImmutableData
import ImmutableUI
import QuakesData
import SwiftUI
@MainActor @propertyWrapper struct Dispatch: DynamicProperty {
@ImmutableUI.Dispatcher() private var dispatcher
init() {
}
var wrappedValue: (QuakesAction) throws -> Void {
self.dispatcher.dispatch
}
}
Similar to our Animals product, we only expose the dispatch function for action values. We do not expose the dispatch function for thunk operations. There might be some use cases where dispatching thunk operations from our component tree might be helpful for testing or prototyping, but our opinion is this is an anti-pattern for your production applications: component trees should dispatch action values, not thunk operations.
Select
Similar to our Animals data models, our Quakes data models adopt Equatable. When we build Selectors, the data returned by our Selectors will also conform to Equatable. We want the equality operator to be how our Selectors determine data has changed.
Add a new Swift file under Sources/QuakesUI. Name this file Select.swift. Here are extensions on ImmutableUI.Selector for us to use value equality:
// Select.swift
import ImmutableData
import ImmutableUI
import QuakesData
import SwiftUI
extension ImmutableUI.DependencySelector {
init(select: @escaping @Sendable (State) -> Dependency) where Dependency : Equatable {
self.init(select: select, didChange: { $0 != $1 })
}
}
extension ImmutableUI.OutputSelector {
init(select: @escaping @Sendable (State) -> Output) where Output : Equatable {
self.init(select: select, didChange: { $0 != $1 })
}
}
extension ImmutableUI.Selector {
init(
id: some Hashable,
label: String? = nil,
filter isIncluded: (@Sendable (Store.State, Store.Action) -> Bool)? = nil,
dependencySelector: repeat @escaping @Sendable (Store.State) -> each Dependency,
outputSelector: @escaping @Sendable (Store.State) -> Output
) where Store == ImmutableData.Store<QuakesState, QuakesAction>, repeat each Dependency : Equatable, Output : Equatable {
self.init(
id: id,
label: label,
filter: isIncluded,
dependencySelector: repeat DependencySelector(select: each dependencySelector),
outputSelector: OutputSelector(select: outputSelector)
)
}
}
extension ImmutableUI.Selector {
init(
label: String? = nil,
filter isIncluded: (@Sendable (Store.State, Store.Action) -> Bool)? = nil,
dependencySelector: repeat @escaping @Sendable (Store.State) -> each Dependency,
outputSelector: @escaping @Sendable (Store.State) -> Output
) where Store == ImmutableData.Store<QuakesState, QuakesAction>, repeat each Dependency : Equatable, Output : Equatable {
self.init(
label: label,
filter: isIncluded,
dependencySelector: repeat DependencySelector(select: each dependencySelector),
outputSelector: OutputSelector(select: outputSelector)
)
}
}
These extensions are optional. If these extensions were not defined, product engineers would be responsible for defining their own didChange closures when every Selector is defined. There are some advanced use cases where this ability to configure and customize is helpful, but value equality is going to be a very good choice as a default for most products.
We can now begin to define the Selectors of our component tree. These will map to the Selectors we defined from AnimalsState. Let’s begin with SelectQuakes. This will return a Dictionary of Quake values for displaying our QuakeMap component.
// Select.swift
@MainActor @propertyWrapper struct SelectQuakes: DynamicProperty {
@ImmutableUI.Selector<ImmutableData.Store<QuakesState, QuakesAction>, Dictionary<Quake.ID, Quake>> var wrappedValue: Dictionary<Quake.ID, Quake>
init(
searchText: String,
searchDate: Date
) {
self._wrappedValue = ImmutableUI.Selector(
id: ID(
searchText: searchText,
searchDate: searchDate
),
label: "SelectQuakes(searchText: \"\(searchText)\", searchDate: \(searchDate))",
filter: QuakesFilter.filterQuakes(),
outputSelector: QuakesState.selectQuakes(
searchText: searchText,
searchDate: searchDate
)
)
}
}
extension SelectQuakes {
fileprivate struct ID : Hashable {
let searchText: String
let searchDate: Date
}
}
Let’s take a closer look at the parameters we use to create our Selector:
- Our
outputSelectortakes two parameters: asearchTextand asearchDate. Our selector returns aDictionary. The operation to filter byStringandDateruns in linear time. - Our
filteris used to improve performance. We know that only a subset of action values could ever change ourQuakevalues: we don’t have to run ouroutputSelectorif we know an action value could not change ourQuakevalues. - Our
labelwill be helpful when we enable debug logging. - Our
idis a value that conforms toHashable. We use this value to help define the value of our Selector. This is similar — but distinct from — the identity of our Selector. The identity of our Selector is tied, throughSwiftUI.State, to the identity of our component. The identity of ourQuakeMapcomponent could stay consistent while our user changes thesearchTextandsearchDateat runtime. If we didn’t pass anid, we would see ourQuakeMapfail to update itsQuakevalues when the user updates their selections: this would be a bug. Ouridvalue is derived from two values: we define anIDtype that adoptsHashableand wrapssearchTextandsearchDate.
Let’s build SelectQuakesValues. This is the selector we use for our QuakeList. It returns an Array of Quake values. Our user has the ability to choose the options we use for sorting.
// Select.swift
@MainActor @propertyWrapper struct SelectQuakesValues: DynamicProperty {
@ImmutableUI.Selector<ImmutableData.Store<QuakesState, QuakesAction>, Dictionary<Quake.ID, Quake>, Array<Quake>> var wrappedValue: Array<Quake>
init(
searchText: String,
searchDate: Date,
sort keyPath: KeyPath<Quake, some Comparable & Sendable> & Sendable,
order: SortOrder
) {
self._wrappedValue = ImmutableUI.Selector(
id: ID(
searchText: searchText,
searchDate: searchDate,
keyPath: keyPath,
order: order
),
label: "SelectQuakesValues(searchText: \"\(searchText)\", searchDate: \(searchDate), keyPath: \(keyPath), order: \(order))",
filter: QuakesFilter.filterQuakes(),
dependencySelector: QuakesState.selectQuakes(
searchText: searchText,
searchDate: searchDate
),
outputSelector: QuakesState.selectQuakesValues(
searchText: searchText,
searchDate: searchDate,
sort: keyPath,
order: order
)
)
}
}
extension SelectQuakesValues {
fileprivate struct ID<Value> : Hashable where Value : Sendable {
let searchText: String
let searchDate: Date
let keyPath: KeyPath<Quake, Value>
let order: SortOrder
}
}
We construct our Selector with four values: in addition to searchText and searchDate, we also pass keyPath and order to choose how Quake values will be sorted. Because sorting is an O(n log n) problem, we also define a dependencySelector that can run in linear time.
Here is SelectQuakesCount:
// Select.swift
@MainActor @propertyWrapper struct SelectQuakesCount: DynamicProperty {
@ImmutableUI.Selector<ImmutableData.Store<QuakesState, QuakesAction>, Int>(
label: "SelectQuakesCount",
outputSelector: QuakesState.selectQuakesCount()
) var wrappedValue: Int
init() {
}
}
Here is SelectQuakesStatus:
// Select.swift
@MainActor @propertyWrapper struct SelectQuakesStatus: DynamicProperty {
@ImmutableUI.Selector<ImmutableData.Store<QuakesState, QuakesAction>, Status?>(
label: "SelectQuakesStatus",
outputSelector: QuakesState.selectQuakesStatus()
) var wrappedValue: Status?
init() {
}
}
Here is SelectQuake:
// Select.swift
@MainActor @propertyWrapper struct SelectQuake: DynamicProperty {
@ImmutableUI.Selector<ImmutableData.Store<QuakesState, QuakesAction>, Quake?> var wrappedValue: Quake?
init(quakeId: String?) {
self._wrappedValue = ImmutableUI.Selector(
id: quakeId,
label: "SelectQuake(quakeId: \(quakeId ?? "nil"))",
outputSelector: QuakesState.selectQuake(quakeId: quakeId)
)
}
}
These three selectors all run in constant time; we won’t see a very impactful performance improvement by defining a dependencySelector and a filter.
PreviewStore
Similar to our Animals product, we will define a component for constructing a Store reference with some sample data already saved. We will use this when we build Container Components in Xcode Previews.
Add a new Swift file under Sources/QuakesUI. Name this file PreviewStore.swift.
// PreviewStore.swift
import ImmutableData
import ImmutableUI
import QuakesData
import SwiftUI
@MainActor struct PreviewStore<Content> where Content : View {
@State private var store: ImmutableData.Store<QuakesState, QuakesAction> = {
do {
let store = ImmutableData.Store(
initialState: QuakesState(),
reducer: QuakesReducer.reduce
)
try store.dispatch(
action: .data(
.persistentSession(
.localStore(
.didFetchQuakes(
result: .success(
quakes: Quake.previewQuakes
)
)
)
)
)
)
return store
} catch {
fatalError("\(error)")
}
}()
private let content: Content
init(@ViewBuilder content: () -> Content) {
self.content = content()
}
}
extension PreviewStore: View {
var body: some View {
Provider(self.store) {
self.content
}
}
}
Debug
Similar to our Animals product, we want the ability to enable some enhanced debug logging when a component computes its body property. We will use launch arguments from Xcode to set a bool value on UserDefaults.
Add a new Swift file under Sources/QuakesUI. Name this file Debug.swift.
// PreviewStore.swift
import SwiftUI
extension UserDefaults {
fileprivate var isDebug: Bool {
self.bool(forKey: "com.northbronson.QuakesUI.Debug")
}
}
extension View {
static func debugPrint() {
#if DEBUG
if UserDefaults.standard.isDebug {
self._printChanges()
}
#endif
}
}
QuakeMap
Most of what we built this chapter looks very similar to our Animals product. Our selectors were specialized for our Quakes product domain, but the patterns and conventions we follow carried over from what we learned before.
Our component tree will follow a similar strategy: common patterns and conventions with specialization for our product domain. Our Presenter Components are built just for our Quakes product, but our Container Components will look — and feel — similar to what we built for our Animals product.
Let’s begin with QuakeMap. We construct a MapKit.Map to display Quake values.

A common pattern with SwiftUI is composition: small components are assembled together. Our app is built from ImmutableData, but our Presenter Components are still going to be regular SwiftUI. Our QuakeMap presenter will display some components that could be defined as subcomponents. The decision to build from ImmutableData is orthogonal to the decision to compose small components or construct “one big” component. For now, let’s start with a small subcomponent that will be displayed in our Map.
Add a new Swift file under Sources/QuakesUI. Name this file QuakeMap.swift. Here is our first declaration:
// QuakeMap.swift
import CoreLocation
import MapKit
import QuakesData
import SwiftUI
@MainActor fileprivate struct QuakeCircle {
private let quake: Quake
private let selected: Bool
init(
quake: Quake,
selected: Bool
) {
self.quake = quake
self.selected = selected
}
}
This component will help display a circle overlay in our Map component. Here is our body property:
// QuakeMap.swift
extension QuakeCircle {
var markerSize: CGSize {
let value = (self.quake.magnitude + 3) * 6
return CGSize(width: value, height: value)
}
}
extension QuakeCircle: View {
var body: some View {
Circle()
.stroke(
self.selected ? .black : .gray,
style: StrokeStyle(
lineWidth: self.selected ? 2 : 1
)
)
.fill(
self.quake.color.opacity(
self.selected ? 1 : 0.5
)
)
.frame(
width: self.markerSize.width,
height: self.markerSize.width
)
}
}
We can Preview these from Xcode:
// QuakeMap.swift
#Preview {
ForEach(Quake.previewQuakes) { quake in
HStack {
QuakeCircle(
quake: quake,
selected: false
).padding()
QuakeCircle(
quake: quake,
selected: true
).padding()
}
}
}
The next step is to construct this component in a MapContent type:
// QuakeMap.swift
@MainActor fileprivate struct QuakeMarker {
private let quake: Quake
private let selected: Bool
init(
quake: Quake,
selected: Bool
) {
self.quake = quake
self.selected = selected
}
}
extension QuakeMarker: MapContent {
var body: some MapContent {
Annotation(coordinate: self.quake.coordinate) {
QuakeCircle(quake: self.quake, selected: selected)
} label: {
Text(self.quake.name)
}
.annotationTitles(.hidden)
.tag(self.quake)
}
}
We’re not going to spend too much time documenting the behavior of these MapKit types, but we encourage you to explore the documentation and sample code from Apple if you want to learn more.1
Here is the main declaration of our QuakeMap root component:
// QuakeMap.swift
@MainActor struct QuakeMap {
private let listSelection: Quake.ID?
@Binding private var mapSelection: Quake.ID?
private let searchText: String
private let searchDate: Date
init(
listSelection: Quake.ID?,
mapSelection: Binding<Quake.ID?>,
searchText: String,
searchDate: Date
) {
self.listSelection = listSelection
self._mapSelection = mapSelection
self.searchText = searchText
self.searchDate = searchDate
}
}
We construct our QuakeMap with four parameters:
- Our
listSelectionis an optionalQuake.IDvalue indicating whichQuakevalue is currently selected by ourQuakeList. - Our
mapSelectionis aSwiftUI.Bindingto an optionalQuake.IDvalue indicating whichQuakevalue is currently selected by ourQuakeMap. - Our
searchTextis aStringindicating the text the user entered from ourQuakeList. - Our
searchDateis aDateindicating the date the user selected from ourQuakeList.
We can now define a body property to construct our Container:
// QuakeMap.swift
extension QuakeMap: View {
var body: some View {
let _ = Self.debugPrint()
Container(
listSelection: self.listSelection,
mapSelection: self.$mapSelection,
searchText: self.searchText,
searchDate: self.searchDate
)
}
}
Remember the role of our Container: we integrate with ImmutableData for fetching and selecting. Our Container is meant to be lightweight; we do the “heavy lifting” of defining our SwiftUI component tree in our Presenter.
Here is the declaration of our Container:
// QuakeMap.swift
extension QuakeMap {
@MainActor fileprivate struct Container {
@SelectQuakes private var quakes: Dictionary<Quake.ID, Quake>
@SelectQuake var listQuake: Quake?
@SelectQuake var mapQuake: Quake?
private let listSelection: Quake.ID?
@Binding private var mapSelection: Quake.ID?
init(
listSelection: Quake.ID?,
mapSelection: Binding<Quake.ID?>,
searchText: String,
searchDate: Date
) {
self._quakes = SelectQuakes(
searchText: searchText,
searchDate: searchDate
)
self._listQuake = SelectQuake(quakeId: listSelection)
self._mapQuake = SelectQuake(quakeId: mapSelection.wrappedValue)
self.listSelection = listSelection
self._mapSelection = mapSelection
}
}
}
We pass the same four parameters from our Root through to our Container. This Container needs two selectors:
SelectQuakes: We select theDictionaryvalue of allQuakevalues that match for oursearchTextandsearchDate.SelectQuake: We select theQuakevalues representing the currentlistSelectionandmapSelection.
The argument could be made that SelectQuake is superfluous: we could also choose to select the correct Quake values from the Dictionary returned by SelectQuakes. Our SelectQuake selector runs in constant time; we don’t lose too much performance by doing things this way. It’s also possible there could be some more advanced use cases where a user could select a Quake which is expected to not be returned from SelectQuakes.
The next step is to construct our Presenter. Here is our body:
// QuakeMap.swift
extension QuakeMap.Container: View {
var body: some View {
let _ = Self.debugPrint()
QuakeMap.Presenter(
quakes: self.quakes,
listQuake: self.listQuake,
mapQuake: self.mapQuake,
listSelection: self.listSelection,
mapSelection: self.$mapSelection
)
}
}
Here is the declaration of our Presenter:
// QuakeMap.swift
extension QuakeMap {
@MainActor fileprivate struct Presenter {
private let quakes: Dictionary<Quake.ID, Quake>
private let listQuake: Quake?
private let mapQuake: Quake?
private let listSelection: Quake.ID?
@Binding private var mapSelection: Quake.ID?
init(
quakes: Dictionary<Quake.ID, Quake>,
listQuake: Quake?,
mapQuake: Quake?,
listSelection: Quake.ID?,
mapSelection: Binding<Quake.ID?>
) {
self.quakes = quakes
self.listQuake = listQuake
self.mapQuake = mapQuake
self.listSelection = listSelection
self._mapSelection = mapSelection
}
}
}
Here is our body property:
// QuakeMap.swift
extension CLLocationCoordinate2D {
fileprivate func distance(to coordinate: CLLocationCoordinate2D) -> CLLocationDistance {
let a = MKMapPoint(self);
let b = MKMapPoint(coordinate);
return a.distance(to: b)
}
}
extension QuakeMap.Presenter {
@KeyframesBuilder<MapCamera> private func keyframes(initialCamera: MapCamera) -> some Keyframes<MapCamera> {
let start = initialCamera.centerCoordinate
let end = self.listQuake?.coordinate ?? start
let travelDistance = start.distance(to: end)
let duration = max(min(travelDistance / 30, 5), 1)
let finalAltitude = travelDistance > 20 ? 3_000_000 : min(initialCamera.distance, 3_000_000)
let middleAltitude = finalAltitude * max(min(travelDistance / 5, 1.5), 1)
KeyframeTrack(\MapCamera.centerCoordinate) {
CubicKeyframe(end, duration: duration)
}
KeyframeTrack(\MapCamera.distance) {
CubicKeyframe(middleAltitude, duration: duration / 2)
CubicKeyframe(finalAltitude, duration: duration / 2)
}
}
}
extension QuakeMap.Presenter {
private var map: some View {
Map(selection: self.$mapSelection) {
ForEach(Array(self.quakes.values)) { quake in
QuakeMarker(quake: quake, selected: quake.id == self.mapSelection)
}
}
.mapCameraKeyframeAnimator(
trigger: self.listQuake,
keyframes: self.keyframes
)
.mapStyle(
.standard(
elevation: .flat,
emphasis: .muted,
pointsOfInterest: .excludingAll
)
)
}
}
extension QuakeMap.Presenter: View {
var body: some View {
let _ = Self.debugPrint()
self.map
.onChange(
of: self.listSelection,
initial: true
) {
if self.mapSelection != self.listSelection {
self.mapSelection = self.listSelection
}
}
.navigationTitle(self.mapQuake?.name ?? "Earthquakes")
.navigationSubtitle(self.mapQuake?.fullDate ?? "")
}
}
There’s a lot of code here, but it’s mostly all just SwiftUI and MapKit. There’s nothing here that’s specific to ImmutableData; most of this code was copied directly from the Apple sample project.
Our mapSelection is a Binding: we can read and write values. There are two places we update this value: when the user selects a new Quake from the Map component and when the user selects a new Quake from the QuakeList component. If the value from QuakeList was updated, we also attempt to animate the area displayed so the Quake is visible.2
Here are two Xcode Previews:
// QuakeMap.swift
#Preview {
@Previewable @State var mapSelection: Quake.ID?
PreviewStore {
QuakeMap(
listSelection: nil,
mapSelection: $mapSelection,
searchText: "",
searchDate: .now
)
}
}
#Preview {
@Previewable @State var mapSelection: Quake.ID?
QuakeMap.Presenter(
quakes: Dictionary(uniqueKeysWithValues: Quake.previewQuakes.map { ($0.quakeId, $0) }),
listQuake: nil,
mapQuake: nil,
listSelection: nil,
mapSelection: $mapSelection
)
}
Support for MapKit from Xcode Previews might not work as well as more simple SwiftUI components. We recommend choosing “Preview as App” instead of “Preview in Canvas” if you see any problems with rendering.
QuakeList
Our QuakeList component displays a subset of Quake values: the user has the option to filter by date and name. We also have the option to delete Quake values from our local database and fetch new values from our remote store.
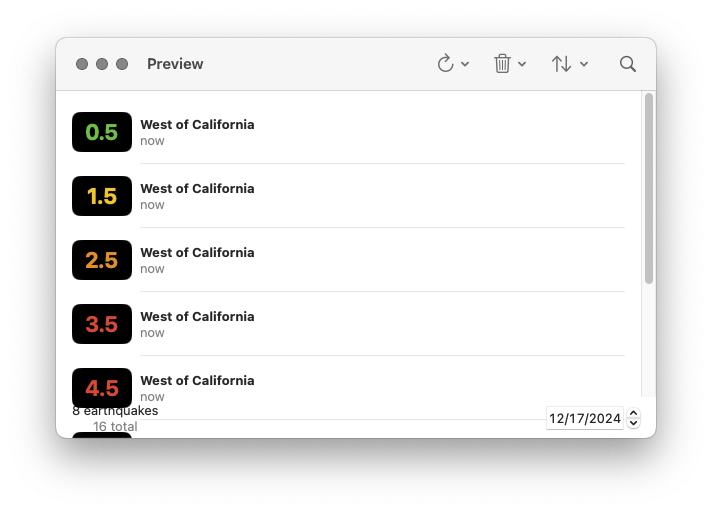
Add a new Swift file under Sources/QuakesUI. Name this file QuakeList.swift. We’re going to begin with some subcomponents needed in our Presenter. Let’s begin with a row component:
// QuakeList.swift
import QuakesData
import SwiftUI
@MainActor fileprivate struct RowContent {
private let quake: Quake
init(quake: Quake) {
self.quake = quake
}
}
extension RowContent: View {
var body: some View {
HStack {
RoundedRectangle(cornerRadius: 8)
.fill(.black)
.frame(width: 60, height: 40)
.overlay {
Text(self.quake.magnitudeString)
.font(.title)
.bold()
.foregroundStyle(self.quake.color)
}
VStack(alignment: .leading) {
Text(self.quake.name)
.font(.headline)
Text("\(self.quake.time.formatted(.relative(presentation: .named)))")
.foregroundStyle(.secondary)
}
}
.padding(.vertical, 8)
}
}
#Preview {
ForEach(Quake.previewQuakes) { quake in
RowContent(quake: quake)
.padding()
}
}
This is just a Presenter: there is no interaction here with ImmutableData.
Our QuakeList displays a “footer” component. Here is where we display the number of earthquakes that match our filters, the total number of earthquakes in our system, and a DatePicker to choose a calendar date.
// QuakeList.swift
@MainActor fileprivate struct Footer {
private let count: Int
private let totalQuakes: Int
@Binding private var searchDate: Date
init(
count: Int,
totalQuakes: Int,
searchDate: Binding<Date>
) {
self.count = count
self.totalQuakes = totalQuakes
self._searchDate = searchDate
}
}
extension Footer: View {
var body: some View {
HStack {
VStack {
Text("\(self.count) \(self.count == 1 ? "earthquake" : "earthquakes")")
Text("\(self.totalQuakes) total")
.foregroundStyle(.secondary)
}
.fixedSize()
Spacer()
DatePicker(
"Search Date",
selection: self.$searchDate,
in: (.distantPast ... .distantFuture),
displayedComponents: .date
)
.labelsHidden()
.disabled(self.totalQuakes == .zero)
}
}
}
#Preview {
@Previewable @State var searchDate: Date = .now
Footer(
count: 8,
totalQuakes: 16,
searchDate: $searchDate
)
.padding()
}
This is just another Presenter: there is no interaction here with ImmutableData.
Our user has the option to sort Quake values by time or magnitude. They can also choose to sort values ascending or descending. It will be a little easier to construct our component if we define these options in two small types:
// QuakeList.swift
extension QuakeList {
fileprivate enum SortOrder: String, CaseIterable, Identifiable, Hashable, Sendable {
case forward, reverse
var id: Self { self }
var name: String { self.rawValue.capitalized }
}
}
extension QuakeList {
fileprivate enum SortParameter: String, CaseIterable, Identifiable, Hashable, Sendable {
case time, magnitude
var id: Self { self }
var name: String { self.rawValue.capitalized }
}
}
We can then map these two types to the types needed for our SelectQuakesValues Selector:
// QuakeList.swift
extension SelectQuakesValues {
fileprivate init(
searchText: String,
searchDate: Date,
sortOrder: QuakeList.SortOrder,
sortParameter: QuakeList.SortParameter
) {
switch (sortParameter, sortOrder) {
case (.time, .forward):
self.init(searchText: searchText, searchDate: searchDate, sort: \Quake.time, order: .forward)
case (.time, .reverse):
self.init(searchText: searchText, searchDate: searchDate, sort: \Quake.time, order: .reverse)
case (.magnitude, .forward):
self.init(searchText: searchText, searchDate: searchDate, sort: \Quake.magnitude, order: .forward)
case (.magnitude, .reverse):
self.init(searchText: searchText, searchDate: searchDate, sort: \Quake.magnitude, order: .reverse)
}
}
}
Here is the main declaration of our QuakeList root component:
// QuakeList.swift
@MainActor struct QuakeList {
@Binding private var listSelection: Quake.ID?
private let mapSelection: Quake.ID?
@Binding private var searchText: String
@Binding private var searchDate: Date
@State private var sortOrder: QuakeList.SortOrder = .forward
@State private var sortParameter: QuakeList.SortParameter = .time
init(
listSelection: Binding<Quake.ID?>,
mapSelection: Quake.ID?,
searchText: Binding<String>,
searchDate: Binding<Date>
) {
self._listSelection = listSelection
self.mapSelection = mapSelection
self._searchText = searchText
self._searchDate = searchDate
}
}
We construct our QuakeList with four parameters:
- Our
listSelectionis a Binding to an optionalQuake.IDindicating whichQuakevalue is currently selected by ourQuakeList. - Our
mapSelectionis an optionalQuake.IDindicating whichQuakevalue is currently selected by ourQuakeMap. - Our
searchTextis a Binding to aStringvalue. This is the text our user entered in the Search Bar component. - Our
searchDateis a Binding to aDatevalue. This is the calendar date our user selected in theFootercomponent.
We save two additional SwiftUI.State properties: sortOrder and sortParameter. We will construct a component for the user to update these selections. Should this state be saved globally in ImmutableData? Maybe… but we would make the argument this is more appropriately saved as local component state. Remember our “Window Test”: if a user opens two different windows to display the same set of Quake values, should the user have the option to choose independent sortOrder and sortParameter values for each window? We believe our user would be more confused if updating the sortOrder in window number one also updated window number two; our user would expect that these windows can customize these values independently.
We can now define a body property to construct our Container:
// QuakeList.swift
extension QuakeList : View {
var body: some View {
let _ = Self.debugPrint()
Container(
listSelection: self.$listSelection,
mapSelection: self.mapSelection,
searchText: self.$searchText,
searchDate: self.$searchDate,
sortOrder: self.$sortOrder,
sortParameter: self.$sortParameter
)
}
}
Here is the declaration of our Container:
// QuakeList.swift
extension QuakeList {
@MainActor fileprivate struct Container {
@SelectQuakesValues private var quakes: Array<Quake>
@SelectQuakesCount private var totalQuakes: Int
@SelectQuakesStatus private var status
@Binding private var listSelection: Quake.ID?
private let mapSelection: Quake.ID?
@Binding private var searchText: String
@Binding private var searchDate: Date
@Binding private var sortOrder: SortOrder
@Binding private var sortParameter: SortParameter
@Dispatch private var dispatch
init(
listSelection: Binding<Quake.ID?>,
mapSelection: Quake.ID?,
searchText: Binding<String>,
searchDate: Binding<Date>,
sortOrder: Binding<SortOrder>,
sortParameter: Binding<SortParameter>
) {
self._quakes = SelectQuakesValues(
searchText: searchText.wrappedValue,
searchDate: searchDate.wrappedValue,
sortOrder: sortOrder.wrappedValue,
sortParameter: sortParameter.wrappedValue
)
self._listSelection = listSelection
self.mapSelection = mapSelection
self._searchText = searchText
self._searchDate = searchDate
self._sortOrder = sortOrder
self._sortParameter = sortParameter
}
}
}
We are going to need to dispatch four action values back to ImmutableData. It will make things a little easier if we construct four private functions to help us:
// QuakeList.swift
extension QuakeList.Container {
private func onAppear() {
do {
try self.dispatch(.ui(.quakeList(.onAppear)))
} catch {
print(error)
}
}
}
extension QuakeList.Container {
private func onTapRefreshQuakesButton(range: QuakesAction.UI.QuakeList.RefreshQuakesRange) {
do {
try self.dispatch(.ui(.quakeList(.onTapRefreshQuakesButton(range: range))))
} catch {
print(error)
}
}
}
extension QuakeList.Container {
private func onTapDeleteSelectedQuakeButton(quakeId: Quake.ID) {
do {
try self.dispatch(.ui(.quakeList(.onTapDeleteSelectedQuakeButton(quakeId: quakeId))))
} catch {
print(error)
}
}
}
extension QuakeList.Container {
private func onTapDeleteAllQuakesButton() {
do {
try self.dispatch(.ui(.quakeList(.onTapDeleteAllQuakesButton)))
} catch {
print(error)
}
}
}
We can then pass our properties and functions to our Presenter:
// QuakeList.swift
extension QuakeList.Container: View {
var body: some View {
let _ = Self.debugPrint()
QuakeList.Presenter(
quakes: self.quakes,
totalQuakes: self.totalQuakes,
status: self.status,
listSelection: self.$listSelection,
mapSelection: self.mapSelection,
searchText: self.$searchText,
searchDate: self.$searchDate,
sortOrder: self.$sortOrder,
sortParameter: self.$sortParameter,
onAppear: self.onAppear,
onTapRefreshQuakesButton: self.onTapRefreshQuakesButton,
onTapDeleteSelectedQuakeButton: self.onTapDeleteSelectedQuakeButton,
onTapDeleteAllQuakesButton: self.onTapDeleteAllQuakesButton
)
}
}
Remember, our Presenter is where we build regular SwiftUI. There’s not going to be anything going on in here that is specifically tied to our ImmutableData architecture; that is what our Container is for.
Here is the declaration of our Presenter:
// QuakeList.swift
extension QuakeList {
@MainActor fileprivate struct Presenter {
private let quakes: Array<Quake>
private let totalQuakes: Int
private let status: Status?
@Binding private var listSelection: Quake.ID?
private let mapSelection: Quake.ID?
@Binding private var searchText: String
@Binding private var searchDate: Date
@Binding private var sortOrder: SortOrder
@Binding private var sortParameter: SortParameter
private let onAppear: () -> Void
private let onTapRefreshQuakesButton: (QuakesAction.UI.QuakeList.RefreshQuakesRange) -> Void
private let onTapDeleteSelectedQuakeButton: (Quake.ID) -> Void
private let onTapDeleteAllQuakesButton: () -> Void
init(
quakes: Array<Quake>,
totalQuakes: Int,
status: Status?,
listSelection: Binding<Quake.ID?>,
mapSelection: Quake.ID?,
searchText: Binding<String>,
searchDate: Binding<Date>,
sortOrder: Binding<SortOrder>,
sortParameter: Binding<SortParameter>,
onAppear: @escaping () -> Void,
onTapRefreshQuakesButton: @escaping (QuakesAction.UI.QuakeList.RefreshQuakesRange) -> Void,
onTapDeleteSelectedQuakeButton: @escaping (Quake.ID) -> Void,
onTapDeleteAllQuakesButton: @escaping () -> Void
) {
self.quakes = quakes
self.totalQuakes = totalQuakes
self.status = status
self._listSelection = listSelection
self.mapSelection = mapSelection
self._searchText = searchText
self._searchDate = searchDate
self._sortOrder = sortOrder
self._sortParameter = sortParameter
self.onAppear = onAppear
self.onTapRefreshQuakesButton = onTapRefreshQuakesButton
self.onTapDeleteSelectedQuakeButton = onTapDeleteSelectedQuakeButton
self.onTapDeleteAllQuakesButton = onTapDeleteAllQuakesButton
}
}
}
Our toolbar will construct three buttons: Refresh, Delete, and Sort. Let’s build our Refresh component:
// QuakeList.swift
extension QuakeList.Presenter {
private var refreshMenu: some View {
Menu("Refresh", systemImage: "arrow.clockwise") {
Button("All Hour") {
self.onTapRefreshQuakesButton(.allHour)
}
Button("All Day") {
self.onTapRefreshQuakesButton(.allDay)
}
Button("All Week") {
self.onTapRefreshQuakesButton(.allWeek)
}
Button("All Month") {
self.onTapRefreshQuakesButton(.allMonth)
}
}
.pickerStyle(.inline)
}
}
We construct a Menu component. Our user has four different options to fetch data. When our user makes a selection, we forward that option back to our Container and dispatch the correct Action value.
Here is our Delete component:
// QuakeList.swift
extension QuakeList.Presenter {
private var deleteMenu: some View {
Menu("Delete", systemImage: "trash") {
Button("Delete Selected") {
if let quakeId = self.listSelection {
self.onTapDeleteSelectedQuakeButton(quakeId)
}
}
.disabled(self.listSelection == nil)
Button("Delete All") {
self.onTapDeleteAllQuakesButton()
}
}
.pickerStyle(.inline)
.disabled(self.totalQuakes == .zero)
}
}
If the user is currently selecting a Quake value, they have the option to delete that value from the local database. If there is at least one Quake value in our global state, they also have the option to delete all Quake values from the local database. These are both actions on global state, so we forward those operations back to our Container.
Here is our Sort component:
// QuakeList.swift
extension QuakeList.Presenter {
private var sortMenu: some View {
Menu("Sort", systemImage: "arrow.up.arrow.down") {
Picker("Sort Order", selection: self.$sortOrder) {
ForEach(QuakeList.SortOrder.allCases) { order in
Text(order.name)
}
}
Picker("Sort By", selection: self.$sortParameter) {
ForEach(QuakeList.SortParameter.allCases) { parameter in
Text(parameter.name)
}
}
}
.pickerStyle(.inline)
.disabled(self.quakes.isEmpty)
}
}
Our sortOrder and sortParameter values are both local component state. When the user makes a selection, we don’t forward that back to our Reducer. We pass a Binding to our Presenter and we perform an imperative mutation directly on that Binding. Because the sortOrder and sortParameter were originally defined as component state in our Root Component, changing those values will update our Container and our Selector.
Here is our List component:
// QuakeList.swift
extension QuakeList.Presenter {
private var list: some View {
ScrollViewReader { proxy in
List(selection: self.$listSelection) {
ForEach(self.quakes) { quake in
RowContent(quake: quake)
}
}
.safeAreaInset(edge: .bottom) {
Footer(
count: self.quakes.count,
totalQuakes: self.totalQuakes,
searchDate: self.$searchDate
)
.padding(.horizontal)
.padding(.bottom, 4)
}
.onChange(of: self.mapSelection) {
if self.listSelection != self.mapSelection {
self.listSelection = self.mapSelection
if let quakeId = self.mapSelection {
withAnimation {
proxy.scrollTo(quakeId, anchor: .center)
}
}
}
}
}
}
}
Similar to our QuakeMap, we update our listSelection when the mapSelection updated. We also attempt to animate the area displayed so the Quake is visible.
Here is our body property:
// QuakeList.swift
extension QuakeList.Presenter: View {
var body: some View {
let _ = Self.debugPrint()
self.list
.onAppear(perform: self.onAppear)
.overlay {
if self.totalQuakes == .zero {
ContentUnavailableView("Refresh to load earthquakes", systemImage: "globe")
} else if self.quakes.isEmpty {
ContentUnavailableView.search
}
}
.searchable(text: self.$searchText)
.toolbar {
self.refreshMenu
self.deleteMenu
self.sortMenu
}
}
}
Here is a Preview of our Root component:
// QuakeList.swift
#Preview {
@Previewable @State var listSelection: Quake.ID?
@Previewable @State var searchText: String = ""
@Previewable @State var searchDate: Date = .now
PreviewStore {
QuakeList(
listSelection: $listSelection,
mapSelection: nil,
searchText: $searchText,
searchDate: $searchDate
)
}
}
Here is a Preview of our Presenter component with zero Quake values in our global state:
// QuakeList.swift
#Preview {
@Previewable @State var listSelection: Quake.ID?
@Previewable @State var searchText: String = ""
@Previewable @State var searchDate: Date = .now
@Previewable @State var sortOrder: QuakeList.SortOrder = .forward
@Previewable @State var sortParameter: QuakeList.SortParameter = .time
QuakeList.Presenter(
quakes: [],
totalQuakes: 0,
status: nil,
listSelection: $listSelection,
mapSelection: nil,
searchText: $searchText,
searchDate: $searchDate,
sortOrder: $sortOrder,
sortParameter: $sortParameter,
onAppear: {
print("onAppear")
},
onTapRefreshQuakesButton: { range in
print("onTapRefreshQuakesButton: \(range)")
},
onTapDeleteSelectedQuakeButton: { quakeId in
print("onTapDeleteSelectedQuakeButton: \(quakeId)")
},
onTapDeleteAllQuakesButton: {
print("onTapDeleteAllQuakesButton")
}
)
}
Here is a Preview of our Presenter component with zero Quake values returned from our Selector:
// QuakeList.swift
#Preview {
@Previewable @State var listSelection: Quake.ID?
@Previewable @State var searchText: String = ""
@Previewable @State var searchDate: Date = .now
@Previewable @State var sortOrder: QuakeList.SortOrder = .forward
@Previewable @State var sortParameter: QuakeList.SortParameter = .time
QuakeList.Presenter(
quakes: [],
totalQuakes: 16,
status: nil,
listSelection: $listSelection,
mapSelection: nil,
searchText: $searchText,
searchDate: $searchDate,
sortOrder: $sortOrder,
sortParameter: $sortParameter,
onAppear: {
print("onAppear")
},
onTapRefreshQuakesButton: { range in
print("onTapRefreshQuakesButton: \(range)")
},
onTapDeleteSelectedQuakeButton: { quakeId in
print("onTapDeleteSelectedQuakeButton: \(quakeId)")
},
onTapDeleteAllQuakesButton: {
print("onTapDeleteAllQuakesButton")
}
)
}
Here is a Preview of our Presenter component with our sample Quake values returned from our Selector:
// QuakeList.swift
#Preview {
@Previewable @State var listSelection: Quake.ID?
@Previewable @State var searchText: String = ""
@Previewable @State var searchDate: Date = .now
@Previewable @State var sortOrder: QuakeList.SortOrder = .forward
@Previewable @State var sortParameter: QuakeList.SortParameter = .time
QuakeList.Presenter(
quakes: Quake.previewQuakes,
totalQuakes: 16,
status: nil,
listSelection: $listSelection,
mapSelection: nil,
searchText: $searchText,
searchDate: $searchDate,
sortOrder: $sortOrder,
sortParameter: $sortParameter,
onAppear: {
print("onAppear")
},
onTapRefreshQuakesButton: { range in
print("onTapRefreshQuakesButton: \(range)")
},
onTapDeleteSelectedQuakeButton: { quakeId in
print("onTapDeleteSelectedQuakeButton: \(quakeId)")
},
onTapDeleteAllQuakesButton: {
print("onTapDeleteAllQuakesButton")
}
)
}
Content
We’re almost done. Let’s build a root component that ties it all together. Add a new Swift file under Sources/QuakesUI. Name this file Content.swift.
// Content.swift
import QuakesData
import SwiftUI
public struct Content {
@State private var listSelection: Quake.ID?
@State private var mapSelection: Quake.ID?
@State private var searchText: String = ""
@State private var searchDate: Date = .now
public init() {
}
}
extension Content: View {
public var body: some View {
let _ = Self.debugPrint()
NavigationSplitView {
QuakeList(
listSelection: self.$listSelection,
mapSelection: self.mapSelection,
searchText: self.$searchText,
searchDate: self.$searchDate
)
} detail: {
QuakeMap(
listSelection: self.listSelection,
mapSelection: self.$mapSelection,
searchText: self.searchText,
searchDate: self.searchDate
)
}
}
}
#Preview {
PreviewStore {
Content()
}
}
We save four values to our local component state. If one of the values is updated from QuakeList, we can then construct QuakeMap with the new values. If mapSelection is updated from QuakeMap, we can then construct QuakeList with the new value.
Here is our QuakesUI package:
QuakesUI
└── Sources
└── QuakesUI
├── Content.swift
├── Debug.swift
├── Dispatch.swift
├── PreviewStore.swift
├── QuakeList.swift
├── QuakeMap.swift
├── QuakeUtils.swift
├── Select.swift
└── StoreKey.swift
Our Quakes product has some big differences compared to our Animals product. Our Animals product used a local database for reading and writing data. Our Quakes product uses a remote server for reading data and a local database for writing data. The good news is that our component tree does not need to know about this: ImmutableData is an abstraction-layer. From the component tree, both products interact with ImmutableData in similar ways: we select data with Selectors and we dispatch actions on user events.
Quakes.app
There are only a few steps left before we can launch our application. Select Quakes.xcodeproj and open QuakesApp.swift. We can delete the original “Hello World” template. Let’s begin by defining our QuakesApp type:
// QuakesApp.swift
import ImmutableData
import ImmutableUI
import QuakesData
import QuakesUI
import Services
import SwiftUI
@main @MainActor struct QuakesApp {
@State private var store = Store(
initialState: QuakesState(),
reducer: QuakesReducer.reduce
)
@State private var listener = Listener(
localStore: Self.makeLocalStore(),
remoteStore: Self.makeRemoteStore()
)
init() {
self.listener.listen(to: self.store)
}
}
We construct our QuakesApp with a Store and a Listener. Our Store is constructed with QuakesState and QuakesReducer. Our Listener will be constructed with a LocalStore and a RemoteStore.
Here is where we construct our LocalStore:
// QuakesApp.swift
extension QuakesApp {
private static func makeLocalStore() -> LocalStore {
do {
return try LocalStore()
} catch {
fatalError("\(error)")
}
}
}
Here is where we construct our RemoteStore:
// QuakesApp.swift
extension NetworkSession: @retroactive RemoteStoreNetworkSession {
}
extension QuakesApp {
private static func makeRemoteStore() -> RemoteStore<NetworkSession<URLSession>> {
let session = NetworkSession(urlSession: URLSession.shared)
return RemoteStore(session: session)
}
}
We saw NetworkSession when we built our QuakesDataClient executable. It’s a lightweight wrapper around URLSession for requesting and serializing JSON. Our RemoteStore needs a type that adopts RemoteStoreNetworkSession: we can extend NetworkSession to conform to RemoteStoreNetworkSession. The retroactive attribute can silence a compiler warning.1 It’s a legit warning, but we control NetworkSession and QuakesApp; there’s not much of a risk of this breaking anything for our tutorial.
Here is our body property:
// QuakesApp.swift
extension QuakesApp: App {
var body: some Scene {
WindowGroup {
Provider(self.store) {
Content()
}
}
}
}
We can now build and run (⌘ R). Our application is now a working clone of the original Quakes sample application from Apple. We preserved the core functionality: we launch our app and fetch Quake values from the USGS server. We can filter and sort Quake values. Our List and Map components stay updated with the same subset of Quake values. We also save our global state on our filesystem in a local database. Launching the app a second time loads the Quake values that were previously cached. We also have the option to delete Quake values from our local database.
You can also create a new window (⌘ N) and watch as edits to global state from one window are reflected in the other. The global state is the complete set of Quake values: this is consistent. The local state is tracked independently: users can sort and filter on one window without affecting the sort and filter options of other windows.
Similar to our Animals product, we can also use Launch Arguments to see the print statements we added for debugging:
-com.northbronson.QuakesData.Debug 1
-com.northbronson.QuakesUI.Debug 1
-com.northbronson.ImmutableUI.Debug 1
-com.apple.CoreData.SQLDebug 1
-com.apple.CoreData.ConcurrencyDebug 1
It’s easy to save thousands of Quake values in global state. Turning on com.northbronson.QuakesData.Debug will print a lot of data. If you were interested in trying to reduce the amount of data printed, you could try and update QuakesData.Listener to print only the difference between the state of our system before and after our Reducer returned. Instead of printing the old state and the new state, think about an algorithm to compare two state values and only print the diff.
Go ahead and try launching the original sample project from Apple. The original sample project fetched all the earthquake values recorded during the current day. a typical day might be about 300 to 400 earthquake values. To test performance with more data, we hacked the original sample project to fetch all the earthquake values recording during the current month. Now, we are fetching an order of magnitude more earthquake values: about 10K. Depending on your network connection, the work to download that data from USGS is not the major bottleneck. The URLSession operation from the original sample project is asynchronous and concurrent. Our main thread is not blocked: we can still scroll around our Map component, even if we don’t have any data to display. Where things get difficult is when those earthquake values have returned from USGS. We then iterate through and insert new PersistentModel reference in our ModelContext. This work happens on main, and it’s slow. This is the bottleneck that leads to apps freezing and “beachballs” spinning.
To be fair, there are more advanced techniques that can perform asynchronous and concurrent ModelContext operations without blocking main.2 Similar to CoreData, we can then attempt to “sync” a ModelContext tied to main with a ModelContext performing asynchronous and concurrent operations. This can help improve performance, but it’s complex code; we don’t want our product engineers to have to think about this. Even if we were able to factor all this code down into shared infra and we were able to write all the automated tests and we were able to defend against all the edge-cases, we would still be stuck with a programming model we don’t agree with: product engineers would be performing imperative mutations on mutable objects from their component tree.
Migrating to ImmutableData fixes both these problems for us: it’s an “abstraction layer” that makes it easy to keep expensive SwiftData operations asynchronous and concurrent, and it delivers immutable value types to our component tree.
-
https://github.com/swiftlang/swift-evolution/blob/main/proposals/0364-retroactive-conformance-warning.md ↩
-
https://fatbobman.com/en/posts/concurret-programming-in-swiftdata/ ↩
AnimalsData
One of the realities of the practice of Software Engineering is the inevitable “changing requirements”.1 We build an application, customers need a new feature, and we have to build something. Sometimes these customers are external customers: the actual users that paid for our product. Sometimes these customers are internal customers: our product managers or engineering managers.
Our ImmutableData architecture looks good so far for “greenfield” products: three new sample products we built from scratch. What happens after the product is built? How flexible are these products to adapt to changing requirements?
Our Animals product was built to save data to a local database. Our experiment will be to build a “next-gen” Animals product. The changing requirements are we now need to support saving data to a remote server. We don’t have to cache data locally; the server will be our “source of truth”.
In a world where our SwiftUI application is built directly on SwiftData, this is possible using some advanced techniques with DataStore.2 This was also possible in Core Data using NSIncrementalStore.3 We’re going to take a slightly different approach. We’re not going to update our existing LocalStore to forward its queries and mutations to a server. We’re going to build a RemoteStore and replace our existing LocalStore on app launch.
Category
Our remote server will return JSON. To serialize that JSON to and from Category values, we are going to adopt Codable. Select the AnimalsData package and open Sources/AnimalsData/Category.swift. Add the Codable conformance to our main declaration:
// Category.swift
public struct Category: Hashable, Codable, Sendable {
public let categoryId: String
public let name: String
package init(
categoryId: String,
name: String
) {
self.categoryId = categoryId
self.name = name
}
}
Animal
Let’s update Animal to adopt Codable. Open Sources/AnimalsData/Animal.swift. Add the Codable conformance to our main declaration:
// Animal.swift
public struct Animal: Hashable, Codable, Sendable {
public let animalId: String
public let name: String
public let diet: Diet
public let categoryId: String
package init(
animalId: String,
name: String,
diet: Diet,
categoryId: String
) {
self.animalId = animalId
self.name = name
self.diet = diet
self.categoryId = categoryId
}
}
We also add Codable to the Diet declaration:
// Animal.swift
extension Animal {
public enum Diet: String, CaseIterable, Hashable, Codable, Sendable {
case herbivorous = "Herbivore"
case carnivorous = "Carnivore"
case omnivorous = "Omnivore"
}
}
RemoteStore
Our PersistentSession performs asynchronous queries and mutations on a type that conforms to PersistentSessionPersistentStore. Our PersistentSession does not have any direct knowledge of SwiftData: that knowledge lives in LocalStore. We’re going to build a new type that conforms to PersistentSessionPersistentStore. This type will perform asynchronous queries and mutations against a remote server.
There’s no “one right way” to design a remote API. This is an interesting topic, but it’s orthogonal to our main goal of teaching ImmutableData. We’re going to build a remote server with an API inspired by GraphQL.4 The history of GraphQL is closely tied with the history of Relay.5 Relay evolved out of the Flux Architecture with an emphasis on retrieving server data.6 Relay and Redux evolved independently of each other, but they both share a common ancestor: Flux.
This isn’t meant as a strong opinion about your own products built from ImmutableData. There’s actually nothing in our RemoteStore that will need any direct knowledge of the ImmutableData architecture. If your server engineers build something that looks like “classic REST”, that doesn’t need to block you on shipping with ImmutableData.
Add a new Swift file under Sources/AnimalsData. Name this file RemoteStore.swift.
Let’s begin with a type to define our Request. This is the outgoing communication from our client to our server.
// RemoteStore.swift
import Foundation
package struct RemoteRequest: Hashable, Codable, Sendable {
package let query: Array<Query>?
package let mutation: Array<Mutation>?
package init(
query: Array<Query>? = nil,
mutation: Array<Mutation>? = nil
) {
self.query = query
self.mutation = mutation
}
}
Our RemoteRequest is constructed with two parameters: an Array of Query values and an Array of Mutation values. We will use Query values to indicate operations to read data and Mutation values to indicate operations to write data.
We will define two possible queries:
// RemoteStore.swift
extension RemoteRequest {
package enum Query: Hashable, Codable, Sendable {
case categories
case animals
}
}
This is easy: one option to request Animal values and one option to request Category values.
We will define four possible mutations:
// RemoteStore.swift
extension RemoteRequest {
package enum Mutation: Hashable, Codable, Sendable {
case addAnimal(
name: String,
diet: Animal.Diet,
categoryId: String
)
case updateAnimal(
animalId: String,
name: String,
diet: Animal.Diet,
categoryId: String
)
case deleteAnimal(animalId: String)
case reloadSampleData
}
}
This should look familiar: these look a lot like the two queries and four mutations we defined on PersistentSessionPersistentStore.
There are two more constructors that will make things easier for us when we only need one Query or one Mutation:
// RemoteStore.swift
extension RemoteRequest {
fileprivate init(query: Query) {
self.init(
query: [
query
]
)
}
}
extension RemoteRequest {
fileprivate init(mutation: Mutation) {
self.init(
mutation: [
mutation
]
)
}
}
Let’s build a type to define our Response. This is the incoming communication from our server to our client.
// RemoteStore.swift
package struct RemoteResponse: Hashable, Codable, Sendable {
package let query: Array<Query>?
package let mutation: Array<Mutation>?
package init(
query: Array<Query>? = nil,
mutation: Array<Mutation>? = nil
) {
self.query = query
self.mutation = mutation
}
}
Our RemoteResponse is constructed with two parameters: an Array of Query values and an Array of Mutation values.
We will define two possible queries:
// RemoteStore.swift
extension RemoteResponse {
package enum Query: Hashable, Codable, Sendable {
case categories(categories: Array<Category>)
case animals(animals: Array<Animal>)
}
}
We will define four possible mutations:
// RemoteStore.swift
extension RemoteResponse {
package enum Mutation: Hashable, Codable, Sendable {
case addAnimal(animal: Animal)
case updateAnimal(animal: Animal)
case deleteAnimal(animal: Animal)
case reloadSampleData(
animals: Array<Animal>,
categories: Array<Category>
)
}
}
We also want some Error types if the response from our server is missing data:
// RemoteStore.swift
extension RemoteResponse.Query {
package struct Error: Swift.Error {
package enum Code: Equatable {
case categoriesNotFound
case animalsNotFound
}
package let code: Self.Code
}
}
extension RemoteResponse.Mutation {
package struct Error: Swift.Error {
package enum Code: Equatable {
case animalNotFound
case sampleDataNotFound
}
package let code: Self.Code
}
}
Similar to QuakesData.RemoteStore, we’re going to define a protocol for our network session. We don’t want our RemoteStore to explicitly depend on URLSession or any type that performs “real” networking; we want the ability to inject a test-double to return stub data in tests.
// RemoteStore.swift
public protocol RemoteStoreNetworkSession: Sendable {
func json<T>(
for request: URLRequest,
from decoder: JSONDecoder
) async throws -> T where T : Decodable
}
Here is the main declaration of our RemoteStore:
// RemoteStore.swift
final public actor RemoteStore<NetworkSession>: PersistentSessionPersistentStore where NetworkSession : RemoteStoreNetworkSession {
private let session: NetworkSession
public init(session: NetworkSession) {
self.session = session
}
}
We’re going to write a utility to serialize our RemoteRequest to a URLRequest that can be forwarded to our NetworkSession:
// RemoteStore.swift
extension RemoteStore {
package struct Error : Swift.Error {
package enum Code: Equatable {
case urlError
case requestError
}
package let code: Self.Code
}
}
extension RemoteStore {
private static func networkRequest(remoteRequest: RemoteRequest) throws -> URLRequest {
guard
let url = URL(string: "http://localhost:8080/animals/api")
else {
throw Error(code: .urlError)
}
var networkRequest = URLRequest(url: url)
networkRequest.httpMethod = "POST"
networkRequest.setValue("application/json", forHTTPHeaderField: "Content-Type")
networkRequest.httpBody = try {
do {
return try JSONEncoder().encode(remoteRequest)
} catch {
throw Error(code: .requestError)
}
}()
return networkRequest
}
}
In the next chapter, we will use Vapor to build a server that runs on localhost. The URL endpoint will accept a POST request and return JSON.
We can now add the functions to conform to PersistentSessionPersistentStore. Let’s begin with fetchCategoriesQuery:
// RemoteStore.swift
extension RemoteStore {
public func fetchCategoriesQuery() async throws -> Array<Category> {
let remoteRequest = RemoteRequest(query: .categories)
let networkRequest = try Self.networkRequest(remoteRequest: remoteRequest)
let remoteResponse: RemoteResponse = try await self.session.json(
for: networkRequest,
from: JSONDecoder()
)
guard
let query = remoteResponse.query,
let categories = {
let element = query.first { element in
if case .categories = element {
return true
}
return false
}
if case .categories(categories: let categories) = element {
return categories
}
return nil
}()
else {
throw RemoteResponse.Query.Error(code: .categoriesNotFound)
}
return categories
}
}
This might look like a lot of code, but we can think through things step-by-step:
- We construct a
RemoteRequestwithQuery.categories. - We transform our
RemoteRequestto aURLRequest. - We forward our
URLRequestto ourNetworkSessionandawaitaRemoteResponse. - We look inside our
RemoteResponsefor aQuery.categoriesvalue. If we found aQuery.categoriesvalue, we return theArrayofCategoryvalues returned by our server. If this values was missing, we throw anError. We can assume that our server would return at most oneQuery.categoriesvalue — we don’t need to code around two differentQuery.categoriesvalues returned in the sameRemoteResponse.
Here is a similar pattern for fetchAnimalsQuery:
// RemoteStore.swift
extension RemoteStore {
public func fetchAnimalsQuery() async throws -> Array<Animal> {
let remoteRequest = RemoteRequest(query: .animals)
let networkRequest = try Self.networkRequest(remoteRequest: remoteRequest)
let remoteResponse: RemoteResponse = try await self.session.json(
for: networkRequest,
from: JSONDecoder()
)
guard
let query = remoteResponse.query,
let animals = {
let element = query.first { element in
if case .animals = element {
return true
}
return false
}
if case .animals(animals: let animals) = element {
return animals
}
return nil
}()
else {
throw RemoteResponse.Query.Error(code: .animalsNotFound)
}
return animals
}
}
On app launch, we will perform a fetchCategoriesQuery and a fetchAnimalsQuery. This will be two different network requests. A legit optimization would be to add more code in our Listener to call only one query on app launch; something like an appLaunchQuery. We can then make one network request for Query.categories and Query.animals at the same time: our server would return them both together.
Mutations will follow a similar pattern. Here is addAnimalMutation:
// RemoteStore.swift
extension RemoteStore {
public func addAnimalMutation(
name: String,
diet: Animal.Diet,
categoryId: String
) async throws -> Animal {
let remoteRequest = RemoteRequest(
mutation: .addAnimal(
name: name,
diet: diet,
categoryId: categoryId
)
)
let networkRequest = try Self.networkRequest(remoteRequest: remoteRequest)
let remoteResponse: RemoteResponse = try await self.session.json(
for: networkRequest,
from: JSONDecoder()
)
guard
let mutation = remoteResponse.mutation,
let animal = {
let element = mutation.first { element in
if case .addAnimal = element {
return true
}
return false
}
if case .addAnimal(animal: let animal) = element {
return animal
}
return nil
}()
else {
throw RemoteResponse.Mutation.Error(code: .animalNotFound)
}
return animal
}
}
Here is updateAnimalMutation:
// RemoteStore.swift
extension RemoteStore {
public func updateAnimalMutation(
animalId: String,
name: String,
diet: Animal.Diet,
categoryId: String
) async throws -> Animal {
let remoteRequest = RemoteRequest(
mutation: .updateAnimal(
animalId: animalId,
name: name,
diet: diet,
categoryId: categoryId
)
)
let networkRequest = try Self.networkRequest(remoteRequest: remoteRequest)
let remoteResponse: RemoteResponse = try await self.session.json(
for: networkRequest,
from: JSONDecoder()
)
guard
let mutation = remoteResponse.mutation,
let animal = {
let element = mutation.first { element in
if case .updateAnimal = element {
return true
}
return false
}
if case .updateAnimal(animal: let animal) = element {
return animal
}
return nil
}()
else {
throw RemoteResponse.Mutation.Error(code: .animalNotFound)
}
return animal
}
}
Here is deleteAnimalMutation:
// RemoteStore.swift
extension RemoteStore {
public func deleteAnimalMutation(animalId: String) async throws -> Animal {
let remoteRequest = RemoteRequest(
mutation: .deleteAnimal(animalId: animalId)
)
let networkRequest = try Self.networkRequest(remoteRequest: remoteRequest)
let remoteResponse: RemoteResponse = try await self.session.json(
for: networkRequest,
from: JSONDecoder()
)
guard
let mutation = remoteResponse.mutation,
let animal = {
let element = mutation.first { element in
if case .deleteAnimal = element {
return true
}
return false
}
if case .deleteAnimal(animal: let animal) = element {
return animal
}
return nil
}()
else {
throw RemoteResponse.Mutation.Error(code: .animalNotFound)
}
return animal
}
}
Here is reloadSampleDataMutation:
// RemoteStore.swift
extension RemoteStore {
public func reloadSampleDataMutation() async throws -> (
animals: Array<Animal>,
categories: Array<Category>
) {
let remoteRequest = RemoteRequest(
mutation: .reloadSampleData
)
let networkRequest = try Self.networkRequest(remoteRequest: remoteRequest)
let remoteResponse: RemoteResponse = try await self.session.json(
for: networkRequest,
from: JSONDecoder()
)
guard
let mutation = remoteResponse.mutation,
let (animals, categories) = {
let element = mutation.first { element in
if case .reloadSampleData = element {
return true
}
return false
}
if case .reloadSampleData(animals: let animals, categories: let categories) = element {
return (animals, categories)
}
return nil
}()
else {
throw RemoteResponse.Mutation.Error(code: .sampleDataNotFound)
}
return (animals, categories)
}
}
Over the course of this tutorial, we’ve presented some strong opinions and value-statements about state-management. We feel strongly about these opinions, but it’s important to remember that some of this code was “arbitrary” in the sense that the designs and patterns are orthogonal to our goal of teaching ImmutableData. The ImmutableData has strong opinions about how components should affect transformations on global state, but we don’t always have strong opinions about what that transformation should look like.
Our LocalStore was built to persist data to our filesystem using SwiftData. We could have chosen Core Data, SQLite, or something else; it is an implementation detail that would not need to influence how we go about building apps on ImmutableData. The decision to choose SwiftData — and the code we wrote to interact with SwiftData — is not meant to sound like an opinion about “the right way” to use ImmutableData.
Similarly, our RemoteStore is built on URLSession and an endpoint that presents a GraphQL-inspired API. These are arbitrary; your own products might look very different, and that’s ok.
-
https://engineering.fb.com/2015/09/14/core-infra/graphql-a-data-query-language/ ↩
-
https://engineering.fb.com/2015/09/14/core-infra/relay-declarative-data-for-react-applications/ ↩
AnimalsDataServer
Before we run our Animals application with RemoteStore, we’re going to actually need an HTTP server to read and write data.
There are many options and languages to choose from when building a server. Our goal is to teach ImmutableData; many of the decisions that go into building scalable web services are outside the scope of this tutorial.
To keep things simple, we’re going to take a couple of shortcuts:
- We will use Swift to build our HTTP server.
- We will run our HTTP server on
localhost.
This isn’t going to scale to millions of daily active users, and that’s ok. We’re just unblocking ourselves on testing our Animals application running against a real server.
Engineers are already using Swift to build server-side applications.1 One of the popular repos for engineering on server-side is Vapor.2 We will use Vapor to build an HTTP server, run our server on localhost, and test our Animals application.
Up to this point, the code we wrote has been almost all new. We refrained from introducing external dependencies and repos. We don’t really want there to be anything “magic” about what we are building. We built the ImmutableData infra and we built three sample application products against that infra. Building an HTTP server in Swift is a very specialized task. Learning how to build this technology ourselves might be interesting, but it should not block our goal of teaching ImmutableData. We’re going to use Vapor to move fast.
We’re also going to import the [Swift-Async-Algorithms]3 repo from Apple. This is helpful for when we iterate over a sequence of values that perform asynchronous operations.
Our Animals product has the ability to read data with queries and write data with mutations. We would like our server to persist that data across launches. The Vapor ecosystem ships Fluent for persisting data in a database. We’re going to take a shortcut. Instead of learning how Fluent works, let’s just use our LocalStore.
Select the AnimalsData package and open Sources/AnimalsDataServer/main.swift. Let’s begin with some utilities for mapping an asynchronous operation over a sequence of values:
// main.swift
import AnimalsData
import AsyncAlgorithms
import Foundation
import Vapor
extension Sequence {
public func map<Transformed>(_ transform: @escaping @Sendable (Self.Element) async throws -> Transformed) async rethrows -> Array<Transformed> {
try await self.async.map(transform)
}
}
extension AsyncSequence {
fileprivate func map<Transformed>(_ transform: @escaping @Sendable (Self.Element) async throws -> Transformed) async rethrows -> Array<Transformed> {
let map: AsyncThrowingMapSequence = self.map(transform)
return try await Array(map)
}
}
Let’s add some utilities on LocalStore for transforming a RemoteRequest to a RemoteResponse:
// main.swift
extension LocalStore {
fileprivate func response(request: RemoteRequest) async throws -> RemoteResponse {
RemoteResponse(
query: try await self.response(query: request.query),
mutation: try await self.response(mutation: request.mutation)
)
}
}
Our RemoteRequest was sent with an Array of Query values and an Array of Mutation values. We’re going to build a RemoteResponse with the data needed for our RemoteStore.
Here is how we build the query and the mutation of our RemoteResponse:
// main.swift
extension LocalStore {
private func response(query: Array<RemoteRequest.Query>?) async throws -> Array<RemoteResponse.Query>? {
try await query?.map { query in try await self.response(query: query) }
}
}
extension LocalStore {
private func response(mutation: Array<RemoteRequest.Mutation>?) async throws -> Array<RemoteResponse.Mutation>? {
try await mutation?.map { mutation in try await self.response(mutation: mutation) }
}
}
We need to transform a RemoteRequest.Query value to a RemoteResponse.Query:
// main.swift
extension LocalStore {
private func response(query: RemoteRequest.Query) async throws -> RemoteResponse.Query {
switch query {
case .animals:
let animals = try await self.fetchAnimalsQuery()
return .animals(animals: animals)
case .categories:
let categories = try await self.fetchCategoriesQuery()
return .categories(categories: categories)
}
}
}
We need to transform a RemoteRequest.Mutation value to a RemoteResponse.Mutation:
// main.swift
extension LocalStore {
private func response(mutation: RemoteRequest.Mutation) async throws -> RemoteResponse.Mutation {
switch mutation {
case .addAnimal(name: let name, diet: let diet, categoryId: let categoryId):
let animal = try await self.addAnimalMutation(name: name, diet: diet, categoryId: categoryId)
return .addAnimal(animal: animal)
case .updateAnimal(animalId: let animalId, name: let name, diet: let diet, categoryId: let categoryId):
let animal = try await self.updateAnimalMutation(animalId: animalId, name: name, diet: diet, categoryId: categoryId)
return .updateAnimal(animal: animal)
case .deleteAnimal(animalId: let animalId):
let animal = try await self.deleteAnimalMutation(animalId: animalId)
return .deleteAnimal(animal: animal)
case .reloadSampleData:
let (animals, categories) = try await self.reloadSampleDataMutation()
return .reloadSampleData(animals: animals, categories: categories)
}
}
}
Let’s construct a LocalStore:
// main.swift
func makeLocalStore() throws -> LocalStore<UUID> {
if let url = Process().currentDirectoryURL?.appending(
component: "default.store",
directoryHint: .notDirectory
) {
return try LocalStore<UUID>(url: url)
}
return try LocalStore<UUID>()
}
Let’s build our Vapor server:
// main.swift
func main() async throws {
let localStore = try makeLocalStore()
let app = try await Application.make(.detect())
app.post("animals", "api") { request in
let response = Response()
let remoteRequest = try request.content.decode(RemoteRequest.self)
print(remoteRequest)
let remoteResponse = try await localStore.response(request: remoteRequest)
print(remoteResponse)
try response.content.encode(remoteResponse, as: .json)
return response
}
try await app.execute()
try await app.asyncShutdown()
}
try await main()
If we build and run our executable, we can see our server is now running on localhost:
$ swift run AnimalsDataServer
[Vapor] Server started on http://127.0.0.1:8080
On first launch, we construct a new LocalStore with the sample data we built in our previous chapters. We can now run curl from shell and confirm the Category values are correct:
$ curl http://localhost:8080/animals/api -X POST -d '{"query": [ {"categories": {}} ]}' -H "Content-Type: application/json" --silent | python3 -m json.tool --indent 2
{
"query": [
{
"categories": {
"categories": [
{
"categoryId": "Mammal",
"name": "Mammal"
},
{
"name": "Bird",
"categoryId": "Bird"
},
{
"categoryId": "Amphibian",
"name": "Amphibian"
},
{
"categoryId": "Invertebrate",
"name": "Invertebrate"
},
{
"categoryId": "Fish",
"name": "Fish"
},
{
"categoryId": "Reptile",
"name": "Reptile"
}
]
}
}
]
}
We pipe our output to python3 for pretty-printing; the original response from Vapor did not include this whitespace.
Here are the Animal values:
$ curl http://localhost:8080/animals/api -X POST -d '{"query": [ {"animals": {}} ]}' -H "Content-Type: application/json" --silent | python3 -m json.tool --indent 2
{
"query": [
{
"animals": {
"animals": [
{
"diet": "Herbivore",
"name": "Southern gibbon",
"categoryId": "Mammal",
"animalId": "Bibbon"
},
{
"diet": "Carnivore",
"categoryId": "Amphibian",
"name": "Newt",
"animalId": "Newt"
},
{
"animalId": "Cat",
"categoryId": "Mammal",
"diet": "Carnivore",
"name": "Cat"
},
{
"name": "House sparrow",
"animalId": "Sparrow",
"diet": "Omnivore",
"categoryId": "Bird"
},
{
"categoryId": "Mammal",
"animalId": "Kangaroo",
"name": "Red kangaroo",
"diet": "Herbivore"
},
{
"name": "Dog",
"animalId": "Dog",
"categoryId": "Mammal",
"diet": "Carnivore"
}
]
}
}
]
}
We can also experiment with a mutation:
$ curl http://localhost:8080/animals/api -X POST -d '{"mutation": [ {"addAnimal": {"name": "Eagle", "diet": "Carnivore", "categoryId": "Bird"}} ]}' -H "Content-Type: application/json" --silent | python3 -m json.tool --indent 2
{
"mutation": [
{
"addAnimal": {
"animal": {
"animalId": "467D0044-4BB9-4C28-A10B-E87A2C328034",
"diet": "Carnivore",
"categoryId": "Bird",
"name": "Eagle"
}
}
}
]
}
If we stop running our server and run our server again, we can request all the Animal values to confirm our mutation was saved:
$ curl http://localhost:8080/animals/api -X POST -d '{"query": [ {"animals": {}} ]}' -H "Content-Type: application/json" --silent | python3 -m json.tool --indent 2
{
"query": [
{
"animals": {
"animals": [
{
"animalId": "Bibbon",
"diet": "Herbivore",
"categoryId": "Mammal",
"name": "Southern gibbon"
},
{
"animalId": "Newt",
"name": "Newt",
"diet": "Carnivore",
"categoryId": "Amphibian"
},
{
"name": "Cat",
"diet": "Carnivore",
"animalId": "Cat",
"categoryId": "Mammal"
},
{
"diet": "Omnivore",
"categoryId": "Bird",
"animalId": "Sparrow",
"name": "House sparrow"
},
{
"animalId": "Kangaroo",
"name": "Red kangaroo",
"diet": "Herbivore",
"categoryId": "Mammal"
},
{
"diet": "Carnivore",
"animalId": "Dog",
"categoryId": "Mammal",
"name": "Dog"
},
{
"diet": "Carnivore",
"name": "Eagle",
"animalId": "467D0044-4BB9-4C28-A10B-E87A2C328034",
"categoryId": "Bird"
}
]
}
}
]
}
With a minimal amount of new code, we not only have an HTTP server running to deliver Category and Animal values, we also leverage our existing LocalStore for writing to a persistent database on our filesystem.
AnimalsDataClient
Our AnimalsDataClient executable was originally built to use LocalStore from command-line. Let’s try testing our RemoteStore.
Select the AnimalsData package and open Sources/AnimalsDataClient/main.swift. Here is all we need for now:
// main.swift
import AnimalsData
import Foundation
import Services
extension NetworkSession: RemoteStoreNetworkSession {
}
func makeRemoteStore() -> RemoteStore<NetworkSession<URLSession>> {
let session = NetworkSession(urlSession: URLSession.shared)
return RemoteStore(session: session)
}
func main() async throws {
let store = makeRemoteStore()
let animals = try await store.fetchAnimalsQuery()
print(animals)
let categories = try await store.fetchCategoriesQuery()
print(categories)
}
try await main()
If we start with running AnimalsDataServer, we can run AnimalsDataClient to perform queries and mutations on RemoteStore.
Try it for yourself: experiment with mutating an Animal value on RemoteStore. Run your executables again and confirm the mutations were persisted.
Animals.app
We’re almost ready to launch our next-gen Animals product. All we have to do is make some changes on app launch. Select Animals.xcodeproj and open AnimalsApp.swift.
Here is our new AnimalsApp:
// AnimalsApp.swift
import AnimalsData
import AnimalsUI
import ImmutableData
import ImmutableUI
import Services
import SwiftUI
@main @MainActor struct AnimalsApp {
@State private var store = Store(
initialState: AnimalsState(),
reducer: AnimalsReducer.reduce
)
@State private var listener = Listener(store: Self.makeRemoteStore())
init() {
self.listener.listen(to: self.store)
}
}
extension NetworkSession: @retroactive RemoteStoreNetworkSession {
}
extension AnimalsApp {
private static func makeRemoteStore() -> RemoteStore<NetworkSession<URLSession>> {
let session = NetworkSession(urlSession: URLSession.shared)
return RemoteStore(session: session)
}
}
extension AnimalsApp: App {
var body: some Scene {
WindowGroup {
Provider(self.store) {
Content()
}
}
}
}
If we start with running AnimalsDataServer, we can now build and run our application (⌘ R). Our Animals application will now use RemoteStore to save its state to our HTTP server.
This is great! We just made a big leap in what this app is capable of: we added the ability to persist data to a remote server. Let’s also think about what we didn’t do:
- Other than building
RemoteStoreand a few small changes to addCodableto data models, we didn’t have to change anything in ourAnimalsDatamodule. - We didn’t have to change anything in our
AnimalsUImodule. - We just changed a few lines of code in
AnimalsAppto migrate fromLocalStoretoRemoteStore.
To be fair, there are also some open questions we might have about scaling to more complex products that depend on fetching data from a remote server:
- If we run our
AnimalsDataServer, run our Animals application, then run ourAnimalsDataClientto perform a mutation from command-line, our Animals application is now “stale”: we don’t display the current data. More complex products could introduce a solution similar to GraphQL subscriptions.1 If our Vapor server delivered a web-socket connection, we could use that for a “two-way” communication: when our source-of-truth is mutated remotely, we can then push the important changes back to our client. Relay has supported GraphQL subscriptions for many years to help solve this problem.2 - In a complex product, we might have multiple components that fetch similar data. An application might “over-fetch” too much data; this can reduce performance and drain battery life. If multiple components need the same data, we would like the option to make this fetch just one time. We would like more control over how and when data is cached. This is one of the problems that Relay was built to help solve.3
- Waiting for a network response can be slow. If our user performs an action — like deleting an
Animalvalue — that should lead to a state mutation on our server, do we need to wait for our server to return? What if we just performed that state mutation directly on the client without waiting for our server to respond? These are known as “optimistic updates”, which we saw examples of when we built our Quakes product. Managing optimistic updates can be challenging: if our server fails to perform the mutation, we need some way to “roll back” the changes that happened locally. Relay manages a lot of this work and reduces the amount of code product engineers need to be responsible for.4
The Flux architecture was meant to be general and agnostic; Flux could have been used to build applications that fetched data from a remote server, but it also could have been used to build applications that saved all data locally. While React and Flux were being used internally at FB, product engineers began to solve the same problems over and over again shipping products that depended on a remote server. Writing repetitive code slows down product engineers and increases the chance of shipping bugs. Relay was built to solve these problems in just one place: the infra.
Redux evolved from Flux, but independent of Relay. Redux and Relay solved different problems. Relay took the principles of Flux and shipped a complex framework for fetching data from a remote server. Redux took the principles of Flux and shipped a lightweight framework with stronger opinions about immutability.
Like Flux and Redux, ImmutableData is lightweight. We built the infra ourselves in two chapters, and we saw that infra deploy to three different sample application products. Like Flux and Redux, ImmutableData is general and agnostic. We built three different sample application products with different needs: our first application saved data locally in-memory, our second application saved data in a persistent database, our third application fetched data from a remote server and saved data locally in a persistent database, and we migrated our second application to save data to a remote server.
Unlike Relay, ImmutableData is not built with opinions about a remote server, or what kind of data that remote server would return. We built our Quakes product and our Animals product with remote data, but we wrote this code as a product engineer; this was product code, not infra code.
In time, the ImmutableData architecture can continue evolving. A “next-gen” ImmutableData would probably look similar to Relay: the infra would ship with opinions about how a remote server works and how the data is structured. From those opinions, infra could then be written to solve for the repetitive problems that product engineers want solutions for: subscribing to remote changes, optimized caching logic, managing optimistic updates, and more.
-
https://relay.dev/docs/guided-tour/updating-data/graphql-subscriptions/ ↩
-
https://relay.dev/docs/tutorial/mutations-updates/#improving-the-ux-with-an-optimistic-updater ↩
Performance
Let’s think back to the fundamental role Reducers play in Redux and ImmutableData:
flowchart LR accTitle: Data Flow through Reducers accDescr: Our reducer maps from a State and an Action to a new State. oldState[State] --> Reducer Action --> Reducer Reducer --> newState[State]
A Reducer maps a State and an Action to a new State. The State and Action values are immutable; it’s not the job of a Reducer to attempt to modify the State in-place. The job of a Reducer is to return a new State value.
Isn’t that slow? If the memory footprint of one State value is N bytes, does that imply that every time our Root Reducer runs we must copy all N bytes?
Let’s go back and learn a little more about the evolution of Flux and Redux, the evolution of Swift, and how some specialized data structures can improve the performance of our Reducers.
TreeDictionary
The original Flux Architecture did not require Data Stores to contain only immutable data. Flux did not require mutable data models, but the common tutorials and examples were presented on mutable data models. An Action value would be dispatched to a Store, and a Store would perform an imperative mutation on a reference to a mutable data model: an Array or a Dictionary.1 Similar to Objective-C, the JavaScript standard library collections were reference types.
One year after Flux was announced, Lee Byron introduced the ImmutableJS framework with some ambitious goals: adding immutable value semantics on JavaScript objects while also optimizing for performance.2
Conventional wisdom might tell you that if you want to copy a Dictionary of N elements by value, you must copy N elements. This is linear time: the amount of space and time to perform a copy scales linearly with the amount of elements in the Dictionary. If a Dictionary contains N elements, and you wish to add one new element while also preserving the original Dictionary, you must copy N elements to construct a new Dictionary.
The insight of ImmutableJS was to use HAMT data structures as the “backing store” of a new Immutable Dictionary type.3 This type followed value semantics: immutability was enforced as the type was built. What HAMTs delivered was fast performance: structural sharing gave product engineers a O(log n) operation to perform copies. At scale, this was a big improvement over the O(n) operation to copy all N elements of our Dictionary. Because our Immutable Dictionary follows values semantics, these two values are now independent: adding one new element to our copy does not mutate our original.
It was now possible to build Flux stores with Immutable Data without performing an O(n) operation on every Action that was dispatched to our Store. Redux took this one step further by requiring immutable data models in Stores.4 Immutable data improved predictability and testability: Reducers were pure functions without side effects. Immutable Data also gave Redux the opportunity to perform some performance optimizations: checking if two state values might have changed could now be performed with a reference equality check in constant time, as opposed to a value equality check in linear time.
Swift ships with first-class support for value types: structs and enumerations. In languages that were primarily object-oriented, adding value semantics to your application often meant adding new code on top of the language itself: ImmutableJS brought value semantics to JavaScript collections and Remodel brought value semantics to Objective-C objects.5 In Swift, value semantics are provided by the language itself: we don’t need a library or framework.
In a Swift Reducer, we can transform a Dictionary and return a new Dictionary. These are value types: the original Dictionary is unchanged. The Dictionary provided by the Swift standard library will perform a O(n) operation to copy its values. To preserve value semantics while also optimizing performance, we would like a data structure similar to ImmutableJS: an immutable Dictionary with a logarithmic operation to perform copies.
The [Swift-Collections]6 repo is maintained by Apple engineers, but ships outside the Swift standard library. The TreeDictionary data structure from Swift-Collections is built from CHAMP data structures.7 Like the HAMT data structures in ImmutableJS, the TreeDictionary data structure can perform copies in logarithmic time. Compared to linear time, this is a huge improvement when our State saves many values.
We built two sample products that save a Dictionary value in State: Our Animals product saved a Dictionary of Category values and a Dictionary of Animal values, and our Quakes product saved a Dictionary of Quake values. For the most part, migrating to TreeDictionary is easy; it’s not a 100-percent drop-in replacement, but it’s pretty close. The basic APIs for reading and writing values remain the same.
CowBox
Let’s look a little deeper into the performance of Dictionary. Suppose we define a Reducer that performs an identity transform on State: this is a Reducer that returns its State parameter with no mutations. We might think this identity transformation is a copy operation: O(n) time.
Suppose we then need to perform an equality check: we need to test that our copy is equal to our original value. We might think this is an O(n) operation: we test for value equality by iterating through all N values in our Dictionary.
Swift Collections, including Dictionary, perform an important optimization: these are copy-on-write data structures. When we copy a collection value, we copy by reference. We share data between both copies. When we perform a mutation on a copy, we then copy by value. This implies that our Reducer that returns an identity transformation can return in constant time: to make a copy of a Dictionary containing N values, we only have to copy a pointer. To preserve value semantics, we “copy-on-write” before a mutation takes place; here is where the O(n) operation happens.8
Copy-on-write data structures can also improve performance when checking for value equality. If two copy-on-write data structures point to the same data reference, these copy-on-write data structures must be equal by value: we can return true in constant time. Redux, which required data to be modeled with immutable data, used a similar technique to optimize performance. Testing if two substates of our Redux state could have changed can use a reference equality check in constant time. When we build our ImmutableData state from copy-on-write data structures, we can take advantage of a similar optimization: checking if two substates could have changed can check for reference equality, which is constant time.
Data structures like Dictionary and TreeDictionary implement copy-on-write, but the Swift language itself does not write that code for us. Engineers that need a copy-on-write data structure can write the code themselves to manage the object reference where data is stored.8 It’s not so bad, but it’s not so great, either.
The Swift-CowBox repo makes it easy to add copy-on-write semantics to custom Swift structs.9 The CowBox macros attach to your struct declaration. All the boilerplate to manage the copy-on-write data storage is written for you at compile time by CowBox. This means we not only get faster copying of our custom data models, we also get faster checking for value equality. This can all add up to big performance wins when building SwiftUI applications.10
The chapter-18 branch migrates AnimalsState and QuakesState to TreeDictionary and CowBox. Please reference this commit to see these data structures in action.
Are these data structures the right choice for your own products? It depends. TreeDictionary and CowBox can have legit performance improvements when dealing with large amounts of complex data models, but there are performance tradeoffs. For small amounts of simple data models, these advanced data structures might not help improve performance: the overhead of the data structure itself might be more expensive than the performance improvements.
If you plan to experiment with these data structures, our advice is to read the appropriate documentation to understand more about the performance tradeoffs. We also recommend measuring your performance with benchmarks. Measure CPU and memory before and after your migration to quantify how these data structures could be impactful in your own products.
Benchmarks
When we built our Quakes product, we saw how much faster the version built from ImmutableData was than the original version from Apple built on SwiftData. The original version not only performed expensive operations in SwiftData, those operations were blocking on main. Building from ImmutableData gave us a natural abstraction layer; the SwiftData operations to persist data on our filesystem could all take place asynchronously and concurrently without blocking main.
Our Reducer is still a synchronous operation, and this operation still blocks main, but the immutable data structures we use to model our state are very lightweight compared to building our state in a SwiftData ModelContext. This is even taking into account that our Reducer returns copies of immutable data; our Reducer does not mutate our state value in-place.
Let’s run some experiments to see for ourselves how efficient these immutable data structures are. We’re going to use two open-source repos for measuring benchmarks: [CollectionsBenchmark]1 from Apple and [Benchmarks]2 from Ordo One. If you’re not experienced with these repos, that’s ok. Running the benchmarks for yourself is optional. We’re going to focus this chapter on analyzing the results.
If you want to follow along with the benchmarks to see for yourself where these measurements came from, you can checkout the ImmutableData-Benchmarks repo.
Our experiments will test three different data structure collections we could choose for the shared mutable state of our SwiftUI applications:
ModelContext: This is a reference type from SwiftData. Our data model elements are also reference types.Dictionary: This is a value type from the Swift Standard Library. Our data model elements are also value types.TreeDictionary: This is a value type from the [Swift-Collections]3 repo. Our data model elements are also value types.
Here is the data model element we use for testing ModelContext:
@Model final class ModelElement : Hashable {
var a: Int64
var b: Int64
var c: Int64
var d: Int64
var e: Int64
var f: Int64
var g: Int64
var h: Int64
var i: Int64
var j: Int64
}
Here is the data model element we use for testing Dictionary and TreeDictionary:
struct StructElement : Hashable {
var a: Int64
var b: Int64
var c: Int64
var d: Int64
var e: Int64
var f: Int64
var g: Int64
var h: Int64
var i: Int64
var j: Int64
}
Inspired by Jared Khan, these data models have a memory footprint of 80 bytes: ten times the width of one pointer on a 64-bit architecture.4
Now that we defined three different data structure collections and the data model elements in those collections, we can define the operations we want to measure on those collections. We begin by constructing a collection of N elements. We then perform the following operations on that collection:
- We count the number of elements.
- We read one existing element.
- We insert one new element.
- We update one existing element.
- We delete one existing element.
- We sort all N elements.
We measure CPU and memory for every operation using CollectionsBenchmark and Benchmarks. To measure CPU, we run CollectionsBenchmark multiple times with increasing values of N. To measure memory, we run Benchmarks to measure the memory footprint when N is at our maximum.
Count
Let’s start by creating a collection of N elements and then measuring the performance of returning its element count. Here are our results from CollectionsBenchmark:
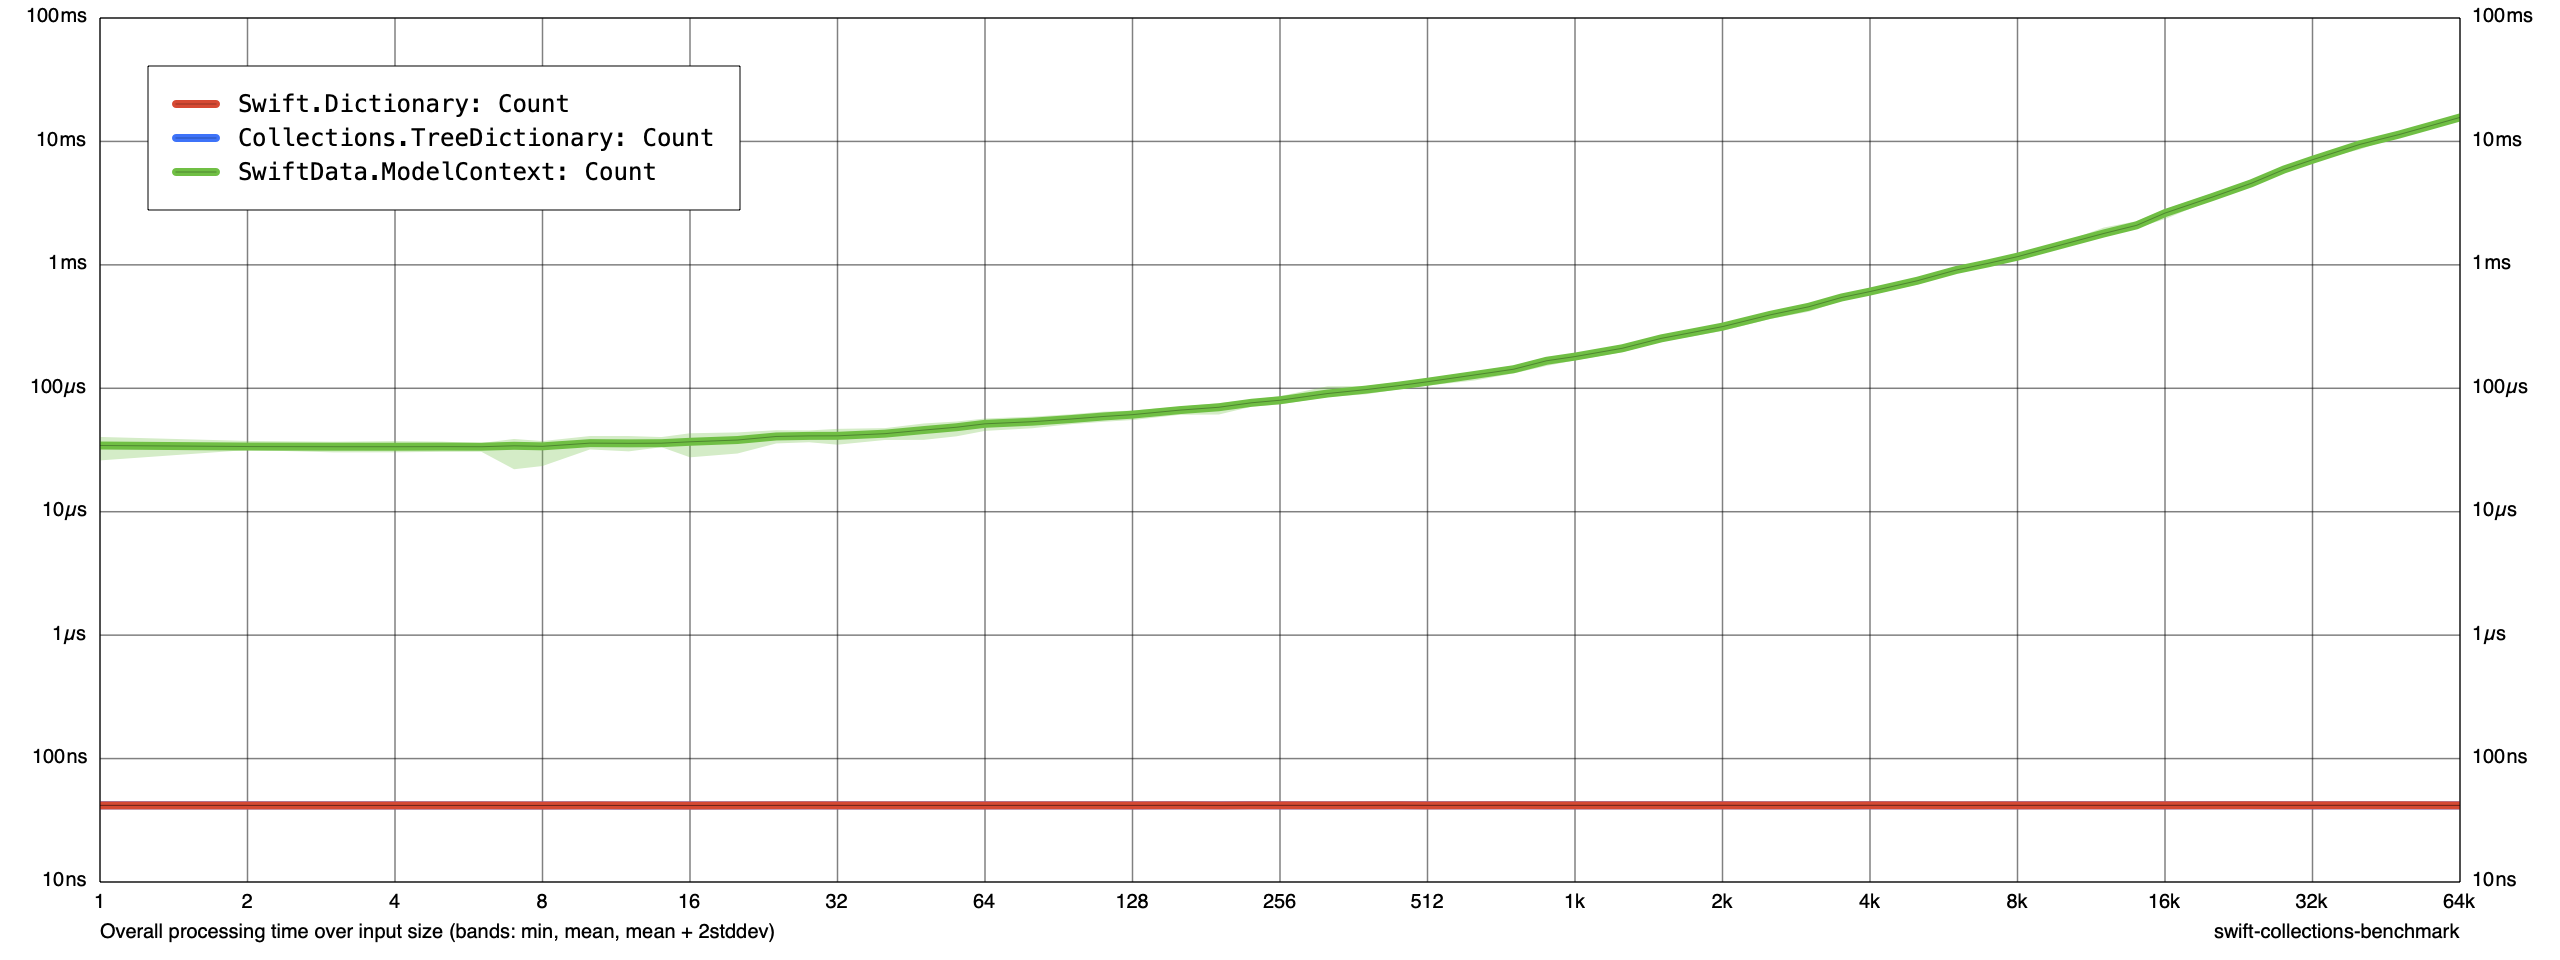
Dictionary and TreeDictionary both return their element count in constant time: as the size of these collections grows, the time spent to count the elements stays about the same. This is great: this data structure scales well with large data.
ModelContext needs more time to return its element count, and this time grows linearly with the size of the collection. By the time our collection is 64k elements, we are spending literal orders of magnitude more time waiting.
Here is what CPU and memory look like from Benchmarks when our collection is 64k elements:
Time (total CPU)
| Test | p0 | p25 | p50 | p75 | p90 | p99 | p100 | Samples |
|---|---|---|---|---|---|---|---|---|
| Benchmarks:Collections.TreeDictionary: Count (μs) * | 2 | 3 | 3 | 3 | 3 | 7 | 7 | 100 |
| Benchmarks:Swift.Dictionary: Count (μs) * | 3 | 3 | 4 | 4 | 4 | 8 | 8 | 100 |
| Benchmarks:SwiftData.ModelContext: Count (μs) * | 18096 | 18235 | 18301 | 18399 | 18612 | 24969 | 25139 | 100 |
Memory (resident peak)
| Test | p0 | p25 | p50 | p75 | p90 | p99 | p100 | Samples |
|---|---|---|---|---|---|---|---|---|
| Benchmarks:Collections.TreeDictionary: Count (M) | 23 | 33 | 33 | 33 | 33 | 33 | 33 | 100 |
| Benchmarks:Swift.Dictionary: Count (M) | 14 | 32 | 32 | 32 | 32 | 32 | 32 | 100 |
| Benchmarks:SwiftData.ModelContext: Count (M) | 240 | 1050 | 1886 | 2722 | 3221 | 3513 | 3555 | 100 |
The memory footprint of Dictionary and TreeDictionary is the same: about 32MB. The memory footprint of ModelContext is over an order of magnitude larger: the median memory footprint from our sample size of 100 is over 1800MB.
Read
Let’s create a collection of N elements and then measure the performance of reading one element. Here are our results from CollectionsBenchmark:

Dictionary and TreeDictionary both return the element in constant time. There does look to be a little more “noise” from TreeDictionary at large values of N, but we don’t see a linear growth as N scales.
ModelContext needs more time to return its element, and this time grows linearly with the size of the collection. Similar to our operation to count elements, we are spending orders of magnitude more time waiting at large values of N.
Here is what CPU and memory look like from Benchmarks when our collection is 64k elements:
Time (total CPU)
| Test | p0 | p25 | p50 | p75 | p90 | p99 | p100 | Samples |
|---|---|---|---|---|---|---|---|---|
| Benchmarks:Collections.TreeDictionary: Read (μs) * | 2 | 3 | 3 | 3 | 3 | 6 | 6 | 100 |
| Benchmarks:Swift.Dictionary: Read (μs) * | 3 | 3 | 4 | 4 | 4 | 10 | 11 | 100 |
| Benchmarks:SwiftData.ModelContext: Read (μs) * | 20115 | 20234 | 20316 | 20464 | 20660 | 24150 | 27103 | 100 |
Memory (resident peak)
| Test | p0 | p25 | p50 | p75 | p90 | p99 | p100 | Samples |
|---|---|---|---|---|---|---|---|---|
| Benchmarks:Collections.TreeDictionary: Read (M) | 23 | 33 | 33 | 33 | 33 | 33 | 33 | 100 |
| Benchmarks:Swift.Dictionary: Read (M) | 14 | 32 | 32 | 32 | 32 | 32 | 32 | 100 |
| Benchmarks:SwiftData.ModelContext: Read (M) | 241 | 1055 | 1892 | 2720 | 3228 | 3519 | 3568 | 100 |
This looks similar to our operation to count elements. Our total memory footprint for these collections remains about the same.
Insert
Let’s create a collection of N elements and then measure the performance of inserting one new element. Here are our results from CollectionsBenchmark:
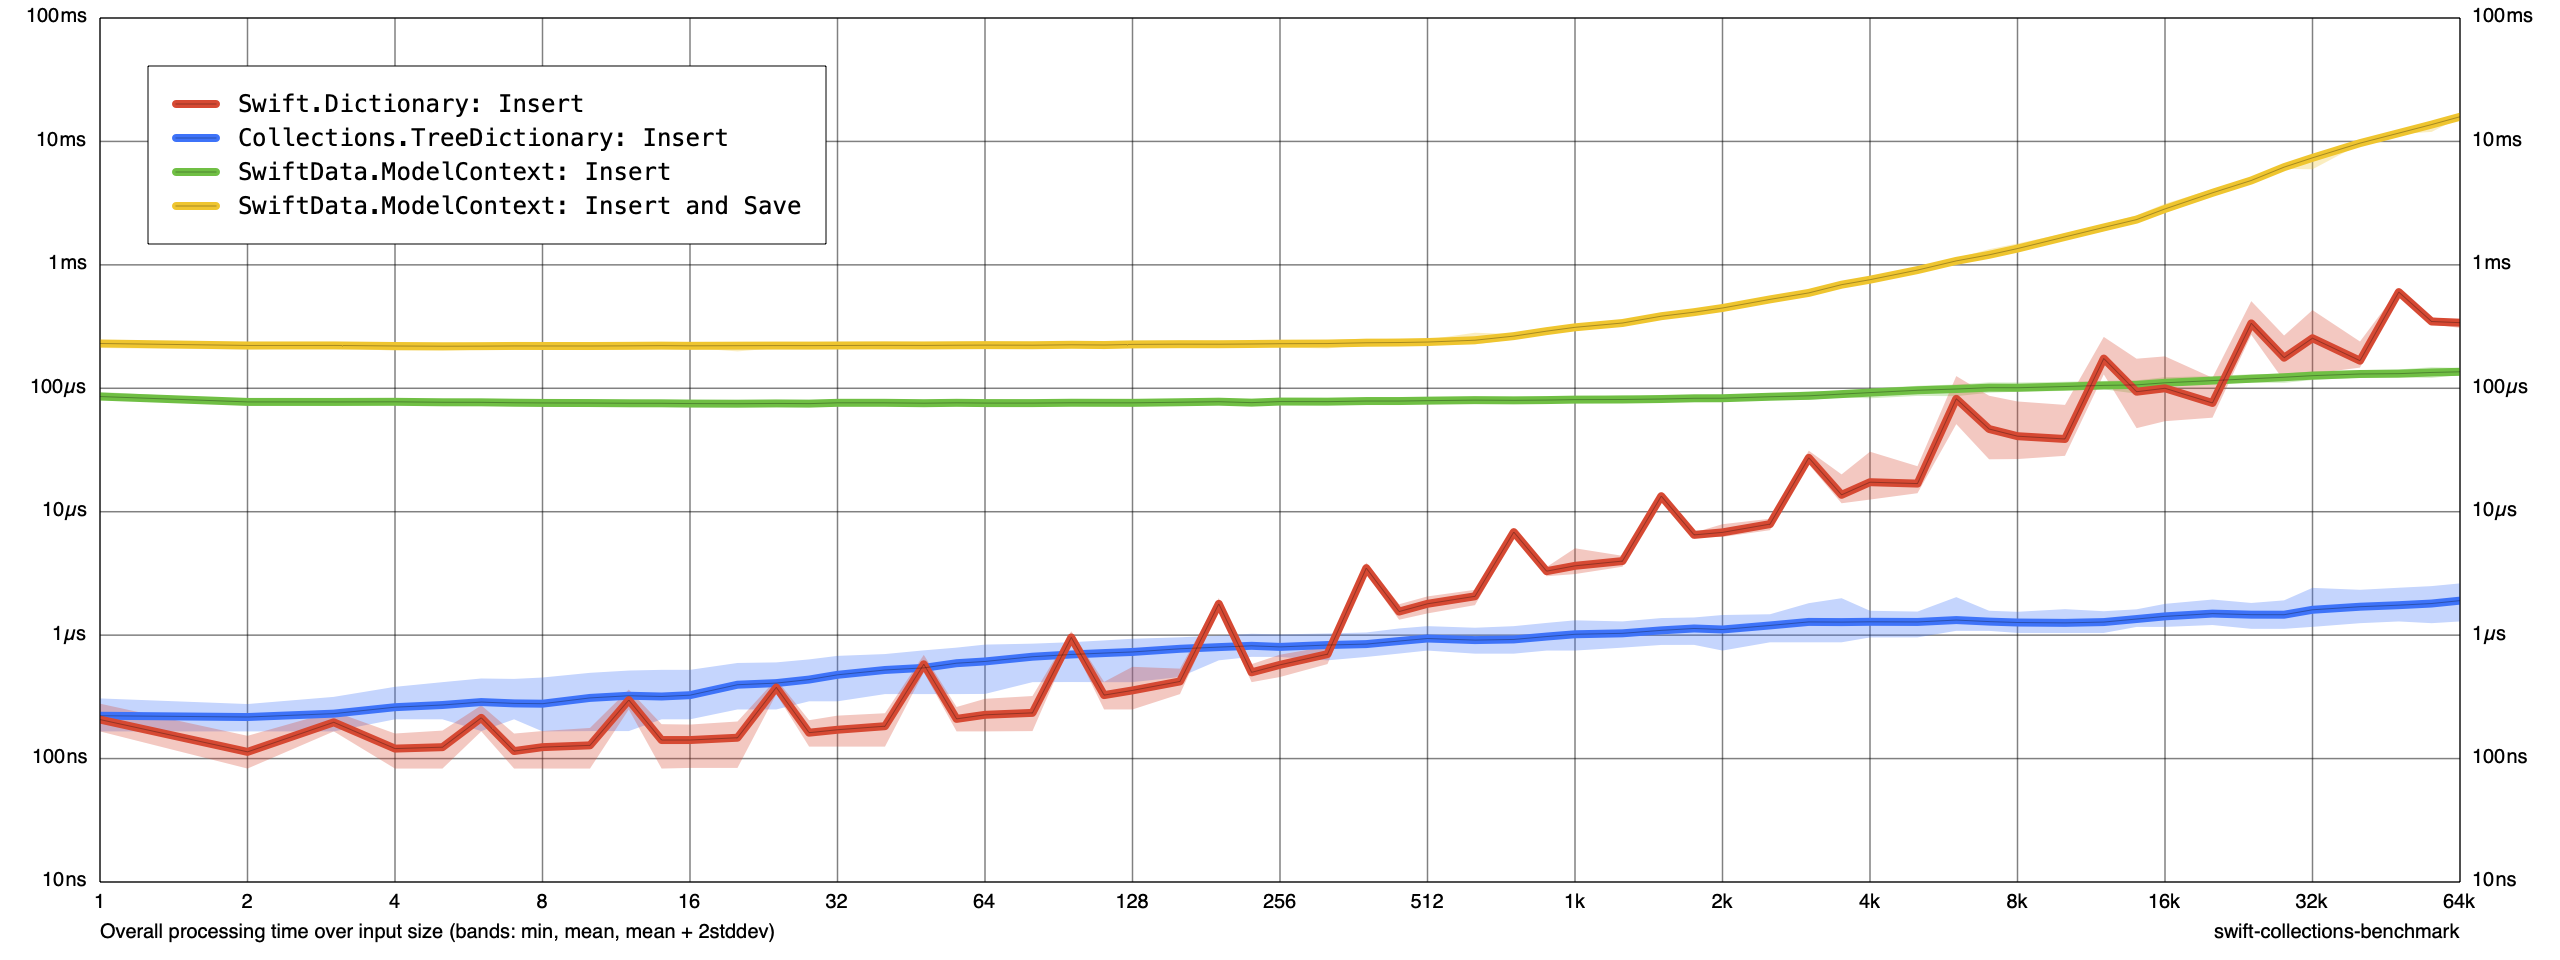
Here is where things start to get interesting. Let’s start with Dictionary. Our Dictionary is a value type. Our Reducer transforms our global state by returning a new immutable value. As discussed in our previous chapter, we can expect Dictionary to perform a linear amount of work when we perform a copy with a mutation applied: we “copy-on-write” all N elements to construct a new value.
We see much better results from TreeDictionary. As discussed in our previous chapter, TreeDictionary is a value type that uses HAMT data structures. This means that performing a copy with a mutation applied performs O(log n) work. At small values of N, it does look like we pay a small performance penalty for TreeDictionary, but this overhead is worth it by the time our collection is 512 elements. By the time our collection is 64k elements, our TreeDictionary is performing its operation orders of magnitude faster than Dictionary.
We measure two different operations for ModelContext: the operation to insert a new element without saving, and the operation to insert a new element with saving. The operation to insert without saving is constant time. At small values of N, this operation is orders of magnitude slower than Dictionary and TreeDictionary. At large values of N, it looks like the O(n) operation in Dictionary begins to catch up: ModelContext performs faster when our collection is 64k elements. TreeDictionary grows with N, but it grows logarithmically: at 64k elements, TreeDictionary is performing its operation orders of magnitude faster than ModelContext.
Where ModelContext begins to slow down is when we insert a new element and then save our context. This becomes a O(n) operation starting at about 512 elements. By the time our collection is 64k elements, ModelContext is an order of magnitude slower than Dictionary.
Here is what CPU and memory look like from Benchmarks when our collection is 64k elements:
Time (total CPU)
| Test | p0 | p25 | p50 | p75 | p90 | p99 | p100 | Samples |
|---|---|---|---|---|---|---|---|---|
| Benchmarks:Collections.TreeDictionary: Insert (μs) * | 3 | 3 | 3 | 4 | 6 | 8 | 10 | 100 |
| Benchmarks:Swift.Dictionary: Insert (μs) * | 891 | 928 | 936 | 947 | 961 | 988 | 993 | 100 |
| Benchmarks:SwiftData.ModelContext: Insert (μs) * | 146 | 165 | 282 | 307 | 349 | 372 | 378 | 100 |
| Benchmarks:SwiftData.ModelContext: Insert and Save (μs) * | 18317 | 18629 | 18727 | 18891 | 19284 | 25992 | 25992 | 100 |
Memory (resident peak)
| Test | p0 | p25 | p50 | p75 | p90 | p99 | p100 | Samples |
|---|---|---|---|---|---|---|---|---|
| Benchmarks:Collections.TreeDictionary: Insert (M) | 23 | 30 | 30 | 30 | 30 | 30 | 30 | 100 |
| Benchmarks:Swift.Dictionary: Insert (M) | 14 | 35 | 35 | 39 | 39 | 39 | 39 | 100 |
| Benchmarks:SwiftData.ModelContext: Insert (M) | 254 | 1209 | 2202 | 3196 | 3794 | 4148 | 4185 | 100 |
| Benchmarks:SwiftData.ModelContext: Insert and Save (M) | 241 | 1044 | 1879 | 2716 | 3215 | 3525 | 3558 | 100 |
Our TreeDictionary uses HAMT data structures and structural sharing. In addition to saving time, this also saves memory compared to a data structure like Dictionary that copies all N values when returning a new copy with a mutation applied.
Update
Let’s create a collection of N elements and then measure the performance of updating one existing element. Here are our results from CollectionsBenchmark:
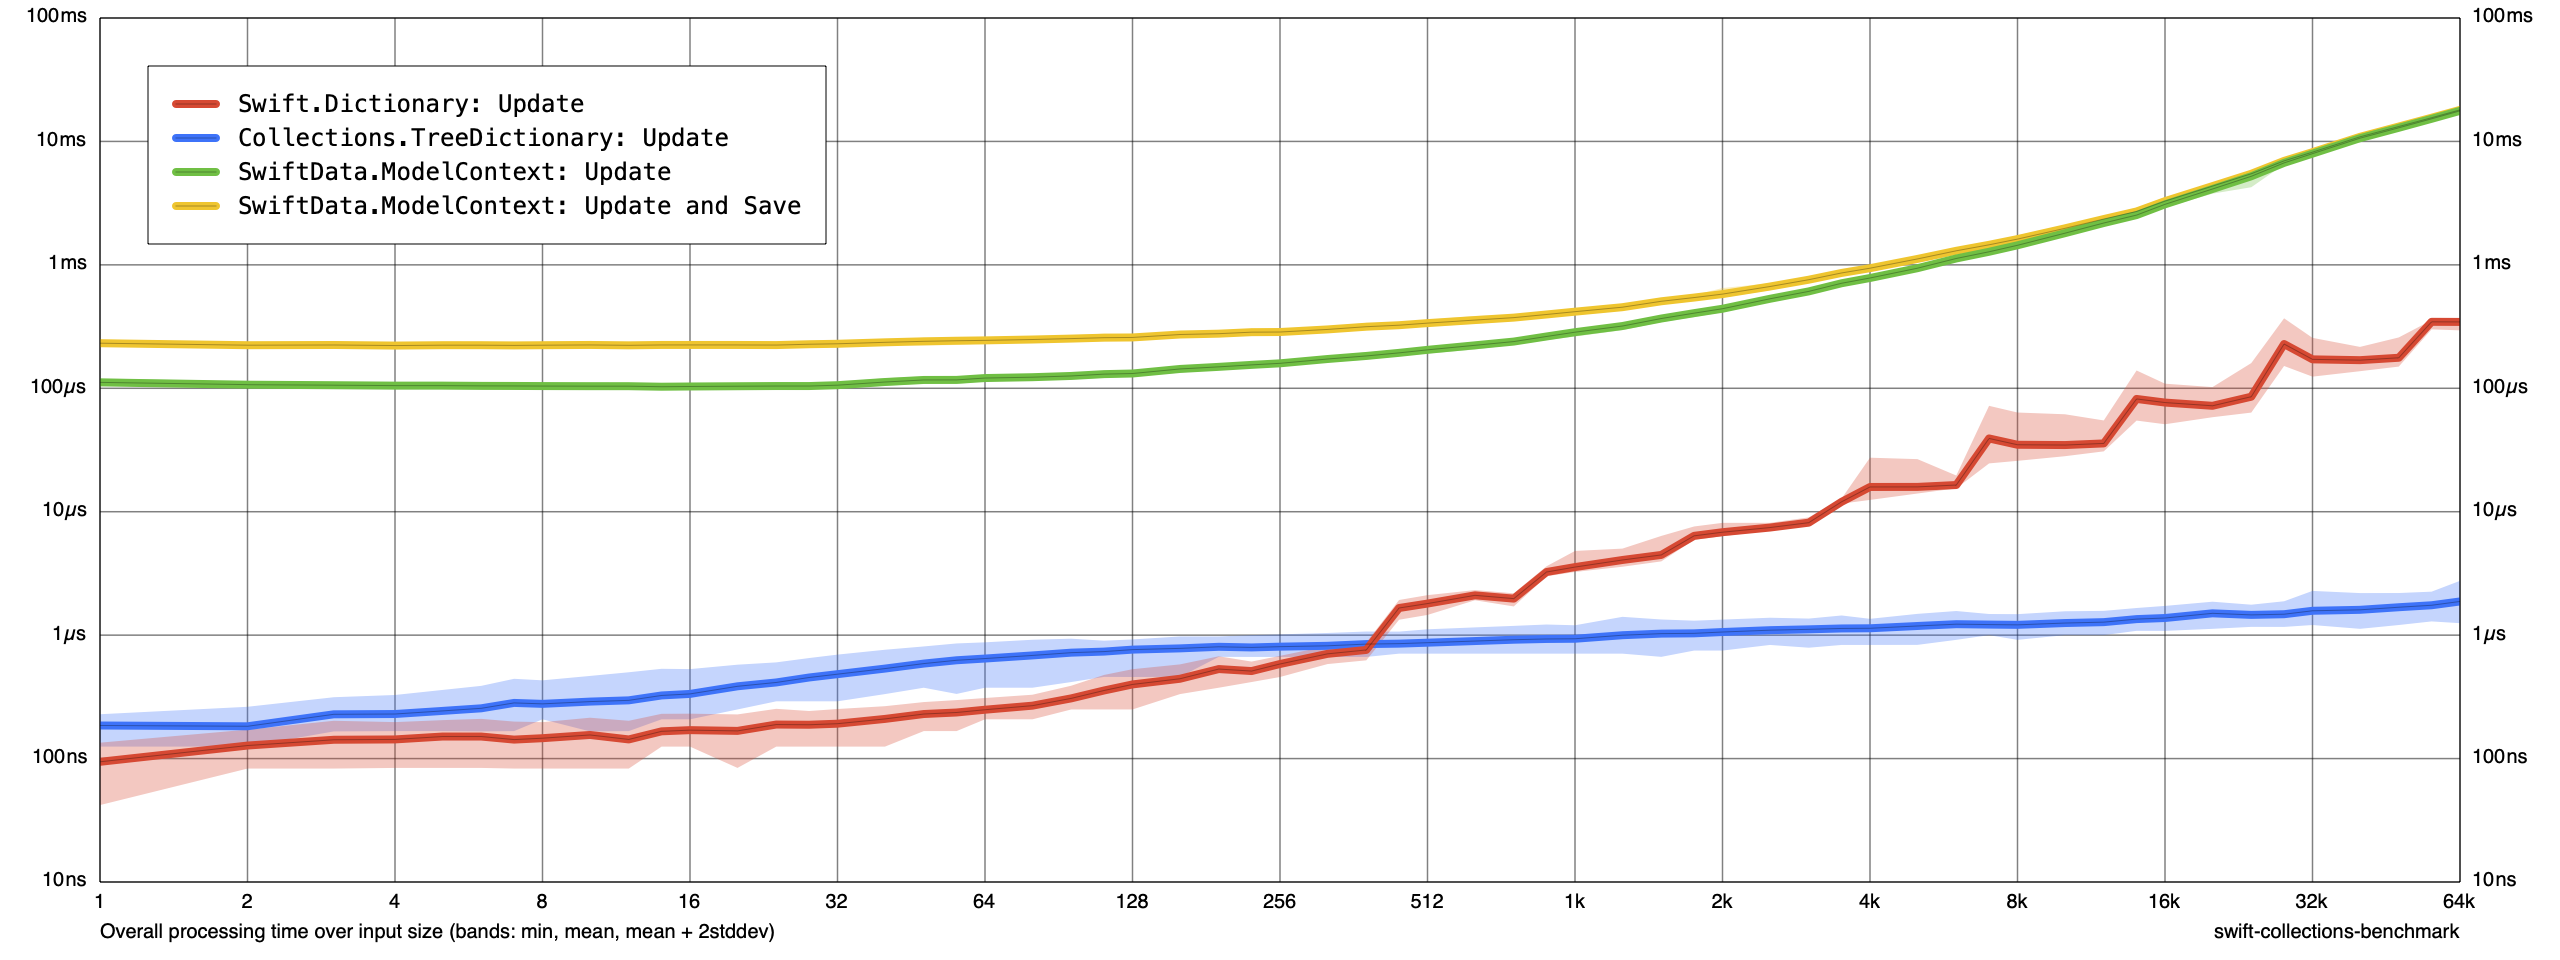
This looks similar to what we saw in our previous operation, except that updating an existing element in ModelContext is a O(n) operation before the save operation takes place. Dictionary is still a O(n) operation. TreeDictionary still performs best at large values of N.
Here is what CPU and memory look like from Benchmarks when our collection is 64k elements:
Time (total CPU)
| Test | p0 | p25 | p50 | p75 | p90 | p99 | p100 | Samples |
|---|---|---|---|---|---|---|---|---|
| Benchmarks:Collections.TreeDictionary: Update (μs) * | 4 | 4 | 4 | 5 | 7 | 9 | 10 | 100 |
| Benchmarks:Swift.Dictionary: Update (μs) * | 912 | 942 | 961 | 975 | 998 | 1141 | 1236 | 100 |
| Benchmarks:SwiftData.ModelContext: Update (μs) * | 20081 | 20349 | 20431 | 20595 | 20922 | 27410 | 27523 | 100 |
| Benchmarks:SwiftData.ModelContext: Update and Save (μs) * | 20481 | 20660 | 20742 | 20873 | 21119 | 27820 | 28453 | 100 |
Memory (resident peak)
| Test | p0 | p25 | p50 | p75 | p90 | p99 | p100 | Samples |
|---|---|---|---|---|---|---|---|---|
| Benchmarks:Collections.TreeDictionary: Update (M) | 23 | 33 | 33 | 33 | 33 | 33 | 33 | 100 |
| Benchmarks:Swift.Dictionary: Update (M) | 14 | 43 | 43 | 43 | 43 | 43 | 43 | 100 |
| Benchmarks:SwiftData.ModelContext: Update (M) | 252 | 1217 | 2210 | 3213 | 3802 | 4163 | 4199 | 100 |
| Benchmarks:SwiftData.ModelContext: Update and Save (M) | 249 | 1043 | 1888 | 2716 | 3223 | 3515 | 3559 | 100 |
The memory usage looks similar to our previous results.
Delete
Let’s create a collection of N elements and then measure the performance of deleting one existing element. Here are our results from CollectionsBenchmark:
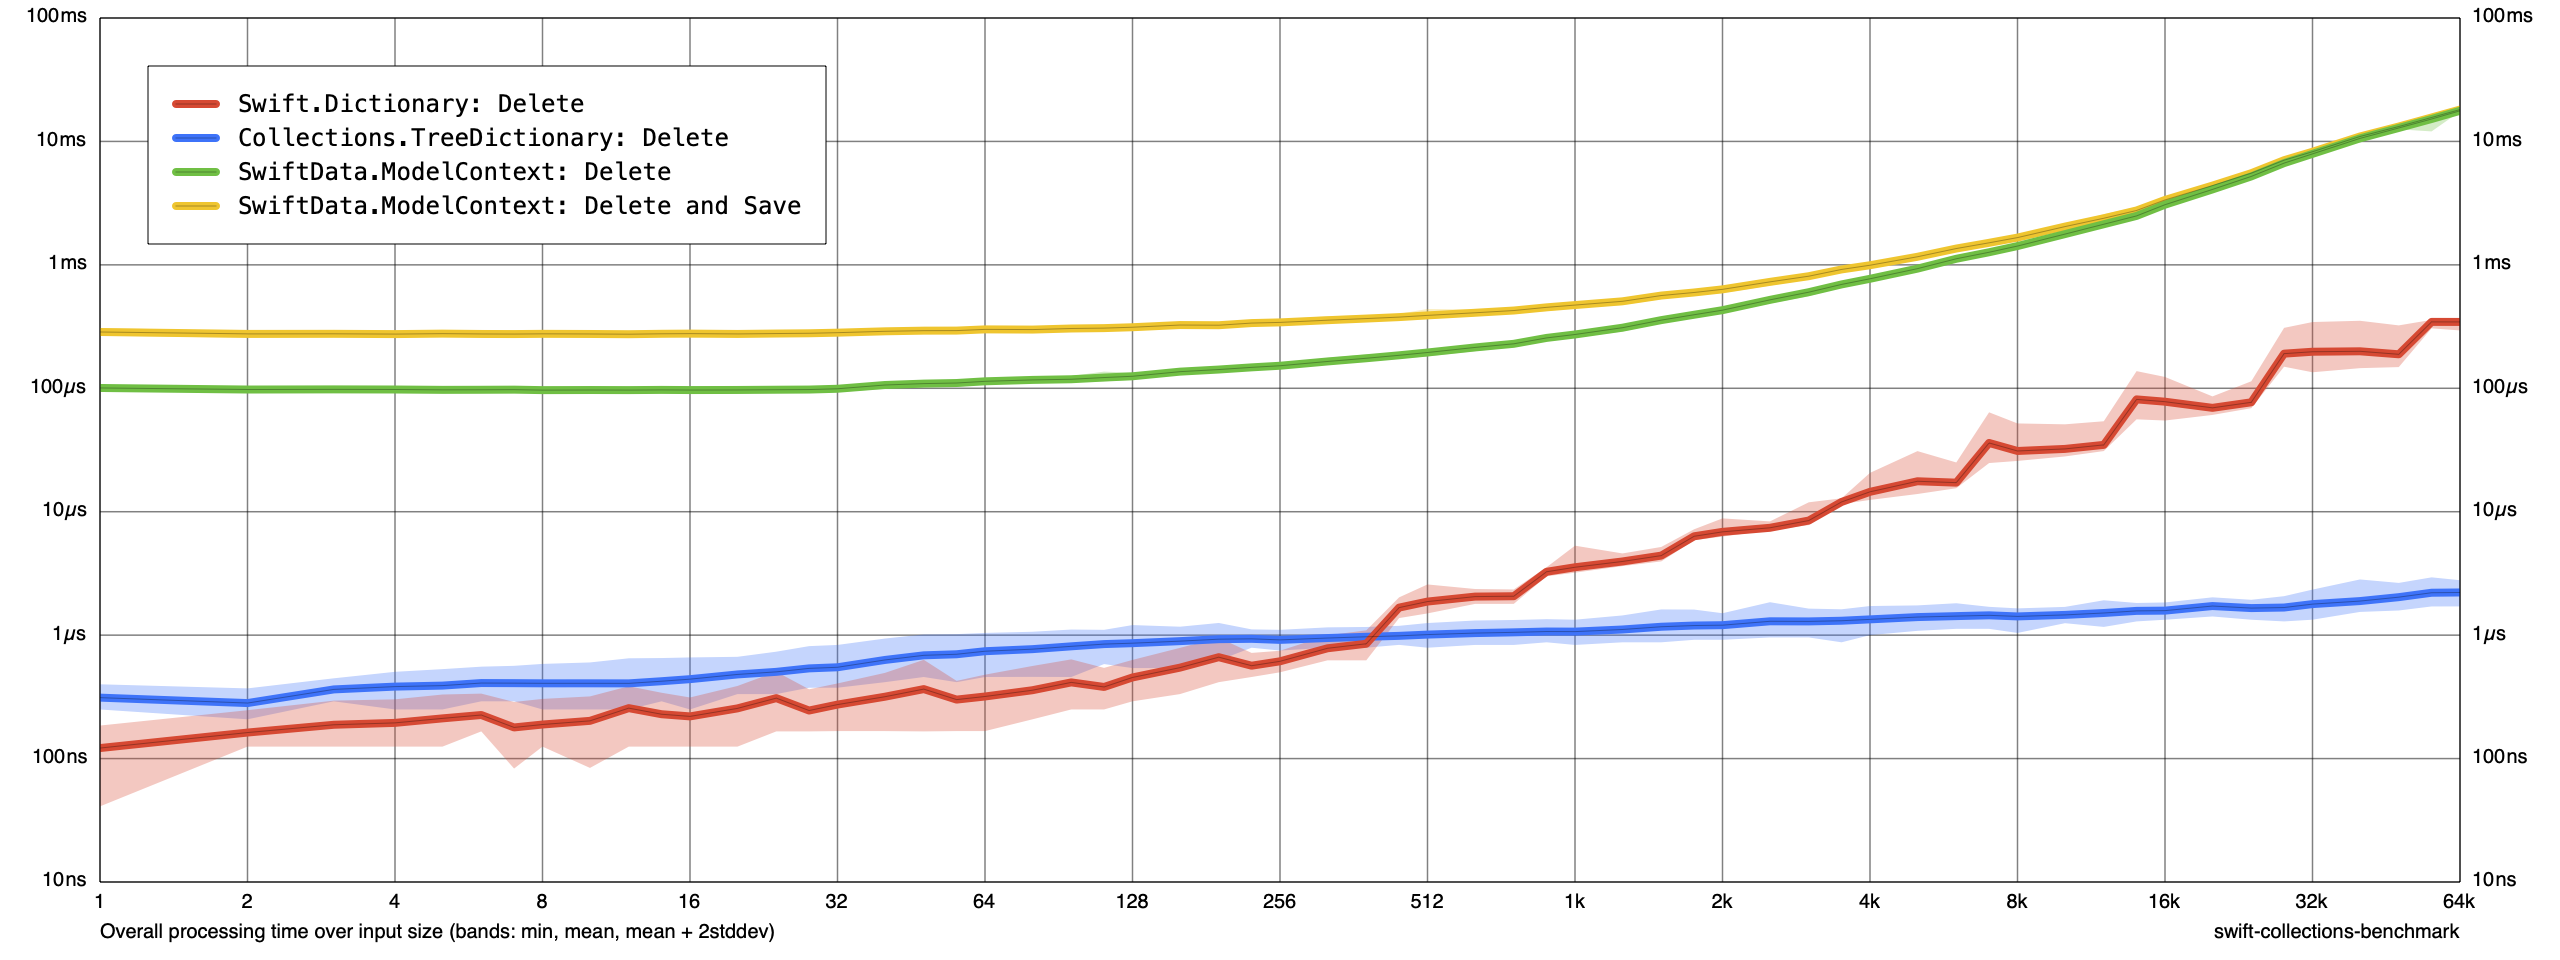
This looks similar to what we saw in our previous operation: ModelContext and Dictionary both grow linearly and TreeDictionary performs best at large values of N.
Here is what CPU and memory look like from Benchmarks when our collection is 64k elements:
Time (total CPU)
| Test | p0 | p25 | p50 | p75 | p90 | p99 | p100 | Samples |
|---|---|---|---|---|---|---|---|---|
| Benchmarks:Collections.TreeDictionary: Delete (μs) * | 4 | 4 | 4 | 5 | 7 | 10 | 19 | 100 |
| Benchmarks:Swift.Dictionary: Delete (μs) * | 908 | 923 | 935 | 947 | 960 | 1000 | 1130 | 100 |
| Benchmarks:SwiftData.ModelContext: Delete (μs) * | 19293 | 20283 | 20349 | 20464 | 20726 | 27640 | 28067 | 100 |
| Benchmarks:SwiftData.ModelContext: Delete and Save (μs) * | 16519 | 20775 | 20873 | 21021 | 21299 | 27460 | 27549 | 100 |
Memory (resident peak)
| Test | p0 | p25 | p50 | p75 | p90 | p99 | p100 | Samples |
|---|---|---|---|---|---|---|---|---|
| Benchmarks:Collections.TreeDictionary: Delete (M) | 23 | 32 | 33 | 33 | 33 | 33 | 33 | 100 |
| Benchmarks:Swift.Dictionary: Delete (M) | 14 | 36 | 40 | 40 | 40 | 40 | 40 | 100 |
| Benchmarks:SwiftData.ModelContext: Delete (M) | 254 | 1218 | 2212 | 3204 | 3804 | 4159 | 4201 | 100 |
| Benchmarks:SwiftData.ModelContext: Delete and Save (M) | 248 | 1069 | 1914 | 2741 | 3238 | 3542 | 3571 | 100 |
The memory usage looks similar to our previous results.
Sort
Let’s create a collection of N elements and then measure the performance of sorting all elements. Here are our results from CollectionsBenchmark:

Sorting is an O(n log n) operation. We expect this to grow as the size of our collection grows. We do seem to notice that sorting Dictionary and TreeDictionary values seems to return an order of magnitude faster than performing a sorted fetch on a ModelContext.
Here is what CPU and memory look like from Benchmarks when our collection is 64k elements:
Time (total CPU)
| Test | p0 | p25 | p50 | p75 | p90 | p99 | p100 | Samples |
|---|---|---|---|---|---|---|---|---|
| Benchmarks:Collections.TreeDictionary: Sort (μs) * | 335467 | 336331 | 336331 | 336855 | 337117 | 337904 | 339169 | 100 |
| Benchmarks:Swift.Dictionary: Sort (μs) * | 326249 | 327680 | 328204 | 328729 | 328991 | 329777 | 330451 | 100 |
| Benchmarks:SwiftData.ModelContext: Sort (μs) * | 2229116 | 2254438 | 2267021 | 2271216 | 2279604 | 2321547 | 2338431 | 100 |
Memory (resident peak)
| Test | p0 | p25 | p50 | p75 | p90 | p99 | p100 | Samples |
|---|---|---|---|---|---|---|---|---|
| Benchmarks:Collections.TreeDictionary: Sort (M) | 27 | 36 | 36 | 36 | 37 | 37 | 37 | 100 |
| Benchmarks:Swift.Dictionary: Sort (M) | 34 | 34 | 34 | 34 | 34 | 34 | 34 | 100 |
| Benchmarks:SwiftData.ModelContext: Sort (M) | 336 | 1165 | 2015 | 2844 | 3341 | 3645 | 3672 | 100 |
It’s difficult to make a strong judgement about memory usage of ModelContext when sorting compared to memory usage of ModelContext when inserting or updating. If you wanted to measure more closely, you could experiment with increasing the sample size to see if you can control for any noise in our measurements. What we’re most concerned about is that our immutable data structures — Dictionary and TreeDictionary — consume orders of magnitude less memory than ModelContext.
Our original and primary goal when choosing ImmutableData instead of SwiftData was semantics. Building SwiftUI directly on SwiftData means our mental model for managing state is imperative and our data models are mutable. Building SwiftUI directly on ImmutableData means our mental model for managing state is declarative and our data models are immutable.
If ImmutableData gave us value semantics and a declarative programming model, the argument could be made we would prefer ImmutableData even if SwiftData offered better performance. If ImmutableData gives us values semantics, a declarative programming model, and better performance than SwiftData, we can strongly recommend this architecture for your own products and teams.
Next Steps
As they say at FB: This journey is one-percent finished.
We covered a lot of ground in this tutorial. We built a new infra library from scratch, we built multiple sample application products, we learned about some external dependencies we can import for specialized data structures to improve performance, and we ran benchmarks to measure how these immutable data structures compare to SwiftData.
If you’re ready to experiment with the ImmutableData architecture in your own products, you have a few different options available:
- If you have the ability to import a new external dependency in your product, you can import the
ImmutableDatarepo package. This is a “standalone” package version of the infra we built in this Programming Guide. - If you have a product that deploys to older operating systems, you might be blocked on importing
ImmutableDatabecause of the dependencies onObservableand variadic types. TheImmutableData-Legacyrepo package is a version of theImmutableDatainfra that deploys to older operating systems. - If you are blocked on importing any new external dependency, you can follow the steps in this Programming Guide to build your own version of the
ImmutableDataarchitecture from scratch.
If you are building a new product from scratch, the sample application products built in this Programming Guide can help you begin to think creatively how ImmutableData can be used for your own product domain.
If you are attempting to bring ImmutableData to an existing product built on a legacy architecture, we recommend reading our ImmutableData-FoodTruck tutorial. The ImmutableData-FoodTruck tutorial is an incremental migration: we show you how the ImmutableData architecture can “coexist” along with a legacy architecture built on imperative logic and mutable data models.
As always, please file a new GitHub issue if you encounter any compatibility problems, issues, or bugs with ImmutableData. Please let us know if there are any missing pieces: anything that is blocking you or your team from migrating to ImmutableData.
Thanks!