AnimalsUI
We completed a lot of work to build the data models of our Animals product. Before we build our component tree, it might be helpful to rebuild the sample project from Apple to remember what we are cloning. We can count four main custom components for our product:
CategoryList: A component to display ourCategoryvalues sorted by name.AnimalList: A component to display ourAnimalvalues for oneCategorysorted by name.AnimalDetail: A component for displaying the properties of oneAnimalvalue.AnimalEditor: A component for adding a newAnimalvalues or updating an existing one.
Our Counter product was very simple. It was just one screen with just a few components. There are many more components we will compose together to build our Animals product, but much of the complexity has already been built in our AnimalsData module. Our AnimalsUI components will — for the most part — be “regular” SwiftUI. This is by design; you shouldn’t have to re-learn SwiftUI to build apps on ImmutableData. Most of what you already know about SwiftUI will still be relevant; you don’t have to “throw away” knowledge.
StoreKey
Similar to our Counter product, let’s begin with a little code to help us configure ImmutableData for our product domain. We begin with defining the Environment value where we will save our Store instance. Select the AnimalsUI package and add a new Swift file under Sources/AnimalsUI. Name this file StoreKey.swift.
Here is the first step:
//  StoreKey.swift

import AnimalsData
import ImmutableData
import ImmutableUI
import SwiftUI

@MainActor fileprivate struct StoreKey : @preconcurrency EnvironmentKey {
  static let defaultValue = ImmutableData.Store(
    initialState: AnimalsState(),
    reducer: AnimalsReducer.reduce
  )
}

extension EnvironmentValues {
  fileprivate var store: ImmutableData.Store<AnimalsState, AnimalsAction> {
    get {
      self[StoreKey.self]
    }
    set {
      self[StoreKey.self] = newValue
    }
  }
}
Once we define our Environment value, we can configure ImmutableUI to use this Store instance. Let’s begin with ImmutableUI.Provider:
//  StoreKey.swift

extension ImmutableUI.Provider {
  public init(
    _ store: Store,
    @ViewBuilder content: () -> Content
  ) where Store == ImmutableData.Store<AnimalsState, AnimalsAction> {
    self.init(
      \.store,
       store,
       content: content
    )
  }
}
Here is ImmutableUI.Dispatcher:
//  StoreKey.swift

extension ImmutableUI.Dispatcher {
  public init() where Store == ImmutableData.Store<AnimalsState, AnimalsAction> {
    self.init(\.store)
  }
}
Here is ImmutableUI.Selector:
//  StoreKey.swift

extension ImmutableUI.Selector {
  public init(
    id: some Hashable,
    label: String? = nil,
    filter isIncluded: (@Sendable (Store.State, Store.Action) -> Bool)? = nil,
    dependencySelector: repeat DependencySelector<Store.State, each Dependency>,
    outputSelector: OutputSelector<Store.State, Output>
  ) where Store == ImmutableData.Store<AnimalsState, AnimalsAction> {
    self.init(
      \.store,
       id: id,
       label: label,
       filter: isIncluded,
       dependencySelector: repeat each dependencySelector,
       outputSelector: outputSelector
    )
  }
}

extension ImmutableUI.Selector {
  public init(
    label: String? = nil,
    filter isIncluded: (@Sendable (Store.State, Store.Action) -> Bool)? = nil,
    dependencySelector: repeat DependencySelector<Store.State, each Dependency>,
    outputSelector: OutputSelector<Store.State, Output>
  ) where Store == ImmutableData.Store<AnimalsState, AnimalsAction> {
    self.init(
      \.store,
       label: label,
       filter: isIncluded,
       dependencySelector: repeat each dependencySelector,
       outputSelector: outputSelector
    )
  }
}
Our Animals product is simple enough that we will build our component tree all in one module. For larger projects, individual pieces of your product might have their own module: AnimalsMessengerUI, AnimalsPhotosUI, AnimalsFeedUI, and more. To save us from duplicating code, these extensions on ImmutableUI could live in just one place: AnimalsUICore or AnimalsUIInfra. Remember: the State of any product should save in just one Store instance; all components should be calling ImmutableUI with the same Environment value.
Dispatch
Our ImmutableUI.Dispatcher returns an ImmutableData.Dispatcher type. This means we can dispatch action values and thunks. Our convention is that our product should only dispatch action values from its component tree; thunks should be dispatched from a Listener. We saw a similar approach for our Counter product.
Add a new Swift file under Sources/AnimalsUI. Name this file Dispatch.swift.
//  Dispatch.swift

import AnimalsData
import ImmutableData
import ImmutableUI
import SwiftUI

@MainActor @propertyWrapper struct Dispatch: DynamicProperty {
  @ImmutableUI.Dispatcher() private var dispatcher

  init() {

  }

  var wrappedValue: (AnimalsAction) throws -> Void {
    self.dispatcher.dispatch
  }
}
There might be some interesting use cases for a component tree to dispatch thunks directly, but we strongly feel that the right approach will almost always be to keep that work in a proper Listener. If you really want to dispatch a thunk from a component, you do have that ability; we just strongly recommend you build a Listener.
Select
We defined several Selectors when we built AnimalsState. We will forward those Selectors to our component tree for displaying data. Add a new Swift file under Sources/AnimalsUI. Name this file Select.swift.
Our ImmutableUI.Selector requires us to define a didChange function to indicate that our slice of State has changed. Similar to our Counter product, we will define value equality to be our “default” didChange function.
//  Select.swift

import AnimalsData
import ImmutableData
import ImmutableUI
import SwiftUI

extension ImmutableUI.DependencySelector {
  init(select: @escaping @Sendable (State) -> Dependency) where Dependency : Equatable {
    self.init(select: select, didChange: { $0 != $1 })
  }
}

extension ImmutableUI.OutputSelector {
  init(select: @escaping @Sendable (State) -> Output) where Output : Equatable {
    self.init(select: select, didChange: { $0 != $1 })
  }
}

extension ImmutableUI.Selector {
  init(
    id: some Hashable,
    label: String? = nil,
    filter isIncluded: (@Sendable (Store.State, Store.Action) -> Bool)? = nil,
    dependencySelector: repeat @escaping @Sendable (Store.State) -> each Dependency,
    outputSelector: @escaping @Sendable (Store.State) -> Output
  ) where Store == ImmutableData.Store<AnimalsState, AnimalsAction>, repeat each Dependency : Equatable, Output : Equatable {
    self.init(
      id: id,
      label: label,
      filter: isIncluded,
      dependencySelector: repeat DependencySelector(select: each dependencySelector),
      outputSelector: OutputSelector(select: outputSelector)
    )
  }
}

extension ImmutableUI.Selector {
  init(
    label: String? = nil,
    filter isIncluded: (@Sendable (Store.State, Store.Action) -> Bool)? = nil,
    dependencySelector: repeat @escaping @Sendable (Store.State) -> each Dependency,
    outputSelector: @escaping @Sendable (Store.State) -> Output
  ) where Store == ImmutableData.Store<AnimalsState, AnimalsAction>, repeat each Dependency : Equatable, Output : Equatable {
    self.init(
      label: label,
      filter: isIncluded,
      dependencySelector: repeat DependencySelector(select: each dependencySelector),
      outputSelector: OutputSelector(select: outputSelector)
    )
  }
}
We can now begin to define the Selectors of our component tree. These will map to the Selectors we defined from AnimalsState. Let’s begin with SelectCategoriesValues:
//  Select.swift

@MainActor @propertyWrapper struct SelectCategoriesValues: DynamicProperty {
  @ImmutableUI.Selector(
    label: "SelectCategoriesValues",
    filter: AnimalsFilter.filterCategories(),
    dependencySelector: AnimalsState.selectCategories(),
    outputSelector: AnimalsState.selectCategoriesValues(sort: \AnimalsData.Category.name)
  ) var wrappedValue

  init() {

  }
}
Let’s think through this step-by-step. It might help if we look through these parameters from back-to-front:
- Our
outputSelectorto fetch the sortedCategoryvalues will beAnimalsState.selectCategoriesValues. This function takes a sort parameter, so we pass\AnimalsData.Category.nameto indicate we sortCategoryvalues by name. - Our
outputSelectorruns inO(n log n)time. To improve performance, ourdependencySelectorwill compare theDictionaryvalues returned byAnimalsState.selectCategories. - Our
dependencySelectorcomparesDictionaryvalues isO(n)time. To improve performance, ourfilterwill pass the Action and State values tofilterCategories. This means we can skip over Action values that would never affect the value returned byAnimalsState.selectCategories. - Our
labelvalue will be helpful when we enable debug logging in our next chapter.
Let’s define SelectCategoriesStatus:
//  Select.swift

@MainActor @propertyWrapper struct SelectCategoriesStatus: DynamicProperty {
  @ImmutableUI.Selector(
    label: "SelectCategoriesStatus",
    outputSelector: AnimalsState.selectCategoriesStatus()
  ) var wrappedValue: Status?

  init() {

  }
}
This one is easy: all we need is an outputSelector. Because this selector runs in constant time, we choose to skip defining a dependencySelector. We pass a label to enable debug logging.
Here is SelectCategory:
//  Select.swift

@MainActor @propertyWrapper struct SelectCategory: DynamicProperty {
  @ImmutableUI.Selector<ImmutableData.Store<AnimalsState, AnimalsAction>, AnimalsData.Category?> var wrappedValue: AnimalsData.Category?

  init(categoryId: AnimalsData.Category.ID?) {
    self._wrappedValue = ImmutableUI.Selector(
      id: categoryId,
      label: "SelectCategory(categoryId: \(categoryId ?? "nil"))",
      outputSelector: AnimalsState.selectCategory(categoryId: categoryId)
    )
  }

  init(animalId: Animal.ID?) {
    self._wrappedValue = ImmutableUI.Selector(
      id: animalId,
      label: "SelectCategory(animalId: \(animalId ?? "nil"))",
      outputSelector: AnimalsState.selectCategory(animalId: animalId)
    )
  }
}
The AnimalsState.selectCategory selector we defined takes a Category.ID as a parameter. We also built a selector that takes a Animal.ID as a parameter and returns the correct Category value for that Animal. We define SelectCategory to accept both: we can init with a Category.ID or a Animal.ID. We then forward that parameter to the correct version of AnimalsState.selectCategory.
When building SwiftUI components, it is common for the SwiftUI infra to keep the identity of a component consistent while the value of a component changes. Because our ImmutableUI.Selector is built on top of SwiftUI.State, the lifetime of its storage is tied to the lifetime of our component. Similar to a component built directly on SwiftUI.State, this can lead to problems. If the identity of our component remains the same, but the data we use to create that component changes, the values saved in our SwiftUI.State can look “stale”. If the value saved in our SwiftUI.State is derived from a parameter passed when our component value is created — which can happen multiple times without changing component identity — we need another way to “reset” that SwiftUI.State. The id parameter passed to ImmutableUI.Selector gives us that flexibility. If the identity of our component remains the same, but the Category.ID or Animal.ID changed, this will reset the SwiftUI.State used in ImmutableUI.Selector.
Here is SelectAnimalsValues:
//  Select.swift

@MainActor @propertyWrapper struct SelectAnimalsValues: DynamicProperty {
  @ImmutableUI.Selector<ImmutableData.Store<AnimalsState, AnimalsAction>, Dictionary<Animal.ID, Animal>, Array<Animal>> var wrappedValue: Array<Animal>

  init(categoryId: AnimalsData.Category.ID?) {
    self._wrappedValue = ImmutableUI.Selector(
      id: categoryId,
      label: "SelectAnimalsValues(categoryId: \(categoryId ?? "nil"))",
      filter: AnimalsFilter.filterAnimals(categoryId: categoryId),
      dependencySelector: AnimalsState.selectAnimals(categoryId: categoryId),
      outputSelector: AnimalsState.selectAnimalsValues(
        categoryId: categoryId,
        sort: \Animal.name
      )
    )
  }
}
This is very similar to what we built for SelectCategoriesValues. The biggest difference is that we need to pass a Category.ID. Similar to our previous example, this Category.ID should be passed as an id. If the identity of our component remains the same, but the Category.ID has been changed, we should reset our SwiftUI.State to prevent displaying stale data.
Here is SelectAnimalsStatus:
//  Select.swift

@MainActor @propertyWrapper struct SelectAnimalsStatus: DynamicProperty {
  @ImmutableUI.Selector(
    label: "SelectAnimalsStatus",
    outputSelector: AnimalsState.selectAnimalsStatus()
  ) var wrappedValue: Status?

  init() {

  }
}
This one is easy: all we need is an outputSelector. Similar to SelectCategoriesStatus, we skip defining a dependencySelector because we know this outputSelector will run in constant time.
Here is SelectAnimal:
//  Select.swift

@MainActor @propertyWrapper struct SelectAnimal: DynamicProperty {
  @ImmutableUI.Selector<ImmutableData.Store<AnimalsState, AnimalsAction>, Animal?> var wrappedValue: Animal?

  init(animalId: Animal.ID?) {
    self._wrappedValue = ImmutableUI.Selector(
      id: animalId,
      label: "SelectAnimal(animalId: \(animalId ?? "nil"))",
      outputSelector: AnimalsState.selectAnimal(animalId: animalId)
    )
  }
}
Here is SelectAnimalStatus:
//  Select.swift

@MainActor @propertyWrapper struct SelectAnimalStatus: DynamicProperty {
  @ImmutableUI.Selector<ImmutableData.Store<AnimalsState, AnimalsAction>, Status?> var wrappedValue: Status?

  init(animalId: Animal.ID?) {
    self._wrappedValue = ImmutableUI.Selector(
      id: animalId,
      label: "SelectAnimalStatus(animalId: \(animalId ?? "nil"))",
      outputSelector: AnimalsState.selectAnimalStatus(animalId: animalId)
    )
  }
}
There isn’t a rule telling you that Selectors have to be defined in one file away from the declaration of your components. Each Selector could be defined in the same place as the component that needs it — just keep in mind that we encourage you to reuse Selectors if you need the same data in more than one place. Do not define multiple Selectors that select the same identical slices of state; this can lead to unexpected behaviors if an engineer on your team ever updates one Selector but forgets to update the other ones. We also encourage you to think about discoverability when you organize these Selectors. Think about an engineer on your team building a new component that needs to display a sorted list of categories. Where would they go to search if that Selector has already been implemented? How could this Selector be placed in a way that your engineer would reuse the existing Selector before duplicating that work in a second place?
PreviewStore
Before we build and run our application, we will use Xcode Previews to see our component tree as we work. It will be helpful to build a way for Previews to run against a Store with our sample data already loaded. We already have this sample data loading in our LocalStore, but we would prefer something more lightweight just for Previews: LocalStore creates a SwiftData ModelContext. All we want is to load some data in-memory. We will only use this for Xcode Previews; we don’t plan to ship this to production.
Add a new Swift file under Sources/AnimalsUI. Name this file PreviewStore.swift. We’re going to build a component that forwards a Store to a Provider. We can then wrap the component we wish to preview with a PreviewStore component for it to read against sample data.
//  PreviewStore.swift

import AnimalsData
import ImmutableData
import ImmutableUI
import SwiftUI

@MainActor struct PreviewStore<Content> where Content : View {
  @State private var store: ImmutableData.Store<AnimalsState, AnimalsAction> = {
    do {
      let store = ImmutableData.Store(
        initialState: AnimalsState(),
        reducer: AnimalsReducer.reduce
      )
      try store.dispatch(
        action: .data(
          .persistentSession(
            .didFetchCategories(
              result: .success(
                categories: [
                  .amphibian,
                  .bird,
                  .fish,
                  .invertebrate,
                  .mammal,
                  .reptile,
                ]
              )
            )
          )
        )
      )
      try store.dispatch(
        action: .data(
          .persistentSession(
            .didFetchAnimals(
              result: .success(
                animals: [
                  .dog,
                  .cat,
                  .kangaroo,
                  .gibbon,
                  .sparrow,
                  .newt,
                ]
              )
            )
          )
        )
      )
      return store
    } catch {
      fatalError("\(error)")
    }
  }()
  private let content: Content

  init(@ViewBuilder content: () -> Content) {
    self.content = content()
  }
}

extension PreviewStore: View {
  var body: some View {
    Provider(self.store) {
      self.content
    }
  }
}
After we create our Store, we pass a didFetchCategories action with our Category values and a didFetchAnimals action with our Animal values. We use this to simulate what will happen in production without going to the trouble of building a real LocalStore.
Xcode Previews can be powerful tools for engineering your SwiftUI products, but your decision to build Previews can be orthogonal to your decision to build from ImmutableData. We use Xcode Previews as a convention for our tutorials, but we don’t have a very strong opinion about how you would choose to implement Xcode Previews in your own products. You might prefer to build and run your app live on-device. Choose the approach that works best for your team and your product.
Debug
Before we start building components, there is more little piece that will help for debugging. SwiftUI ships a function called _printChanges that can help us track when the infra is computing the body property of a component.1 Let’s add a way to turn this on and off from UserDefaults.
Add a new Swift file under Sources/AnimalsUI. Name this file Debug.swift.
//  Debug.swift

import SwiftUI

extension UserDefaults {
  fileprivate var isDebug: Bool {
    self.bool(forKey: "com.northbronson.AnimalsUI.Debug")
  }
}

extension View {
  static func debugPrint() {
#if DEBUG
    if UserDefaults.standard.isDebug {
      self._printChanges()
    }
#endif
  }
}
When we build our components, we can call debugPrint from our body property. If the com.northbronson.AnimalsUI.Debug flag is false, nothing happens.
We use the debugPrint function liberally for components in our sample products, but we don’t have a very strong opinion about bringing this to your own products. You might have a different pattern or convention to follow for tracking component lifecycle. Choose the approach that works best for your team and your product.
AnimalEditor
We’re about to build our first component for this product. Our AnimalEditor component will be displayed when the user requests to edit an existing Animal value or create a new Animal value. This is a simple form-style component with options to select a name, a category, and a diet. The Cancel button should dismiss the component with no mutations to our global state. The Save button should attempt to mutate our global state with the selected parameters.
The components we build for this product will be much more complex that what we built for our Counter application. This makes sense: our Data Model is more complex. Before we begin writing code, let’s explain what our approach to components will look like.
Engineers from the ReactJS community had a pattern you might have heard about: Presenters and Containers.2 This patterns means different things to different people, but let’s just quickly focus on this observation from Dan Abramov:
- Presenter Components are concerned with how things look.
- Container Components are concerned with how things work.
As Dan mentions in this essay, presenters and containers are not explicitly encouraged in “modern” React applications, but this pattern can still be available and legit as a matter of personal engineering style.
Our pattern for building components in the ImmutableData tutorial will follow a similar pattern: Presenter Components for how things look and Container Components for how things work. We follow this convention for our sample products, but we don’t have a strong opinion whether or not this belongs in your own products. One advantage we do like about this pattern is that breaking apart our mental model between Presenters and Containers gives us two “domains” to think about. Since our Presenter Domains are regular SwiftUI, it gives us a chance to focus our attention on making ImmutableData work alongside the traditional SwiftUI you already know about.
In addition to Presenters and Containers, we also build a “root” component, which is responsible for building our Container. There are three basic roles we plan to use these three categories for:
- Root Components build Container Components. Root Components also manage component state that is needed for our Selectors. This is “local” state that we do not choose to save in our
Store, but it is local state that our Selectors depend on. An example could be a component that displays aListofPersonvalues. We might have the ability to sort these values by first name or last name. The state to manage what parameter is used for our sorting algorithm is local state: this belongs in our component and not in ourStore. Because our Selector to return the sortedArrayofPersonvalues needs the parameter to use for sorting, we manage this in our Root Component and pass it to our Container Component. - Container Components build Presenter Components. Container Components are where we concentrate on integrating SwiftUI with
ImmutableData. Here is where we define the Selectors this component will depend on, and here is where wedispatchAction values back to ourStorewhen an important user event occurs. - Presenter Components build Presenter Components. Presenter Components can also leverage SwiftUI navigation to bring the user to new Root Components. What we want to concentrate on is keeping
ImmutableDataout of our Presenter Components. Building Presenter Components should look like regular SwiftUI as much as possible. Presenter Components will also manage local state that does not drive our Selectors. An example would be aFormcomponent with options to select new parameters on aPersonvalue. When the user selects to save thatFormdata, we shoulddispatchthat data to ourStorewith an Action value, but the ephemeral state of thatFormdata does not drive our Selectors while it is being edited.
This might sound a little abstract, but it will make more sense once we see some examples. Let’s get started and see what this looks like. Add a new Swift file under Sources/AnimalsUI. Name this file AnimalEditor.swift.
Let’s begin with a AnimalEditor Root Component:
//  AnimalEditor.swift

import AnimalsData
import SwiftUI

@MainActor struct AnimalEditor {
  @State private var id: Animal.ID
  @Binding private var isPresented: Bool

  init(
    id: Animal.ID?,
    isPresented: Binding<Bool>
  ) {
    self._id = State(initialValue: id ?? UUID().uuidString)
    self._isPresented = isPresented
  }
}

extension AnimalEditor: View {
  var body: some View {
    let _ = Self.debugPrint()
    Container(
      id: self.id,
      isPresented: self.$isPresented
    )
  }
}
We create our Root Component with two parameters: a Animal.ID value and a SwiftUI.Binding to a Bool. Our id parameter represents the Animal value being edited. Our isPresented binding will be used to dismiss this component when our Animal value is saved.
Before we construct our Container Component, we perform one extra step on our Animal.ID value. When a user chooses to begin creating a new Animal value, we don’t have an Animal.ID. If the user passed a nil value for id when this Root Component was created, we still would like a “placeholder” value here for us to use when tracking the Status of our asynchronous operation to save the new Animal to our PersistentStore. We save this placeholder values as a UUID value in SwiftUI.State. We use SwiftUI.State to keep this placeholder value consistent if the infra recreates this component value: we don’t want this value to change out from underneath us before our PersistentStore has completed its asynchronous operation.
There is a small performance optimization we can discuss for a future fix. The lifetime of this SwiftUI.State value is tied to the lifetime of our component identity. The value of our component could be created many times for one identity. The work in init should be kept as small — and as fast — as possible. Even though the lifetime of our SwiftUI.State could outlive the lifetime of our component value, creating a new component value can still produce a new UUID value. Because the identity of our component has not changed, this value was not needed; it’s just thrown away. An optimization would be to not have created it at all when the component identity has not changed.3 This is something that happens to any SwiftUI component that creates SwiftUI.State with a default value. There’s nothing specific to ImmutableData about why this happens, and strategies and techniques to optimize this can be orthogonal to our work on ImmutableData. This would be good to optimize in a production application, but for our purposes — keeping a tutorial moving to teach the ImmutableData architecture — we will optimize for keeping this code short and file a mental TODO to investigate this more another day.
Let’s turn our attention to our Container Component. This will be where we integrate with the ImmutableData architecture. This is where our Selectors will live and where we dispatch action values back to our Store. Here is our first step:
//  AnimalEditor.swift

extension AnimalEditor {
  @MainActor fileprivate struct Container {
    @SelectAnimal private var animal: Animal?
    @SelectAnimalStatus private var status: Status?
    @SelectCategoriesValues private var categories: Array<AnimalsData.Category>

    private let id: Animal.ID
    @Binding private var isPresented: Bool

    @Dispatch private var dispatch

    init(
      id: Animal.ID,
      isPresented: Binding<Bool>
    ) {
      self._animal = SelectAnimal(animalId: id)
      self._status = SelectAnimalStatus(animalId: id)
      self._categories = SelectCategoriesValues()

      self.id = id
      self._isPresented = isPresented
    }
  }
}
Our Container Component is constructed with an id value — which will be a placeholder value when we create a new Animal value — and a isPresented binding that will be used to dismiss this component.
This container constructs three selectors:
SelectAnimal: Theidvalue is passed toSelectAnimal. If our user is creating a newAnimalvalue, thisidwill be a placeholder value. That implies thatSelectAnimalwill returnnil. As an optimization, we could pass some extra context when our Container is constructed to indicate that thisidis a placeholder. Since we builtSelectAnimalto return in constant time, we will not spend too much time optimizing this.SelectAnimalStatus: Editing anAnimalvalue or creating a new one will begin an asynchronous operation on ourPersistentSession. We can track theStatusvalue of that operation here.SelectCategoriesValues: OurFormwill give users the ability to choose aCategoryvalue for thisAnimal. This selector will return allCategoryvalues sorted by name. This Selector takes no parameters, which means we could choose to skip an explicit construct ininitto save some space.
In addition to our Selectors, our Container Component also constructs a Dispatch value. We will use this to respond to user events. Let’s begin with a user event to indicate we want to add a new Animal value:
//  AnimalEditor.swift

extension AnimalEditor.Container {
  private func onTapAddAnimalButton(data: AnimalEditor.Presenter.AddAnimalData) {
    do {
      try self.dispatch(
        .ui(
          .animalEditor(
            .onTapAddAnimalButton(
              id: data.id,
              name: data.name,
              diet: data.diet,
              categoryId: data.categoryId
            )
          )
        )
      )
    } catch {
      print(error)
    }
  }
}
The AnimalEditor.Presenter.AddAnimalData type will be added later. This is just a payload to deliver the data our user selected for this new Animal.
As previously discussed, a robust discussion about error handling in production SwiftUI applications is outside the scope of this tutorial. Our focus is on teaching ImmutableData; error handling can be learned independently in a separate tutorial. For now, we just print an error if our dispatch failed.
Remember, our goal here is to think declaratively. Our action values are not imperative instructions. Our component tree is not telling our Store what to do. Our component tree is telling our Store what just happened.
Here is the next action value:
//  AnimalEditor.swift

extension AnimalEditor.Container {
  private func onTapUpdateAnimalButton(data: AnimalEditor.Presenter.UpdateAnimalData) {
    do {
      try self.dispatch(
        .ui(
          .animalEditor(
            .onTapUpdateAnimalButton(
              animalId: data.animalId,
              name: data.name,
              diet: data.diet,
              categoryId: data.categoryId
            )
          )
        )
      )
    } catch {
      print(error)
    }
  }
}
Now, we can build our body and our Presenter Component:
//  AnimalEditor.swift

extension AnimalEditor.Container: View {
  var body: some View {
    let _ = Self.debugPrint()
    AnimalEditor.Presenter(
      animal: self.animal,
      status: self.status,
      categories: self.categories,
      id: self.id,
      isPresented: self.$isPresented,
      onTapAddAnimalButton: self.onTapAddAnimalButton,
      onTapUpdateAnimalButton: self.onTapUpdateAnimalButton
    )
  }
}
Because our Presenter Component does not know about ImmutableData — we keep that out of Presenters by design — our Presenter Component does not know how to dispatch actions on user events. We pass our onTapAddAnimalButton and onTapUpdateAnimalButton functions as parameters; these will be called when user events happen.
Let’s build our Presenter. Here is the main declaration:
//  AnimalEditor.swift

extension AnimalEditor {
  @MainActor fileprivate struct Presenter {
    @State private var name: String
    @State private var diet: Animal.Diet?
    @State private var categoryId: AnimalsData.Category.ID?

    private let animal: Animal?
    private let status: Status?
    private let categories: Array<AnimalsData.Category>
    private let id: Animal.ID
    @Binding private var isPresented: Bool
    private let onTapAddAnimalButton: (AddAnimalData) -> Void
    private let onTapUpdateAnimalButton: (UpdateAnimalData) -> Void

    init(
      animal: Animal?,
      status: Status?,
      categories: Array<AnimalsData.Category>,
      id: Animal.ID,
      isPresented: Binding<Bool>,
      onTapAddAnimalButton: @escaping (AddAnimalData) -> Void,
      onTapUpdateAnimalButton: @escaping (UpdateAnimalData) -> Void
    ) {
      self._name = State(initialValue: animal?.name ?? "")
      self._diet = State(initialValue: animal?.diet)
      self._categoryId = State(initialValue: animal?.categoryId)

      self.animal = animal
      self.status = status
      self.categories = categories
      self._isPresented = isPresented
      self.id = id
      self.onTapAddAnimalButton = onTapAddAnimalButton
      self.onTapUpdateAnimalButton = onTapUpdateAnimalButton
    }
  }
}
The parameters we recognize from our Container Component. We add three SwiftUI.State properties for saving the current selections from our Form. This is local component state: before a save operation takes place, this state is not part of our global Store. Because our Selectors do not need this local state for deriving data, we can define it here in Presenter (as opposed to the Root Component).
Let’s build the two types we use for passing data on user events:
//  AnimalEditor.swift

extension AnimalEditor.Presenter {
  struct AddAnimalData: Hashable, Sendable {
    let id: Animal.ID
    let name: String
    let diet: Animal.Diet
    let categoryId: AnimalsData.Category.ID
  }
}

extension AnimalEditor.Presenter {
  struct UpdateAnimalData: Hashable, Sendable {
    let animalId: Animal.ID
    let name: String
    let diet: Animal.Diet
    let categoryId: AnimalsData.Category.ID
  }
}
We could choose to pass all these parameters directly to the closures from our Container (without building an extra type), but we lose the ability to use argument labels to help keep these parameters in the correct place.4 Using custom types to pass this data to our closure gives us a little stricter compile time checking that we are doing the correct thing. You are free to follow this pattern in your own products if you choose.
Our Presenter component is regular SwiftUI: there’s nothing here that needs to know about ImmutableData. We assume a familiarity with SwiftUI components and we’re going to go a little fast when we build our Presenters. If any of these SwiftUI components are new to you, please reference the documentation and sample code projects from Apple to learn more.
Here is a Form for capturing user selections:
//  AnimalEditor.swift

extension AnimalEditor.Presenter {
  private var form: some View {
    Form {
      TextField("Name", text: self.$name)
      Picker("Category", selection: self.$categoryId) {
        Text("Select a category").tag(nil as String?)
        ForEach(self.categories) { category in
          Text(category.name).tag(category.categoryId as String?)
        }
      }
      Picker("Diet", selection: self.$diet) {
        Text("Select a diet").tag(nil as Animal.Diet?)
        ForEach(Animal.Diet.allCases, id: \.self) { diet in
          Text(diet.rawValue).tag(diet as Animal.Diet?)
        }
      }
    }
  }
}
Here is a Button to cancel our edits:
//  AnimalEditor.swift

extension AnimalEditor.Presenter {
  private var cancelButton: some ToolbarContent {
    ToolbarItem(placement: .cancellationAction) {
      Button("Cancel", role: .cancel) {
        self.isPresented = false
      }
    }
  }
}
Here is a Button to attempt to save our edits:
//  AnimalEditor.swift

extension AnimalEditor.Presenter {
  private var saveButton: some ToolbarContent {
    ToolbarItem(placement: .confirmationAction) {
      Button("Save") {
        if let diet = self.diet,
           let categoryId = self.categoryId {
          if self.animal != nil {
            self.onTapUpdateAnimalButton(
              UpdateAnimalData(
                animalId: self.id,
                name: self.name,
                diet: diet,
                categoryId: categoryId
              )
            )
          } else {
            self.onTapAddAnimalButton(
              AddAnimalData(
                id: self.id,
                name: self.name,
                diet: diet,
                categoryId: categoryId
              )
            )
          }
        }
      }
      .disabled(self.isSaveDisabled)
    }
  }
}
Our AnimalEditor component handles both adding a new Animal and editing an existing Animal. This means we have some conditional logic to confirm if our user is adding or editing. An alternative would be two different components: a Creator and a Editor. We don’t have a very strong opinion about the tradeoffs — this is a SwiftUI question, not a ImmutableData question. You can choose to design components for your own products using the pattern that works best for you.
There are going to be times we want to prevent the user from attempting a save:
- A save operation is already in progress for this
Animal. - The
namefield is empty. - The
dietfield is empty. - The
categoryfield is empty.
Here is what that looks like:
//  AnimalEditor.swift

extension AnimalEditor.Presenter {
  private var isSaveDisabled: Bool {
    if self.status == .waiting {
      return true
    }
    if self.name.isEmpty {
      return true
    }
    if self.diet == nil {
      return true
    }
    if self.categoryId == nil {
      return true
    }
    return false
  }
}
Now, we are ready to build our body property:
//  AnimalEditor.swift

extension AnimalEditor.Presenter: View {
  var body: some View {
    let _ = Self.debugPrint()
    self.form
      .navigationTitle(self.animal != nil ? "Edit Animal" : "Add Animal")
      .onChange(of: self.status) {
        if self.status == .success {
          self.isPresented = false
        }
      }
      .toolbar {
        self.cancelButton
        self.saveButton
      }
      .padding()
  }
}
Because our save operation is asynchronous, we don’t dismiss our component as soon as the user taps the save button. If the save completes successfully, our component will refresh with status equal to success. We can then dismiss our component with the isPresented value.
We use Containers and Presenters for teaching ImmutableData, but we don’t have a very strong opinion about recommending this pattern for your own products. Could we have merged our Containers and Presenter? There’s nothing stopping us. We did need a Root Component to save a SwiftUI.State variable for passing to our Selectors, but there are other SwiftUI patterns you might find for this same situation.
One advantage we see with this approach is Presenters are “free” of ImmutableData by design. If you have an engineer on your team who is brand-new to ImmutableData and experienced in SwiftUI, having them focus on building Presenters would be one way to keep them shipping measurable impact while they ramp up on learning ImmutableData. If you have an engineer that is brand-new to ImmutableData and SwiftUI, breaking components apart with Containers and Presenters is a way to avoid trying to teach them “two things at once”.
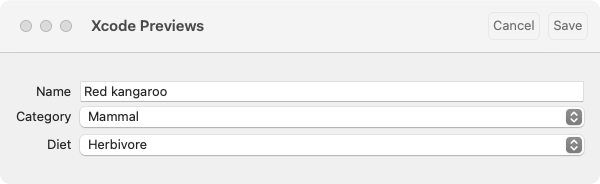
Let’s build some Xcode Previews to see what this component looks like. Here is our Root Component created with an existing Animal.ID:
//  AnimalEditor.swift

#Preview {
  @Previewable @State var isPresented: Bool = true
  NavigationStack {
    PreviewStore {
      AnimalEditor(
        id: Animal.kangaroo.animalId,
        isPresented: $isPresented
      )
    }
  }
}
We remember to wrap our AnimalEditor component with PreviewStore to make the sample data available.
Here is our AnimalEditor with no Animal.ID to indicate we are creating a new Animal:
//  AnimalEditor.swift

#Preview {
  @Previewable @State var isPresented: Bool = true
  NavigationStack {
    PreviewStore {
      AnimalEditor(
        id: nil,
        isPresented: $isPresented
      )
    }
  }
}
Because our Presenter Component has no dependencies on ImmutableData, we can build an Xcode Preview for our Presenter without any PreviewStore:
//  AnimalEditor.swift

#Preview {
  @Previewable @State var isPresented: Bool = true
  NavigationStack {
    AnimalEditor.Presenter(
      animal: .kangaroo,
      status: nil,
      categories: [
        .amphibian,
        .bird,
        .fish,
        .invertebrate,
        .mammal,
        .reptile,
      ],
      id: Animal.kangaroo.animalId,
      isPresented: $isPresented,
      onTapAddAnimalButton: { data in
        print("onTapAddAnimalButton: \(data)")
      },
      onTapUpdateAnimalButton: { data in
        print("onTapUpdateAnimalButton: \(data)")
      }
    )
  }
}

#Preview {
  @Previewable @State var isPresented: Bool = true
  NavigationStack {
    AnimalEditor.Presenter(
      animal: nil,
      status: nil,
      categories: [
        .amphibian,
        .bird,
        .fish,
        .invertebrate,
        .mammal,
        .reptile,
      ],
      id: "1234",
      isPresented: $isPresented,
      onTapAddAnimalButton: { data in
        print("onTapAddAnimalButton: \(data)")
      },
      onTapUpdateAnimalButton: { data in
        print("onTapUpdateAnimalButton: \(data)")
      }
    )
  }
}
AnimalDetail
Our AnimalDetail component will display the name, category, and diet values of an Animal. We also build buttons to edit or delete the Animal.
We follow a similar pattern: our Root Component constructs a Container Component, our Container Component constructs Presenter Components, and our Presenter Component constructs Presenter Components. We will also leverage standard SwiftUI navigation to construct a Root Component from our Presenter Component.
Add a new Swift file under Sources/AnimalsUI. Name this file AnimalDetail.swift. Here is our Root Component:
//  AnimalDetail.swift

import AnimalsData
import SwiftUI

@MainActor struct AnimalDetail {
  private let selectedAnimalId: Animal.ID?

  init(selectedAnimalId: Animal.ID?) {
    self.selectedAnimalId = selectedAnimalId
  }
}

extension AnimalDetail : View {
  var body: some View {
    let _ = Self.debugPrint()
    Container(selectedAnimalId: self.selectedAnimalId)
  }
}
We construct our AnimalDetail with an optional Animal.ID. We pass our Animal.ID to our Container:
//  AnimalDetail.swift

extension AnimalDetail {
  @MainActor fileprivate struct Container {
    @SelectAnimal private var animal: Animal?
    @SelectCategory private var category: AnimalsData.Category?
    @SelectAnimalStatus private var status: Status?

    @Dispatch private var dispatch

    init(selectedAnimalId: Animal.ID?) {
      self._animal = SelectAnimal(animalId: selectedAnimalId)
      self._category = SelectCategory(animalId: selectedAnimalId)
      self._status = SelectAnimalStatus(animalId: selectedAnimalId)
    }
  }
}
For a given Animal.ID value, we can select the Animal, the Category, and the Status through ImmutableData. On app launch, our Animal.ID is nil; these values returned by our Selectors will also be nil. When that happens, we will build our Presenter to display a special message to the user.
There is one action value we can dispatch to our Store:
//  AnimalDetail.swift

extension AnimalDetail.Container {
  private func onTapDeleteSelectedAnimalButton(animal: Animal) {
    do {
      try self.dispatch(
        .ui(
          .animalDetail(
            .onTapDeleteSelectedAnimalButton(
              animalId: animal.id
            )
          )
        )
      )
    } catch {
      print(error)
    }
  }
}
Here is our body:
//  AnimalDetail.swift

extension AnimalDetail.Container: View {
  var body: some View {
    let _ = Self.debugPrint()
    AnimalDetail.Presenter(
      animal: self.animal,
      category: self.category,
      status: self.status,
      onTapDeleteSelectedAnimalButton: self.onTapDeleteSelectedAnimalButton
    )
  }
}
Here is our Presenter:
//  AnimalDetail.swift

extension AnimalDetail {
  @MainActor fileprivate struct Presenter {
    @State private var isAlertPresented = false
    @State private var isSheetPresented = false

    private let animal: Animal?
    private let category: AnimalsData.Category?
    private let status: Status?
    private let onTapDeleteSelectedAnimalButton: (Animal) -> Void

    init(
      animal: Animal?,
      category: AnimalsData.Category?,
      status: Status?,
      onTapDeleteSelectedAnimalButton: @escaping (Animal) -> Void
    ) {
      self.animal = animal
      self.category = category
      self.status = status
      self.onTapDeleteSelectedAnimalButton = onTapDeleteSelectedAnimalButton
    }
  }
}
Here is our body:
//  AnimalDetail.swift

extension AnimalDetail.Presenter: View {
  var body: some View {
    let _ = Self.debugPrint()
    if let animal = self.animal,
       let category = self.category {
      VStack {
        Text(animal.name)
          .font(.title)
          .padding()
        List {
          HStack {
            Text("Category")
            Spacer()
            Text(category.name)
          }
          HStack {
            Text("Diet")
            Spacer()
            Text(animal.diet.rawValue)
          }
        }
      }
      .alert("Delete \(animal.name)?", isPresented: self.$isAlertPresented) {
        Button("Yes, delete \(animal.name)", role: .destructive) {
          self.onTapDeleteSelectedAnimalButton(animal)
        }
      }
      .sheet(isPresented: self.$isSheetPresented) {
        NavigationStack {
          AnimalEditor(
            id: animal.id,
            isPresented: self.$isSheetPresented
          )
        }
      }
      .toolbar {
        Button { self.isSheetPresented = true } label: {
          Label("Edit \(animal.name)", systemImage: "pencil")
        }
        .disabled(self.status == .waiting)
        Button { self.isAlertPresented = true } label: {
          Label("Delete \(animal.name)", systemImage: "trash")
        }
        .disabled(self.status == .waiting)
      }
    } else {
      ContentUnavailableView("Select an animal", systemImage: "pawprint")
    }
  }
}
This is a lot of code, but we are looking at some standard SwiftUI; there is no ImmutableData in our Presenter. You might choose to compose this Presenter from additional components to improve readability. Our goal with this tutorial is to teach ImmutableData; for the most part, we don’t have very strong opinions about how you build your Presenter Components in your own Products.
Here are two Previews of our Root Component:
//  AnimalDetail.swift

#Preview {
  NavigationStack {
    PreviewStore {
      AnimalDetail(selectedAnimalId: Animal.kangaroo.animalId)
    }
  }
}

#Preview {
  NavigationStack {
    PreviewStore {
      AnimalDetail(selectedAnimalId: nil)
    }
  }
}
Here are two Previews of our Presenter Component:
//  AnimalDetail.swift

#Preview {
  NavigationStack {
    AnimalDetail.Presenter(
      animal: .kangaroo,
      category: .mammal,
      status: nil,
      onTapDeleteSelectedAnimalButton: { animal in
        print("onTapDeleteSelectedAnimalButton: \(animal)")
      }
    )
  }
}

#Preview {
  NavigationStack {
    AnimalDetail.Presenter(
      animal: nil,
      category: nil,
      status: nil,
      onTapDeleteSelectedAnimalButton: { animal in
        print("onTapDeleteSelectedAnimalButton: \(animal)")
      }
    )
  }
}
AnimalList
Our AnimalList component will display the Animal values for a given Category.ID sorted by name. We also construct a button to add a new Animal to our Store.
Add a new Swift file under Sources/AnimalsUI. Name this file AnimalList.swift. Here is our Root Component:
//  AnimalList.swift

import AnimalsData
import SwiftUI

@MainActor struct AnimalList {
  private let selectedCategoryId: AnimalsData.Category.ID?
  @Binding private var selectedAnimalId: Animal.ID?

  init(
    selectedCategoryId: AnimalsData.Category.ID?,
    selectedAnimalId: Binding<Animal.ID?>
  ) {
    self.selectedCategoryId = selectedCategoryId
    self._selectedAnimalId = selectedAnimalId
  }
}

extension AnimalList : View {
  var body: some View {
    Container(
      selectedCategoryId: self.selectedCategoryId,
      selectedAnimalId: self.$selectedAnimalId
    )
  }
}
We construct our Root Component with a Category.ID and a SwiftUI.Binding to a Animal.ID. We choose a SwiftUI.Binding because selecting a new Animal in this component should also update the Animal we display in our AnimalDetail component.
Here is our Container:
//  AnimalList.swift

extension AnimalList {
  @MainActor fileprivate struct Container {
    @SelectAnimalsValues private var animals: Array<Animal>
    @SelectCategory private var category: AnimalsData.Category?
    @SelectAnimalsStatus private var status: Status?

    @Binding private var selectedAnimalId: Animal.ID?

    @Dispatch private var dispatch

    init(
      selectedCategoryId: AnimalsData.Category.ID?,
      selectedAnimalId: Binding<Animal.ID?>
    ) {
      self._animals = SelectAnimalsValues(categoryId: selectedCategoryId)
      self._category = SelectCategory(categoryId: selectedCategoryId)
      self._status = SelectAnimalsStatus()

      self._selectedAnimalId = selectedAnimalId
    }
  }
}
We pass our Category.ID to two selectors: we select the sorted Animal values and we select the Category value itself. We also select the Status of the last time Animal values were fetched from our PersistentStore, but we don’t pass a Category.ID for that.
Our Category.ID value will be nil on app launch; we will display a special message in our Presenter if that happens.
A legit optimization would be to update this fetch to fetch only the Animal values for a specific Category.ID. If we are about to display all Reptile values, we might not need to fetch all Mammal values. For larger products with large amounts of data, this optimization would be very important to conserve CPU and Battery. For now, we keep things simple and file a mental TODO to improve this with a more efficient option in the future.
There are two action values we can dispatch to our Store:
//  AnimalList.swift

extension AnimalList.Container {
  private func onAppear() {
    do {
      try self.dispatch(
        .ui(
          .animalList(
            .onAppear
          )
        )
      )
    } catch {
      print(error)
    }
  }
}

extension AnimalList.Container {
  private func onTapDeleteSelectedAnimalButton(animal: Animal) {
    do {
      try self.dispatch(
        .ui(
          .animalList(
            .onTapDeleteSelectedAnimalButton(
              animalId: animal.id
            )
          )
        )
      )
    } catch {
      print(error)
    }
  }
}
Here is our body:
//  AnimalList.swift

extension AnimalList.Container: View {
  var body: some View {
    let _ = Self.debugPrint()
    AnimalList.Presenter(
      animals: self.animals,
      category: self.category,
      status: self.status,
      selectedAnimalId: self.$selectedAnimalId,
      onAppear: self.onAppear,
      onTapDeleteSelectedAnimalButton: self.onTapDeleteSelectedAnimalButton
    )
  }
}
Our next step is our Presenter:
//  AnimalList.swift

extension AnimalList {
  @MainActor fileprivate struct Presenter {
    @State private var isSheetPresented = false

    private let animals: Array<Animal>
    private let category: AnimalsData.Category?
    private let status: Status?
    @Binding private var selectedAnimalId: Animal.ID?
    private let onAppear: () -> Void
    private let onTapDeleteSelectedAnimalButton: (Animal) -> Void

    init(
      animals: Array<Animal>,
      category: AnimalsData.Category?,
      status: Status?,
      selectedAnimalId: Binding<Animal.ID?>,
      onAppear: @escaping () -> Void,
      onTapDeleteSelectedAnimalButton: @escaping (Animal) -> Void
    ) {
      self.animals = animals
      self.category = category
      self.status = status
      self._selectedAnimalId = selectedAnimalId
      self.onAppear = onAppear
      self.onTapDeleteSelectedAnimalButton = onTapDeleteSelectedAnimalButton
    }
  }
}
Here is our List component:
//  AnimalList.swift

extension AnimalList.Presenter {
  var list: some View {
    List(selection: self.$selectedAnimalId) {
      ForEach(self.animals) { animal in
        NavigationLink(animal.name, value: animal.id)
          .deleteDisabled(false)
      }
      .onDelete { indexSet in
        for index in indexSet {
          let animal = self.animals[index]
          self.onTapDeleteSelectedAnimalButton(animal)
        }
      }
    }
  }
}
Our List component displays our sorted Animal values. Every value is built with a NavigationLink to indicate we leverage standard SwiftUI navigation patterns when this Animal is selected. We also save the value of our Animal selection to our SwiftUI.Binding.
Swiping on an Animal value gives users the opportunity to delete the Animal. A potential edge-casey behavior to defend against would be to guarantee that a given Animal is not currently waiting on an asynchronous operation before attempting to delete. A potential solution to this would be to define a selector to return all Animal.ID values that are currently waiting on an asynchronous operation, and then use those values to set deleteDisabled to true when our user should not have the option to delete this Animal value. For now, we file a mental TODO to keep this in mind for a future update.
Here is a button to add a new Animal:
//  AnimalList.swift

extension AnimalList.Presenter {
  var addButton: some View {
    Button { self.isSheetPresented = true } label: {
      Label("Add an animal", systemImage: "plus")
    }
    .disabled(self.status == .waiting)
  }
}
Here is our body:
//  AnimalList.swift

extension AnimalList.Presenter: View {
  var body: some View {
    let _ = Self.debugPrint()
    if let category = self.category {
      self.list
        .navigationTitle(category.name)
        .onAppear {
          self.onAppear()
        }
        .overlay {
          if self.animals.isEmpty {
            ContentUnavailableView {
              Label("No animals in this category", systemImage: "pawprint")
            } description: {
              self.addButton
            }
          }
        }
        .sheet(isPresented: self.$isSheetPresented) {
          NavigationStack {
            AnimalEditor(
              id: nil,
              isPresented: self.$isSheetPresented
            )
          }
        }
        .toolbar {
          ToolbarItem(placement: .primaryAction) {
            self.addButton
          }
        }
    } else {
      ContentUnavailableView("Select a category", systemImage: "sidebar.left")
    }
  }
}
Here are two previews:
//  AnimalList.swift

#Preview {
  @Previewable @State var selectedAnimal: Animal.ID?
  NavigationStack {
    PreviewStore {
      AnimalList(
        selectedCategoryId: Category.mammal.id,
        selectedAnimalId: $selectedAnimal
      )
    }
  }
}

#Preview {
  @Previewable @State var selectedAnimalId: Animal.ID?
  NavigationStack {
    AnimalList.Presenter(
      animals: [
        Animal.cat,
        Animal.dog,
        Animal.kangaroo,
        Animal.gibbon,
      ],
      category: .mammal,
      status: nil,
      selectedAnimalId: $selectedAnimalId,
      onAppear: {
        print("onAppear")
      },
      onTapDeleteSelectedAnimalButton: { animal in
        print("onTapDeleteSelectedAnimalButton: \(animal)")
      }
    )
  }
}
CategoryList
Our CategoryList component will display the Category values sorted by name. We also construct a button to refresh our application with the sample data built on the initial launch.

Add a new Swift file under Sources/AnimalsUI. Name this file CategoryList.swift. Here is our Root Component:
//  CategoryList.swift

import AnimalsData
import SwiftUI

@MainActor struct CategoryList {
  @Binding private var selectedCategoryId: AnimalsData.Category.ID?

  init(selectedCategoryId: Binding<AnimalsData.Category.ID?>) {
    self._selectedCategoryId = selectedCategoryId
  }
}

extension CategoryList : View {
  var body: some View {
    let _ = CategoryList.debugPrint()
    Container(selectedCategoryId: self.$selectedCategoryId)
  }
}
Our Category.ID is a SwiftUI.Binding; we will change this selection in our CategoryList and this will update the value used to build our AnimalList.
Here is our Container:
//  CategoryList.swift

extension CategoryList {
  @MainActor fileprivate struct Container {
    @SelectCategoriesValues private var categories: Array<AnimalsData.Category>
    @SelectCategoriesStatus private var status: Status?

    @Binding private var selectedCategoryId: AnimalsData.Category.ID?

    @Dispatch private var dispatch

    init(selectedCategoryId: Binding<AnimalsData.Category.ID?>) {
      self._categories = SelectCategoriesValues()
      self._status = SelectCategoriesStatus()

      self._selectedCategoryId = selectedCategoryId
    }
  }
}
Our Container selects the sorted Category values and the Status of our most recent attempt to fetch Category values.
There are two action values we can dispatch to our Store:
//  CategoryList.swift

extension CategoryList.Container {
  private func onAppear() {
    do {
      try self.dispatch(
        .ui(
          .categoryList(
            .onAppear
          )
        )
      )
    } catch {
      print(error)
    }
  }
}

extension CategoryList.Container {
  private func onReloadSampleData() {
    do {
      try self.dispatch(
        .ui(
          .categoryList(
            .onTapReloadSampleDataButton
          )
        )
      )
    } catch {
      print(error)
    }
  }
}
Here is our Container body:
//  CategoryList.swift

extension CategoryList.Container: View {
  var body: some View {
    let _ = Self.debugPrint()
    CategoryList.Presenter(
      categories: self.categories,
      status: self.status,
      selectedCategoryId: self.$selectedCategoryId,
      onAppear: self.onAppear,
      onReloadSampleData: self.onReloadSampleData
    )
  }
}
Here is the main declaration of our Presenter:
//  CategoryList.swift

extension CategoryList {
  @MainActor fileprivate struct Presenter {
    @State private var isAlertPresented = false

    private let categories: Array<AnimalsData.Category>
    private let status: Status?
    @Binding private var selectedCategoryId: AnimalsData.Category.ID?
    private let onAppear: () -> Void
    private let onReloadSampleData: () -> Void

    init(
      categories: Array<AnimalsData.Category>,
      status: Status?,
      selectedCategoryId: Binding<AnimalsData.Category.ID?>,
      onAppear: @escaping () -> Void,
      onReloadSampleData: @escaping () -> Void
    ) {
      self.categories = categories
      self.status = status
      self._selectedCategoryId = selectedCategoryId
      self.onAppear = onAppear
      self.onReloadSampleData = onReloadSampleData
    }
  }
}
Here is our List component:
//  CategoryList.swift

extension CategoryList.Presenter {
  var list: some View {
    List(selection: self.$selectedCategoryId) {
      Section("Categories") {
        ForEach(self.categories) { category in
          NavigationLink(category.name, value: category.id)
        }
      }
    }
  }
}
Similar to our AnimalList, we use NavigationLink for the standard SwiftUI navigation pattern when this Category is selected.
Here is our body:
//  CategoryList.swift

extension CategoryList.Presenter: View {
  var body: some View {
    let _ = Self.debugPrint()
    self.list
      .alert("Reload Sample Data?", isPresented: self.$isAlertPresented) {
        Button("Yes, reload sample data", role: .destructive) {
          self.onReloadSampleData()
        }
      } message: {
        Text("Reloading the sample data deletes all changes to the current data.")
      }
      .onAppear {
        self.onAppear()
      }
      .toolbar {
        Button { self.isAlertPresented = true } label: {
          Label("Reload sample data", systemImage: "arrow.clockwise")
        }
        .disabled(self.status == .waiting)
      }
  }
}
We disable the refresh button when the Status of our Category values is waiting. This prevents a user from beginning a new fetch if the previous fetch is still not complete. A potential edge-case we might think about defending against is disabling the reload button when any asynchronous operation is happening in our PersistentSession. This could include operations to edit or save Animal values. If the user attempts to edit an existing Animal and then immediately tries to reload sample data, there could be unexpected behavior when these two operations complete. A potential solution to this would be to define a Selector to return a Bool value indicating if any Animal value is currently waiting on an asynchronous operation, and then use that value to disable the refresh button. For now, we file a mental TODO to test this behavior more carefully in a future update.
Here are two previews:
//  CategoryList.swift

#Preview {
  @Previewable @State var selectedCategoryId: AnimalsData.Category.ID?
  NavigationStack {
    PreviewStore {
      CategoryList(selectedCategoryId: $selectedCategoryId)
    }
  }
}

#Preview {
  @Previewable @State var selectedCategoryId: AnimalsData.Category.ID?
  NavigationStack {
    CategoryList.Presenter(
      categories: [
        Category.amphibian,
        Category.bird,
        Category.fish,
        Category.invertebrate,
        Category.mammal,
        Category.reptile,
      ],
      status: nil,
      selectedCategoryId: $selectedCategoryId,
      onAppear: {
        print("onAppear")
      },
      onReloadSampleData: {
        print("onReloadSampleData")
      }
    )
  }
}
Content
We’re almost done with AnimalsUI. All we need is a Content component to stitch things together. This is the component we construct from app launch. Add a new Swift file under Sources/AnimalsUI. Name this file Content.swift. Here is our component:
//  Content.swift

import AnimalsData
import SwiftUI

@MainActor public struct Content {
  @State private var selectedCategoryId: AnimalsData.Category.ID?
  @State private var selectedAnimalId: Animal.ID?

  public init() {

  }
}

extension Content: View {
  public var body: some View {
    let _ = Self.debugPrint()
    NavigationSplitView {
      CategoryList(selectedCategoryId: self.$selectedCategoryId)
    } content: {
      AnimalList(
        selectedCategoryId: self.selectedCategoryId,
        selectedAnimalId: self.$selectedAnimalId
      )
    } detail: {
      AnimalDetail(selectedAnimalId: self.selectedAnimalId)
    }
  }
}

#Preview {
  PreviewStore {
    Content()
  }
}
We save selectedCategoryId and selectedAnimalId as local component state. When we change selectedCategoryId from CategoryList, we pass our new value to AnimalList and we update the Animal values displayed. When we change selectedAnimalId from AnimalList, we pass our new value to AnimalDetail and we update the Animal value displayed.
Here is our AnimalsUI package:
AnimalsUI
└── Sources
    └── AnimalsUI
        ├── AnimalDetail.swift
        ├── AnimalEditor.swift
        ├── AnimalList.swift
        ├── CategoryList.swift
        ├── Content.swift
        ├── Debug.swift
        ├── Dispatch.swift
        ├── PreviewStore.swift
        ├── Select.swift
        └── StoreKey.swift
We wrote a lot of code, but you saw for yourself that a lot of what we built was really just standard SwiftUI. Learning ImmutableData does not mean throwing away the knowledge you already have. The biggest difference you would probably notice is that none of these components perform imperative mutations on data model objects to transform our global state — we’re programming with a very different mental-model. We think declaratively: our components dispatch actions to our Store when something happens. Our components do not tell our Store how to behave; our components tell our Store what just happened.